0%

U-Boot 2017.11

  • 这里参照开发板原版的u-boot-2009修改部分源码与配置文件才可以正常启动,配置文件,补丁文件
1
2
3
~$ make ARCH=arm CROSS_COMPILE=arm-none-eabi- O=../imx28evk mx28evk_defconfig
~$ cd ../imx28evk
~$ make ARCH=arm CROSS_COMPILE=arm-none-eabi- u-boot.sb

tftpd-hpa 安装

1
2
3
4
5
6
7
8
~$ sudo apt-get install tftpd-hpa
~$ cat /etc/default/tftpd-hpa
# /etc/default/tftpd-hpa
TFTP_USERNAME="tftp"
TFTP_DIRECTORY="/srv/tftp"
TFTP_ADDRESS="0.0.0.0:69"
TFTP_OPTIONS="-l -c -s"

NFS Server 配置

  • 确保 CS 两端的 NFS 协议版本要兼容,exports的路径一致.
1
2
3
4
5
6
7
8
9
10
~$ cat /proc/fs/nfsd/versions
+2 +3 +4 +4.1 +4.2

$ cat /etc/exports
# /etc/exports: the access control list for filesystems which may be exported
# to NFS clients. See exports(5).
#
# Example for NFSv2 and NFSv3:
# /srv/homes hostname1(rw,sync,no_subtree_check) hostname2(ro,sync,no_subtree_check)
/fullpath/nfs-imx28evk 192.168.1.0/24(rw,no_root_squash,subtree_check)

U-boot 使用

公共变量

1
2
3
4
5
6
7
8
9
10
11
12
13
14
15
=> setenv console_mainline ttyAMA0
=> setenv buadrate 115200
=> setenv tftpboot "tftp ${zImage} ; bootz"
=> setenv mmcfatboot "mmc rescan ; fatload mmc 0 ${loadaddr} ${zImage} ; bootz"
=> setenv mmcextboot "mmc rescan ; ext4load mmc 0:1 ${loadaddr} ${zImage} ; bootz"
=> setenv nandboot "mtdparts default ; nand read.jffs2 ${loadaddr} ${kerneladdr} ${kernelsize} ; bootz"
=> setenv zImage zImage_dtb
=> setenv ipaddr 192.168.1.10
=> setenv serverip 192.168.1.100
=> setenv netmask 255.255.255.0
=> setenv gatewayip 192.168.1.1
=> setenv eth eth0
=> setenv hostname imx283-lcy
=> setenv kernelsize 0x00400000
=> setenv kerneladdr 0x00200000

NFS ROOTFS

1
2
3
4
5
6
=> setenv nfsrootpath  /opt/nfs-imx28evk
=> setenv ipstatic "ip=${ipaddr}:${serverip}:${gatewayip}:${netmask}:${hostname}:${eth}:off"
=> setenv nfsargs "setenv bootargs consoel=${console_mainline},${buadrate} root=/dev/nfs rw nfsroot=${serverip}:{$nfsrootpath},v3,tcp,nolock ${ipstatic} init=/linuxrc"
=> setenv bootcmd_nfs "run nfsargs ; run ${tftpboot}"
=> savee
=> run nfs_root

MMC ROOTFS

1
2
3
4
=> setenv mmcargs "mmc rescan ; setenv bootargs consoel=${console_mainline},${buadrate} rootfstype=ext3  root=/dev/mmcblk0p3 rw rootwait"
=> setenv bootcmd_mmc "run mmcargs ; run ${mmcfatboot}"
=> savee
=> run bootcmd_mmc

USB Stack ROOTFS

  • U盘的方法与MMC的方式是一样的.

UBIFS ROOTFS

1
2
3
4
5
6
7
8
9
10
11
12
13
14
15
16
17
18
19
20
21
22
23
24
25
26
27
28
29
30
31
32
33
34
35
36
37
38
39
40
41
42
43
44
45
46
47
48
49
50
51
52
53
54
55
56
57
58
59
60
=> mtdparts

device nand0 <gpmi-nand>, # parts = 7
#: name size offset mask_flags
0: boot 0x00c00000 0x00000000 0
1: env 0x00080000 0x00c00000 0
2: reserve 0x00080000 0x00c80000 0
3: bmp 0x00200000 0x00d00000 0
4: reserve 0x00080000 0x00f00000 0
5: rootfs 0x04000000 0x00f80000 0
6: opt 0x03080000 0x04f80000 0

active partition: nand0,0 - (boot) 0x00c00000 @ 0x00000000

defaults:
mtdids : nand0=gpmi-nand
mtdparts: mtdparts=gpmi-nand:12m(boot),512k(env),512k(reserve),2m(bmp),512k(reserve),64m(rootfs),-(opt)
=> ubi part rootfs
ubi0: attaching mtd1
ubi0: scanning is finished
ubi0 warning: print_rsvd_warning: cannot reserve enough PEBs for bad PEB handling, reserved 5, need 20
ubi0: attached mtd1 (name "mtd=5", size 64 MiB)
ubi0: PEB size: 131072 bytes (128 KiB), LEB size: 126976 bytes
ubi0: min./max. I/O unit sizes: 2048/2048, sub-page size 2048
ubi0: VID header offset: 2048 (aligned 2048), data offset: 4096
ubi0: good PEBs: 512, bad PEBs: 0, corrupted PEBs: 0
ubi0: user volume: 1, internal volumes: 1, max. volumes count: 128
ubi0: max/mean erase counter: 2/1, WL threshold: 4096, image sequence number: 0
ubi0: available PEBs: 0, total reserved PEBs: 512, PEBs reserved for bad PEB handling: 5

// 这里显示boot分区有坏块了吗?这个分区反复擦写的次数比较多.
=>ubi part boot
ubi0: detaching mtd1
ubi0: mtd1 is detached
ubi0: attaching mtd1
ubi0 warning: ubi_io_read: error -74 (ECC error) while reading 64 bytes from PEB 0:0, read only 64 bytes, retry
ubi0 error: ubi_io_read: error -74 (ECC error) while reading 64 bytes from PEB 0:0, read 64 bytes
ubi0 warning: ubi_io_read: error -74 (ECC error) while reading 64 bytes from PEB 1:0, read only 64 bytes, retry
ubi0 error: ubi_io_read: error -74 (ECC error) while reading 64 bytes from PEB 1:0, read 64 bytes
ubi0 warning: ubi_io_read: error -74 (ECC error) while reading 64 bytes from PEB 2:0, read only 64 bytes, retry
ubi0 error: ubi_io_read: error -74 (ECC error) while reading 64 bytes from PEB 2:0, read 64 bytes
ubi0 warning: ubi_io_read: error -74 (ECC error) while reading 64 bytes from PEB 3:0, read only 64 bytes, retry
ubi0 error: ubi_io_read: error -74 (ECC error) while reading 64 bytes from PEB 3:0, read 64 bytes
ubi0: scanning is finished
ubi0 error: ubi_read_volume_table: the layout volume was not found
ubi0 error: ubi_attach_mtd_dev: failed to attach mtd1, error -22
UBI error: cannot attach mtd1UBI error: cannot initialize UBI, error -22UBI init error 22

=> setenv nandargs "setenv bootargs console=${console_mainline},${baudrate} rootfstype=ubifs ubi.mtd=5 root=ubi0:rootfs mtdparts=gpmi-nand:12m(boot),512k(env),512k(reserve),2m(bmp),512k(reserve),64m(rootfs),-(opt) ${ipstatic}"
=> setenv bootcmd_nand "run nandargs ; run nandboot "
=> savee
=> run bootcmd_nand

通过网络更新 kernel

1
=> setenv upkernel "tftp zImage_dtb ; nand erase clean ${kerneladdr} ${kernelsize} ; nand write.jffs2 ${loadaddr} ${kerneladdr} ${kernelsize}"

通过网络更新nand文件系统

1
=> setenv uprootfs "mtdparts default ; nand erase.part rootfs ; ubi part rootfs ; ubi create rootfs ; tftp ${rootfs} ; ubi write ${loadaddr} rootfs ${filesize}"

imx-bootlets

  • imx-bootlets可以使用开发板自带的源码,也可以从这里imx-bootlets下载.它只能使用arm-none-eabi-工具链编译,我换成Linaro Toolchain工具链编译之后无法启动.编译中的脚本会要用到elftosb,要先把elftosb编译出来.
1
2
3
4
5
6
7
8
9
~$ cd imx-bootlets
~$ ln -svf ../linux-4.13/build_output/zImage_dtb zImage // 链接内核到这里
~$ ln -svf ../u-boot-2017-9/imx28evk/uboot uboot      // 链接uboot到这里
~$ make BOARD=iMX28_EVK ARCH=mx28 CROSS_COMPILE=arm-none-eabi- clean
~$ make BOARD=iMX28_EVK ARCH=mx28 CROSS_COMPILE=arm-none-eabi-
~$ ls *.bd
linux.bd linux_ivt.bd uboot.bd uboot_ivt.bd updater.bd updater_ivt.bd
~$ ls *.sb
imx28_ivt_linux.sb imx28_ivt_uboot.sb imx28_linux.sb imx28_uboot.sb

烧写系统

IMX280A USB 烧写模式

  • 短接JP4->WDG,JP6->USB,接上USB_DEV接口,当然POWER接口也是要接上的,系统就会出现下列硬件.这里要使用MfgTool工具烧入,相对较麻烦一些.
1
Bus 008 Device 005: ID 15a2:004f Freescale Semiconductor, Inc. i.MX28 SystemOnChip in RecoveryMode

IMX280 TF 烧写模式

  • EasyARM iMX280A这块板子可以支持TF卡烧写模式,通过串口发现,它里面有一个小系统经过上电之后从TF卡中读取名为imx28_ivt_uboot.sb,rootfs.tar.bz2,uImage,updater_ivt.sb,当然用来烧写 TF 卡是要用官方提供的cfimager.exe格式化,并烧入updater_ivt.sb才可以.
  • 短接JP4->WDG,JP3->USB, 接上串口打印,就会看相应的烧写日志输出了.

BuildRoot 文件系统

  • 使用BusyBox的制作rootfs的方式比较老了,使用BuildRoot可以一站式解决嵌入式的系统移植,这里我只使用它来做rootfs的编译,kernel,u-boot这里我是单独立维护的.
1
2
3
4
~$ export TOPDIR=.
~$ export BASE_DIR=.
~$ make ARCH=arm CROSS_COMPILE=arm-none-eabi- O=../build-imx28evk freescale_imx28evk_defconfig
~$ cd ../build-imx28evk && make ARCH=arm CROSS_COMPILE=arm-none-eabi- menuconfig
  • ToolChain 设置
1
2
3
4
5
6
7
8
9
10
11
12
13
14
15
16
17
18
19
20
21
22
23
24
25
26
27
28
29
30
31
32
33
34
35
36
37
38
39
40
41
  Toolchain type (External toolchain)  --->
*** Toolchain External Options ***
Toolchain (Custom toolchain) --->
Toolchain origin (Pre-installed toolchain) --->
(/linaro-toolchain/gcc-linaro-5.5.0-2017.10-x86_64_arm-linux-gnueabi) Toolchain path
($(ARCH)-linux-gnueabi) Toolchain prefix
External toolchain gcc version (5.x) --->
External toolchain kernel headers series (4.0.x) --->
External toolchain C library (glibc/eglibc) --->
[*] Toolchain has SSP support?
[*] Toolchain has RPC support?
[*] Toolchain has C++ support?
[...]
System configuration -> Run a getty (login prompt ) after boot

│ │ --- Run a getty (login prompt) after boot │ │
│ │ (ttyAMA0) TTY port │ │
│ │ Baudrate (115200) ---> │ │
│ │ (vt100) TERM environment variable │ │
│ │ () other options to pass to getty │ │

[...]

Target packages -> Networking applications
│ │ [*] dropbear │ │
│ │ [*] client programs │ │
│ │ [*] disable reverse DNS lookups │ │
│ │ [*] optimize for size │ │
│ │ [ ] log dropbear access to wtmp │ │
│ │ [ ] log dropbear access to lastlog │ │

Target packages -> Hardware handling
[*] evtest
[*] spi-tools
[*] lm-sensors
[*] i2c-tools


# 如果下载文件需代理的通下面命令修改.
BR2_WGET="wget --passive-ftp -nd -t 3 -e use_proxy=yes -e http_proxy=192.168.1.235:4444 -e https_proxy=192.168.1.235:4444"
  • 如果外部交叉编译工具链出现,少库的错误,还是选择使用BuildRoot编译的工具链吧.整个编译完成之后build-imx28evk目录如下:
1
2
3
4
5
6
7
8
9
10
$ tree -L 1
.
├── build
├── dl  # 软件源码下载的位置.
├── host # 如查使用``BuildRoot``编译的工具链,这里就是工具链的位置.
├── images #最终生成的各种镜像文件.
├── Makefile
├── staging -> host/arm-buildroot-linux-gnueabi/sysroot
└── target

  • 参照EasyArm imx280的文档对UBIFS文件系统修改如下:
1
2
3
4
5
6
7
8
9
 [*] tar the root filesystem
│ │ Compression method (no compression) --->

[*] ubifs root filesystem
│ │ (0x1f000) logical eraseblock size
│ │ (0x800) minimum I/O unit size
│ │ (512) maximum logical eraseblock count
│ │ ubifs runtime compression (lzo) --->
│ │ Compression method (no compression) --->

BusyBox 配置静态编译

  • 看了很多教材,都建议把BusyBox编译成静态连接,就不用复制一堆的库了.
1
2
3
~$ make ARCH=arm CROSS_COMPILE=arm-none-eabi- busybox-menuconfig

Busybox Settings -> [*] Build BusyBox as a static binary (no shared libs)

Linux Kernel 配置

  • 如果要对Buildroot中的Kernel做细致栽剪设置,需要使用到下面命令,但是我这里是把 U-boot,Linux Kernel分开维护的.
1
~$ make ARCH=arm CROSS_COMPILE=arm-linux-gnueabi- linux-menuconfig

编译

  • 解压rootfs.tarNFS Root或者U盘,SD卡的分区都可以,同时为Dropbear添加公钥登录认证.方便使用SSH来能登录进行交互操作.
1
2
3
4
5
6
7
8
9
~$ tree images
images
├── rootfs.cpio
├── rootfs.ext2
└── rootfs.tar

~$ sudo tar xvf rootfs.tar -C /nfsroot/rootfs
~# cd /nfsroot/rootfs/root && mkdir .ssh && chmod 700 .ssh
~# cd .ssh && echo "public key" > authorized_keys && chmod 600 authorized_keys

UBIFS 文件系统制作

1
2
~$ cd  /nfsroot/
~$ sudo mkfs.ubifs -d rootfs -e 0x1f000 -c 512 -m 0x800 -x lzo -o rootfs.ubifs

UBIFS 文件烧写

  • 下面建一条组合命令来通过Uboot从 SD 中读取rootfs.ubifs文件并烧写到 NAND 的 rootfs 分区中.从 USB 设备中也是类似.UBoot 命令中,ext4load是从ext3/ext4的文件系统加载文件,fatload是从FAT32/FAText文件系统中加载文件.如果从 USB 设备读取,先运行usb reset.
1
2
3
4
5
6
7
8
9
10
11
12
13
14
15
16
17
18
19
20
21
22
# MMC 卡单分区
=> ls mmc 0
2616657 zImage_dtb
7618560 rootfs.ubifs
635808 imx28_ivt_uboot.sb
.Trash-1000/
2488348 zImage
4718592 rootfs.ubi

# 这里是列出一张多分区的MMC卡的文件系统列表,这是第一分区的内容.
=> ls mmc 0:1
<DIR> 1024 .
<DIR> 1024 ..
<DIR> 12288 lost+found
225 uEnv.txt
<DIR> 1024 boot
<DIR> 1024 .Trash-1000
2643950 zImage_dtb
4317184 rootfs.ubifs

=>setenv burnsd_rootfs "mtdparts default;nand erase.part rootfs;ubi part rootfs 2048;ubi create rootfs;dcache on; mmc rescan; ext4load mmc 0:3 0x82000000 rootfs.ubifs; ubi write 0x82000000 rootfs ${filesize}; "
=> saveenv

Linux 内核编译

Linux 下载及配置选项

  • 我这边针对EasyARM 280A的开发板修改的配置文件在这里,把它复制到编译目录里,改成.config就可以了.Linux 的源码部份只是改了设备树的部份,这是补丁文件
1
2
3
4
5
6
7
8
9
10
11
12
13
14
15
16
17
18
19
20
21
~$ wget -c https://cdn.kernel.org/pub/linux/kernel/v4.x/linux-4.14.51.tar.xz
~$ tar xvf linux-4.14.51.tar.xz && cd linux-4.14.51
~$ make ARCH=arm CROSS_COMPILE=arm-none-eabi- O=../imx28evk-kernel mxs_defconfig

GEN ./Makefile
HOSTCC scripts/kconfig/mconf.o
HOSTCC scripts/kconfig/lxdialog/checklist.o
[...]

~$ make ARCH=arm CROSS_COMPILE=arm-none-eabi- menuconfig

Boot options -> [*] Use appended device tree blob to zImage (EXPERIMENTAL)
[*] Supplement the appended DTB with traditional ATAG information
Kernel command line type (Use bootloader kernel arguments if available) --->
(console=ttyAMA0,115200n8 rootfstype=ubifs ubi.mtd=5 root=ubi0_0 rootwait=1 rw earlyprintk) Default kernel command string
Kernel command line type (Use bootloader kernel arguments if available) --->
Kernel hacking → printk and dmesg options -> [*] Enable dynamic printk() support
[*] Kernel low-level debugging functions (read help!)
Kernel low-level debugging port (i.MX28 Debug UART) --->
[*] Early printk
Device Drivers → Network device support → Ethernet driver support -> Freescale devices -> FEC ethernet controller

编译内核用设备树

  • Linux 内核3.x以后都要使用设备树才能正常启动,可以把DTB附加到zImage后面,也可以在U-Boot中指定dtb文件路径.
  • 设备树的patch如下.经过测试iMX280A必须改成pinctrl-0 = <&duart_pins_b>不然串口ttyAMA0无法输入,同时修改时要注意 IO 定义的冲突处理.这里是我修改的iMX280A的设备树补丁文件
1
~$ diff -Naur ../../linux-4.14.51/arch/arm/boot/dts/imx28-evk.dts ../linux-4.14.51/arch/arm/boot/dts/imx28-evk.dts > ../linux-4.14.51-imx28evk.patch

设备树相关

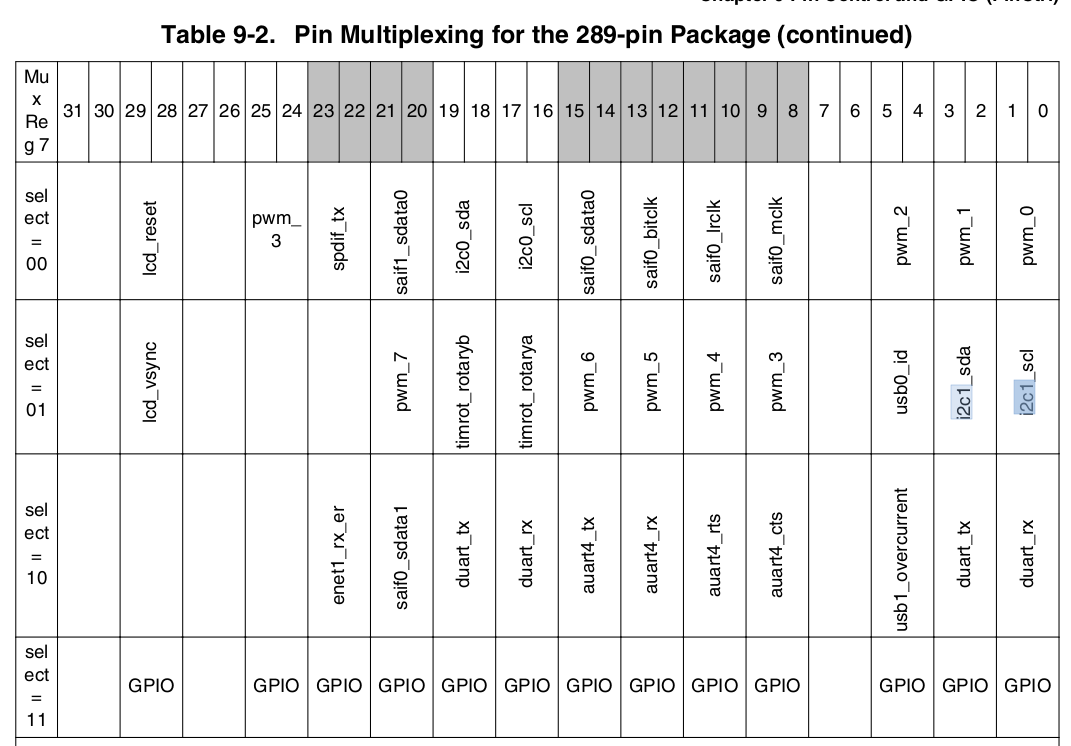
  • 这里设备树配置要参照芯片的数据手册,还有内核的文档Documentation/devicetree/bindings/pinctrl/fsl,mxs-pinctrl.txt,下一面给出芯片管脚与内核对应定义示例.

imx28evk

1
2
3
4
5
6
7
8
9
$ grep -e "PWM0" -e "PWM1" ./arch/arm/boot/dts/imx28-pinfunc.h
#define MX28_PAD_PWM0__PWM_0 0x3100
#define MX28_PAD_PWM1__PWM_1 0x3110
#define MX28_PAD_PWM0__I2C1_SCL 0x3101
#define MX28_PAD_PWM1__I2C1_SDA 0x3111
#define MX28_PAD_PWM0__DUART_RX 0x3102
#define MX28_PAD_PWM1__DUART_TX 0x3112
#define MX28_PAD_PWM0__GPIO_3_16 0x3103
#define MX28_PAD_PWM1__GPIO_3_17 0x3113

imx28evk-pin-324

1
2
3
4
5
6
7
8
9
10
11
$ grep -e "I2C0"  ./arch/arm/boot/dts/imx28-pinfunc.h
#define MX28_PAD_I2C0_SCL__I2C0_SCL 0x3180
#define MX28_PAD_I2C0_SDA__I2C0_SDA 0x3190
#define MX28_PAD_AUART0_RX__I2C0_SCL 0x3001
#define MX28_PAD_AUART0_TX__I2C0_SDA 0x3011
#define MX28_PAD_I2C0_SCL__TIMROT_ROTARYA 0x3181
#define MX28_PAD_I2C0_SDA__TIMROT_ROTARYB 0x3191
#define MX28_PAD_I2C0_SCL__DUART_RX 0x3182
#define MX28_PAD_I2C0_SDA__DUART_TX 0x3192
#define MX28_PAD_I2C0_SCL__GPIO_3_24 0x3183
#define MX28_PAD_I2C0_SDA__GPIO_3_25 0x3193

imx28evk-dma_apbx

1
2
3
4
5
6
7
8
9
10
11
12
13
14
15
16
17
18
19
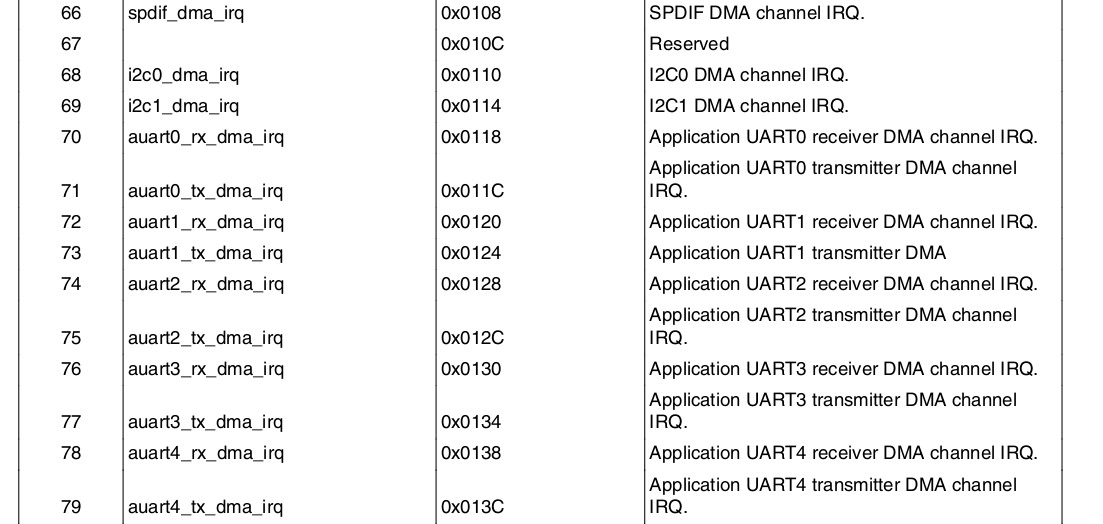
$ cat arch/arm/boot/dts/imx28.dtsi
[...]
dma_apbx: dma-apbx@80024000 {
compatible = "fsl,imx28-dma-apbx";
reg = <0x80024000 0x2000>;
interrupts = <78 79 66 0
80 81 68 69
70 71 72 73
74 75 76 77>;
interrupt-names = "auart4-rx", "auart4-tx", "spdif-tx", "empty",
"saif0", "saif1", "i2c0", "i2c1",
"auart0-rx", "auart0-tx", "auart1-rx", "auart1-tx",
"auart2-rx", "auart2-tx", "auart3-rx", "auart3-tx";
#dma-cells = <1>;
dma-channels = <16>;
clocks = <&clks 26>;
};

[...]
1
2
3
4
5
6
7
8
9
10
11
12
13
14
15
16
17
18
19
20
21
22
23
24
25
26
27
28
29
30
31
32
33
34
35
36
37
38
39
40
41
42
43
~$ cd ../imx28evk-kernel &&  make ARCH=arm CROSS_COMPILE=arm-none-eabi- zImage modules
GEN ./Makefile
scripts/kconfig/conf --silentoldconfig Kconfig
SYSHDR arch/arm/include/generated/uapi/asm/unistd-common.h
SYSHDR arch/arm/include/generated/uapi/asm/unistd-oabi.h
SYSHDR arch/arm/include/generated/uapi/asm/unistd-eabi.h
CHK include/config/kernel.release
[...]

~$ make ARCH=arm CROSS_COMPILE=arm-none-eabi- imx28-evk.dtb
~$ cat arch/arm/boot/zImage arch/arm/boot/dts/imx28-evk.dtb > zImage_dtb
// 如果内核中有模块编译就使用下面这命令把它安装到根文件系统目录下, make INSTALL_HDR_PATH=/nfsroot/rootfs headers_install 安装内核头文件在这里不需要,只是做一个记录.
# make INSTALL_MOD_PATH=/nfsroot/rootfs/ modules_install
INSTALL crypto/echainiv.ko
INSTALL drivers/crypto/mxs-dcp.ko
INSTALL drivers/media/usb/gspca/gspca_main.ko
DEPMOD 4.14.51_lcybuild-20180706-1017
# cd /nfsroot/rootfs/lib/modules && tree
.
└── 4.14.51_lcybuild-20180706-1017
├── build -> /fullpath/kernel-imx28evk-buildroot-toolchain
├── kernel
│   ├── crypto
│   │   └── echainiv.ko
│   └── drivers
│   ├── crypto
│   │   └── mxs-dcp.ko
│   └── media
│   └── usb
│   └── gspca
│   └── gspca_main.ko
├── modules.alias
├── modules.alias.bin
├── modules.builtin
├── modules.builtin.bin
├── modules.dep
├── modules.dep.bin
├── modules.devname
├── modules.order
├── modules.softdep
├── modules.symbols
├── modules.symbols.bin
└── source -> /fullpath/linux-4.14.51

mkimage 生成 uImage

  • 如果要用到uImage文件,用下面这条命令转换出来.注意LOADADDR是变量,不同开发板定义是不一样的.
1
2
3
4
5
6
7
mkimage -A arm -O linux -T kernel -C none -a 0x40008000 -e 0x40008000 -n "Linux-4.13.11" -d arch/arm/boot/zImage uImage
Image Name: Linux-4.13.11
Created: Fri Jun 22 12:03:38 2018
Image Type: ARM Linux Kernel Image (uncompressed)
Data Size: 4280112 Bytes = 4179.80 kB = 4.08 MB
Load Address: 40008000
Entry Point: 40008000

测试 I2C 功能

  • 霍尼韦尔HMC5883L接线
1
2
3
4
5
6
iMX280A				HMC5883L

SCL1 <---> SCL
SDA1 <---> SDA
GND <---> GND
3.3v <---> 3V3
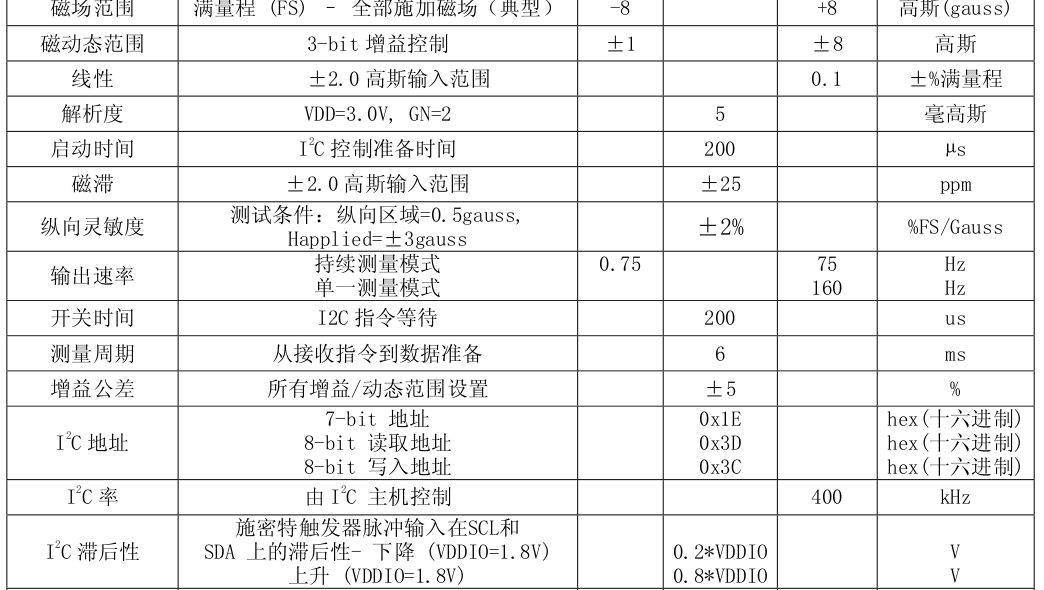
  • HMC5883L 规格书

hmc5883l

  • 进入 iMX280A 输入下面命令检测设备.并 dump 传感器数值
1
2
3
4
5
6
7
8
9
10
11
12
13
14
15
16
17
18
19
20
21
22
23
24
25
26
27
28
29
# i2cdetect -r -y 1
0 1 2 3 4 5 6 7 8 9 a b c d e f
00: -- -- -- -- -- -- -- -- -- -- -- -- --
10: -- -- -- -- -- -- -- -- -- -- -- -- -- -- 1e --
20: -- -- -- -- -- -- -- -- -- -- -- -- -- -- -- --
30: -- -- -- -- -- -- -- -- -- -- -- -- -- -- -- --
40: -- -- -- -- -- -- -- -- -- -- -- -- -- -- -- --
50: -- -- -- -- -- -- -- -- -- -- -- -- -- -- -- --
60: -- -- -- -- -- -- -- -- -- -- -- -- -- -- -- --
70: -- -- -- -- -- -- -- --
# i2cdump -y 1 0x1e w
0,8 1,9 2,a 3,b 4,c 5,d 6,e 7,f
00: 2010 0320 0003 1900 0119 e101 ffe1 10ff
08: 0010 4803 3448 3334 1033 0000 3c00 003c
10: 0000 0000 0000 0000 0000 0000 0000 0000
18: 0000 0000 a500 10a5 0710 e807 10e8 0010
20: 0000 0000 0000 0000 0000 0000 0000 1000
28: 0010 0000 0000 0000 0000 0000 0000 0000
30: 0000 0000 1400 8314 6683 5466 0054 a000
[....]
80: 2010 0320 0003 1900 0119 e101 ffe1 10ff
88: 0010 4803 3448 3334 1033 0000 3c00 003c
90: 0000 0000 0000 0000 0000 0000 0000 0000
98: 0000 0000 a500 10a5 0710 e807 10e8 0010
a0: 0000 0000 0000 0000 0000 0000 0000 1000
a8: 0010 0000 0000 0000 0000 0000 0000 0000
b0: 0000 0000 1400 8314 6683 5466 0054 a000
b8: 00a0 0700 0007 0000 0000 0000 0000 0000
[.....]

SPI 测试

  • SPI用户空间编程,需要在内核中要开启CONFIG_SPI_SPIDEV=y.
  • 还需要在内核的源码中添加一项{ .compatible = "spidev" },不然会出现**spidev spi1.0: buggy DT: spidev listed directly in DT**的错误.
1
2
3
4
5
6
7
8
9
10
11
12
$cat ../linux-4.14.51/drivers/spi/spidev.c
[....]
#ifdef CONFIG_OF
static const struct of_device_id spidev_dt_ids[] = {
{ .compatible = "rohm,dh2228fv" },
{ .compatible = "lineartechnology,ltc2488" },
{ .compatible = "ge,achc" },
{ .compatible = "semtech,sx1301" },
{ .compatible = "spidev" },
{},
};
[...]

下载测试代码

1
2
3
4
5
6
7
8
9
$ git clone https://github.com/rm-hull/spidev-test
$ cd spidev-test
$ gcc spidev_test.c -o spidev_test
#./spidev_test
spi mode: 0
bits per word: 8
max speed: 500000 Hz (500 KHz)
can't send spi message: Invalid argument
Aborted (core dumped)
  • MMC/SD 卡的分区类型说明
1
2
3
4
* for a card connected via a PCI card reader
DISK=/dev/mmcblk0
* for a card connected via a USB card reader,
DISK=/dev/sdX

错误处理

Root 挂载错误

  • 下面这个错误的可能性会很多,我这边使用Linaro Toolchain工具链生成的rootfs.tar解压到 NFS 服务器里,就会出现下面错误,后来换成BuildRoot编译的工具就没有问题.
  • 如果是 UBIFS 文件系统挂载一定要指定mtdparts给 u-boot 的bootargs变量里面,不然找不到分区信息,就无法挂载.
1
2
3
4
5
6
7
8
9
10
11
12
13
14
15

[ 5.625458] Kernel panic - not syncing: Attempted to kill init! exitcode=0x00000004
[ 5.625458]
[ 5.634639] CPU: 0 PID: 1 Comm: init Not tainted 4.14.51_lcybuild-20180702-0852 #3
[ 5.642215] Hardware name: Freescale MXS (Device Tree)
[ 5.647434] [<c00157bc>] (unwind_backtrace) from [<c0013644>] (show_stack+0x10/0x14)
[ 5.655216] [<c0013644>] (show_stack) from [<c001d580>] (panic+0xb8/0x234)
[ 5.662120] [<c001d580>] (panic) from [<c001eecc>] (do_exit+0x9c8/0x9fc)
[ 5.668843] [<c001eecc>] (do_exit) from [<c001fa28>] (do_group_exit+0x3c/0xb4)
[ 5.676102] [<c001fa28>] (do_group_exit) from [<c002846c>] (get_signal+0x264/0x58c)
[ 5.683792] [<c002846c>] (get_signal) from [<c0012aa8>] (do_signal+0xb8/0x42c)
[ 5.691043] [<c0012aa8>] (do_signal) from [<c0012fdc>] (do_work_pending+0xb0/0xc0)
[ 5.698640] [<c0012fdc>] (do_work_pending) from [<c0010148>] (slow_work_pending+0xc/0x20)
[ 5.706839] ---[ end Kernel panic - not syncing: Attempted to kill init! exitcode=0x00000004
[ 5.706839]

u-boot 编译错误

1
2
3
4
5
6
7
8
9
10
11
12
13
14
15
16
17
gcc -Wall -Wstrict-prototypes -O2 -fomit-frame-pointer -include /home/michael/3TB-DISK/imx28-test/u-boot-2014.01/include/libfdt_env.h -idirafter /home/michael/3TB-DISK/imx28-test/u-boot-2014.01/include -idirafter /home/michael/3TB-DISK/imx28-test/u-boot-2014.01/arch/arm/include -idirafter /home/michael/3TB-DISK/imx28-test/u-boot-2014.01/include -I /home/michael/3TB-DISK/imx28-test/u-boot-2014.01/lib/libfdt -I /home/michael/3TB-DISK/imx28-test/u-boot-2014.01/tools -DCONFIG_SYS_TEXT_BASE=0x40000100 -DUSE_HOSTCC -D__KERNEL_STRICT_NAMES -D_GNU_SOURCE -DCONFIG_MXS   -o mxsimage.o mxsimage.c -c
mxsimage.c:146:19: error: field ‘cipher_ctx’ has incomplete type
EVP_CIPHER_CTX cipher_ctx;
^~~~~~~~~~
mxsimage.c:147:15: error: field ‘md_ctx’ has incomplete type
EVP_MD_CTX md_ctx;
^~~~~~
mxsimage.c: In function ‘sb_postfill_image_header’:
mxsimage.c:1345:13: error: storage size of ‘md_ctx’ isn’t known
EVP_MD_CTX md_ctx;
^~~~~~
mxsimage.c:1345:13: warning: unused variable ‘md_ctx’ [-Wunused-variable]
mxsimage.c: In function ‘sb_verify_image_header’:
mxsimage.c:1638:13: error: storage size of ‘md_ctx’ isn’t known
EVP_MD_CTX md_ctx;
^~~~~~
mxsimage.c:1638:13: warning: unused variable ‘md_ctx’ [-Wunused-variable]
  • 一些旧的版本编译时会出现上述错误,需修改的是把它改成指针声明.可以用这个patch文件解决.

U-boot 加载内核错误

1
2
3
4
5
6
7
8
 Booting kernel from Legacy Image at 42000000 ...
Image Name: Linux-4.13.11
Image Type: ARM Linux Kernel Image (uncompressed)
Data Size: 4280112 Bytes = 4.1 MB
Load Address: 40008000
Entry Point: 40008000
Verifying Checksum ... Bad Data CRC
ERROR: can't get kernel image!
  • 上面是因为启动的 uImage 在的体积大于 uboot 中的变里kernelsize所设定的值,设置如下:
1
2
3
U-Boot >setenv kernelsize 0x415000
U-Boot >save
U-Boot >reset

编译环境错误

1
2
3
4
5
6
7
8
You have PERL_MM_OPT defined because Perl local::lib
is installed on your system. Please unset this variable
before starting Buildroot, otherwise the compilation of
Perl related packages will fail
support/dependencies/dependencies.mk:25: recipe for target 'core-dependencies' failed
make[1]: *** [core-dependencies] Error 1
Makefile:16: recipe for target '_all' failed
make: *** [_all] Error 2
  • 如果编译时出现上述错误,要运行下面的脚本.
1
~$ eval $(perl -Mlocal::lib=--deactivate-all)

BusyBox 编译错误

1
2
3
4
5
6
7
/home/michael/3TB-DISK/imx28-test/MX283Linux/busybox-1.27.2/miscutils/nandwrite.c: In function 'nandwrite_main':
/home/michael/3TB-DISK/imx28-test/MX283Linux/busybox-1.27.2/miscutils/nandwrite.c:152: error: 'MTD_FILE_MODE_RAW' undeclared (first use in this function)
/home/michael/3TB-DISK/imx28-test/MX283Linux/busybox-1.27.2/miscutils/nandwrite.c:152: error: (Each undeclared identifier is reported only once
/home/michael/3TB-DISK/imx28-test/MX283Linux/busybox-1.27.2/miscutils/nandwrite.c:152: error: for each function it appears in.)
/home/michael/3TB-DISK/imx28-test/MX283Linux/busybox-1.27.2/scripts/Makefile.build:197: recipe for target 'miscutils/nandwrite.o' failed
make[3]: *** [miscutils/nandwrite.o] Error 1
/home/michael/3TB-DISK/imx28-test/MX283Linux/busybox-1.27.2/Makefile:742: recipe for target 'miscutils' failed
  • 复制/usr/include/mtd/mtd-abi.h 到 busybox/include 下面,再要 nandwrite.c 里加上#include "mtd-abi.h"
1
2
3
4
5
6
7
/home/michael/3TB-DISK/imx28-test/MX283Linux/busybox-1.27.2/util-linux/blkdiscard.c: In function 'blkdiscard_main':
/home/michael/3TB-DISK/imx28-test/MX283Linux/busybox-1.27.2/util-linux/blkdiscard.c:71: error: 'BLKSECDISCARD' undeclared (first use in this function)
/home/michael/3TB-DISK/imx28-test/MX283Linux/busybox-1.27.2/util-linux/blkdiscard.c:71: error: (Each undeclared identifier is reported only once
/home/michael/3TB-DISK/imx28-test/MX283Linux/busybox-1.27.2/util-linux/blkdiscard.c:71: error: for each function it appears in.)
/home/michael/3TB-DISK/imx28-test/MX283Linux/busybox-1.27.2/scripts/Makefile.build:197: recipe for target 'util-linux/blkdiscard.o' failed
make[3]: *** [util-linux/blkdiscard.o] Error 1
/home/michael/3TB-DISK/imx28-test/MX283Linux/busybox-1.27.2/Makefile:742: recipe for target 'util-linux' failed
  • 可以按照上述方法添加头文件解决,它位于/usr/include/linux/fs.h 中,也可以不编译这个模块 Linux System Utilities ->blkidiscard就不会报错了.
1
2
3
4
5
6
7
8
9
10
11
12
13
14
15
coreutils/lib.a(mktemp.o): In function `mktemp_main':
mktemp.c:(.text.mktemp_main+0x98): warning: the use of `mktemp\' is dangerous, better use `mkstemp\'
util-linux/lib.a(nsenter.o): In function `nsenter_main\':
nsenter.c:(.text.nsenter_main+0x1b0): undefined reference to `setns\'
coreutils/lib.a(sync.o): In function `sync_main\':
sync.c:(.text.sync_main+0x80): undefined reference to `syncfs\'
collect2: ld returned 1 exit status
Note: if build needs additional libraries, put them in CONFIG_EXTRA_LDLIBS.
Example: CONFIG_EXTRA_LDLIBS="pthread dl tirpc audit pam"
/home/michael/3TB-DISK/imx28-test/MX283Linux/busybox-1.27.2/Makefile:717: recipe for target 'busybox_unstripped' failed
make[2]: *** [busybox_unstripped] Error 1
Makefile:112: recipe for target '_all' failed
make[1]: *** [_all] Error 2
Makefile:14: recipe for target 'all' failed
make: *** [all] Error 2
  • 不要选择下面这两个模块
1
2
Coreutils->sync
Linux System Utilities->nsenter

谢谢支持

OpenOCD安装

1
2
3
4
5
6
7
8
9
10
11
12
13
14
15
16
17
18
19
20
21
22
23
24
25
26
27
28
29
30
31
32
33
34
35
36
37
38
39
40
41
42
43
44
45
46
47
48
49
~$ apt-get install libhidapi-dev libhidapi-libusb0  libgpiod-dev # CMSIS-DAP 必需要安装HIDAPI
~$ git clone http://repo.or.cz/r/openocd.git
~$ cd openocd
~$ git submodule update --init --recursive
~$ autoreconf -i
~$ mkdir build && cd build
~$ ../configure --enable-cmsis-dap

libjaylink configuration summary:
- Package version ................ 0.2.0
- Library version ................ 1:0:1
- Installation prefix ............ /usr/local
- Building on .................... x86_64-pc-linux-gnu
- Building for ................... x86_64-pc-linux-gnu

Enabled transports:
- USB ............................ yes
- TCP ............................ yes


OpenOCD configuration summary
--------------------------------------------------
MPSSE mode of FTDI based devices yes (auto)
ST-Link Programmer yes (auto)
TI ICDI JTAG Programmer yes (auto)
Keil ULINK JTAG Programmer yes (auto)
Altera USB-Blaster II Compatible yes (auto)
Bitbang mode of FT232R based devices yes (auto)
Versaloon-Link JTAG Programmer yes (auto)
TI XDS110 Debug Probe yes (auto)
CMSIS-DAP v2 Compliant Debugger yes (auto)
OSBDM (JTAG only) Programmer yes (auto)
eStick/opendous JTAG Programmer yes (auto)
Olimex ARM-JTAG-EW Programmer yes (auto)
Raisonance RLink JTAG Programmer yes (auto)
USBProg JTAG Programmer yes (auto)
Andes JTAG Programmer yes (auto)
CMSIS-DAP Compliant Debugger yes (auto)
Nu-Link Programmer yes (auto)
Cypress KitProg Programmer yes (auto)
Altera USB-Blaster Compatible yes (auto)
ASIX Presto Adapter yes (auto)
OpenJTAG Adapter yes (auto)
SEGGER J-Link Programmer yes (auto)
Bus Pirate yes (auto)
Use Capstone disassembly framework yes (auto)

~$ make -j10 && make install

OpenOCD使用

CMSIS-DAP 连接

  • 查看USB的信息
1
2
3
4
5
6
7
8
$ lsusb
[...]
Bus 001 Device 007: ID 03eb:2111 Atmel Corp.
[...]

~$ lsusb -v -s 001:007 | grep "iSerial"
iSerial 3 ATML1803040200001055

  • 添加udev规则
1
2
~$ cat /etc/udev/rules.d/49-cmsis-dap.rules
SUBSYSTEMS=="usb", ATTRS{idVendor}=="03eb", ATTRS{idProduct}=="2111", MODE:="0666", OWNER="user"
  • 更新udev,创建一个openocd 连接配置文件
1
2
3
4
5
6
7
8
9
~$ sudo udevadm trigger
~$ cat atmel_sam4s_xplained_pro.cfg
interface cmsis-dap
cmsis_dap_vid_pid 0x03eb 0x2111
cmsis_dap_serial ATML1803040200001055
set CHIPNAME ATSAM4SD32C
source [find board/atmel_sam4s_xplained_pro.cfg]

~$ openocd -f atmel_sam4s_xplained_pro.cfg

J-Link使用

  • 假如是J-Link硬件,目标板是STM32F103ZET6带有20Pin的JTAG接口,就直接命令行连接就可以了.
1
2
~$ openocd -f interface/jlink.cfg -f target/stm32f1x.cfg

  • 假如是某宝30元左右,三线JLink-OB硬件,目标板是STM32F103ZET6带有SWD接口,就要用一个配置文件来连接了.
1
2
3
4
5
6
~$ cat jlink-swd.cfg
source [find interface/jlink.cfg]
transport select swd
source [find target/stm32f1x.cfg]

~$ openocd -f jlink-swd.cfg

JLink 恢复

  • 因为某宝上面几十元的JLink在使用大于5.0以上的驱动时,如果不升级是没有问题的.如果选择了自动升级固件,就会提示错误,并且无法使,这时只能重新刷写旧版本的固件才能使用.

擦除固件

  • 如下图所示,打开盖板,会看到两排排针,一个写着**erase,一个写着TST.先把earse**短接,上电10秒以上,断开erase,短接TST
  • 上电几秒,再继开短接.重新上电系统会出现如下设备
1
Bus 009 Device 106: ID 03eb:6124 Atmel Corp. at91sam SAMBA bootloader

SAM-BA烧写

  • sam-ba 是atmel的一个烧写工具,有Linux版与windows版,因为它是用QT开发的,所以两个平台的操作界面与流程是一样的,可以从参考链接下载, 我这里用的Linux
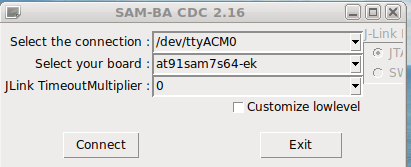
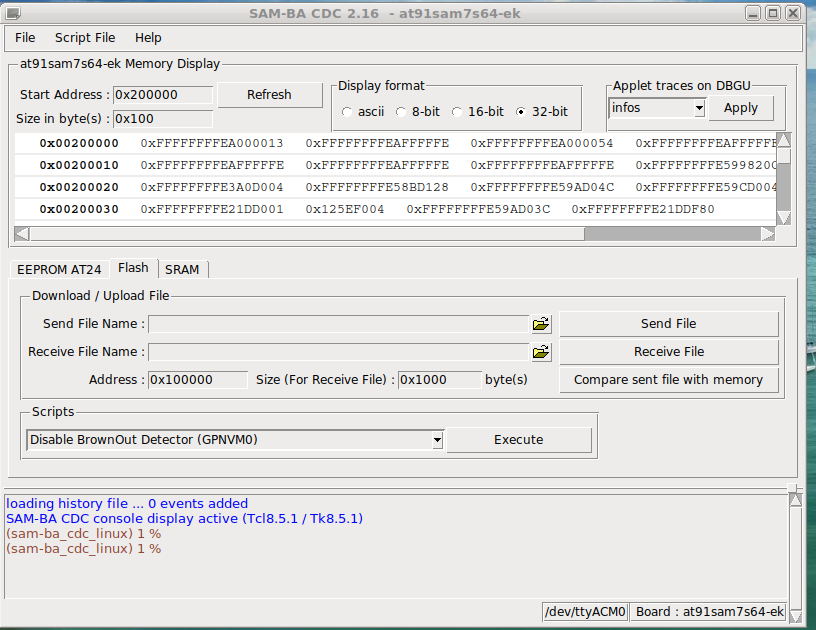
  • 运行sam-ba就会自动识别芯片,Jlink的主控芯片就是AT91SAM7S64, 如图所示

connector

  • 连接之后会出现如下图所示,不用修用参数,直接选一个正解的固件文件,按Send File就可以.

main

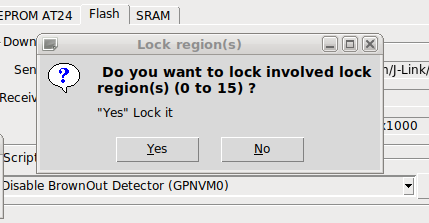
  • 烧写过程中会现对话框,要选择UnLock it,选择Yes才能烧写,后一次问你要不要Lock it锁定,选择No这样JLink才可以自动升级.

sam-ba-no-lock

使用JLink原生驱动与工具

  • 使用它的原生驱动会比使用OpenOCD要好很多,比如JLinkGDBServer.exe运行起来会监听localhost的端口,如要想从其它IP来访问不可能,在这里就要使用端口转发.下面就是把localhost2331,2332,2333分别映射为8888,8889,8890供局域网内使用.它本身也是可以支持0.0.0.0.0地址监听.

windows 端口转发

1
2
3
4
5
6
7
8
9
10
11
12
C:\Documents and Settings\Administrator>netsh interface ipv6 install
C:\Documents and Settings\Administrator>netsh interface portproxy add v4tov4 listenport=8889 listenaddress=192.168.1.235 connectport=2332 connectaddress=127.0.0.1
C:\Documents and Settings\Administrator>netsh interface portproxy add v4tov4 listenport=8890 listenaddress=192.168.1.235 connectport=2333 connectaddress=127.0.0.1
C:\Documents and Settings\Administrator>netsh interface portproxy show v4tov4

侦听 IPv4: 连接到 IPv4:

地址 端口 地址 端口
--------------- ---------- --------------- ----------
192.168.1.235 8888 127.0.0.1 2331
192.168.1.235 8889 127.0.0.1 2332
192.168.1.235 8890 127.0.0.1 2333

谢谢支持

安装 VSCode

  • 因为 vscode 是支持跨平台,多语言,易配置的免费 IDE 工具,所以安装是很简的.我这里以Linux Debian系统为例.

插件与扩展

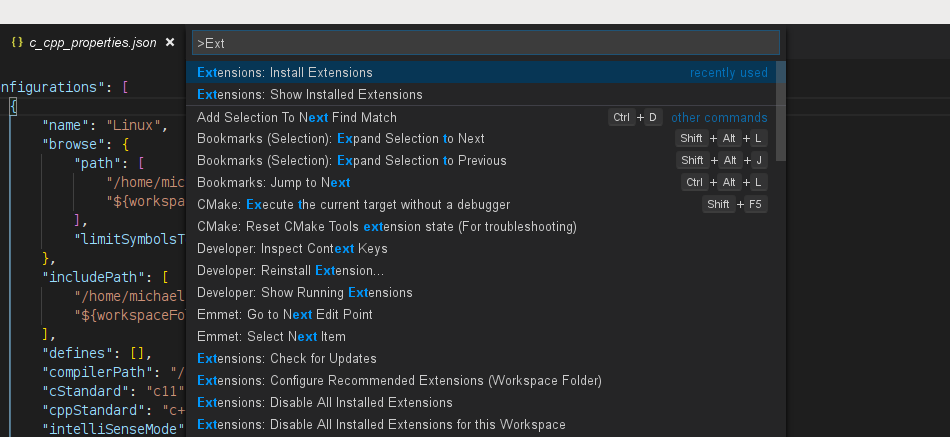
  • 安装插件也是很简单,当然要确保电脑是可以上网的,选中 VSCode 主窗口按下组合快捷键Ctrl+Shift+P,就会出现下图的界面:

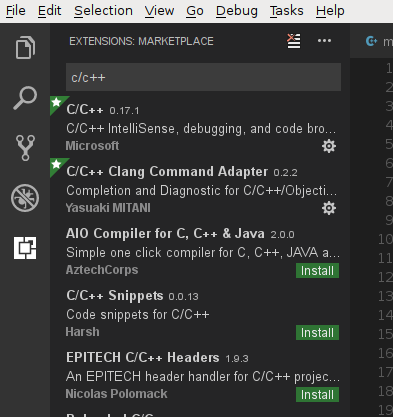
extinstall 输入:Ext就会有自动补全的选项,选择的项如图所示,确认之后就会在左边 Docker 出现一个查询列表,在这里输入一些关键字进行查询,没有安装的插件,会在右下端有绿色高亮显示install安装按钮.如下图所示:
extsearch

C/C++ 工程开发(CMake)

  • 安装了的插件有:
    • ms-vscode.cpptools
    • mitaki28.vscode-clang
    • twxs.cmake -
    • vector-of-bool.cmake-tools -
    • webfreak.debug -
    • ionutvmi.path-autocomplete //路径补全 -
    • christian-kohler.path-intellisense  //路径补全
    • vscode-fileheader // 自动创建文件头部注释信息,如:作者,版权.

创建 CMakeLists.txt

  • 首先新建一个空目录,使用 VSCode 打开这个目录,同时我个人喜欢把编译目录也建在这个目录下,名为build.用 VSCode 新建一个名为CMakeLists.txt的文件加入如下基本行:
1
2
3
4
5
6
7
8
9
10
11
project(chapter3)
cmake_minimum_required(VERSION 3.0)
aux_source_directory(. DIR_ROOT_SRCS)

#下面这三行不是必须,这三行只是为了使用非标准路径的OpenCV库.
include_directories(/fullpath/opencv-build-3.x-qt5/include)
link_directories(/fullpath/opencv-build-3.x-qt5/lib)
find_package(OpenCV 3.4.1 HINTS /fullpath/opencv-build-3.x-qt5)
add_executable(${PROJECT_NAME} ${DIR_ROOT_SRCS})
target_link_libraries(${PROJECT_NAME} ${OpenCV_LIBS})

创建 c_cpp_properties.json 文件

  • 组合快捷键Ctrl+Shift+P输入C/Cpp: Edit Configurations ...确定,就会进入一个新的名为c_cpp_properties.json的文件编辑状态,输入如下内容:
1
2
3
4
5
6
7
8
9
10
11
12
13
14
15
16
17
18
19
20
21
22
23
24
25
26
{
"configurations": [
{
"name": "Linux",

"browse": {
// 这个path是为在开发中自动补齐头文件名
"path": [
"/fullpath/opencv-build-3.x-qt5/include",
"${workspaceFolder}"
],
"limitSymbolsToIncludedHeaders": true
},
"includePath": [
"/fullpath/opencv-build-3.x-qt5/include",
"${workspaceFolder}/**"
],
"defines": [],
"compilerPath": "/usr/bin/clang",
"cStandard": "c11",
"cppStandard": "c++17",
"intelliSenseMode": "clang-x64"
}
],
"version": 4
}

创建tasks.json文件

  • 组合快捷键Ctrl+Shift+P输入Tasks: Configure Default Build Tasks,或者从工具栏的Tasks->Configure Default Build Task ...,就会出现一个下拉列表,选择Other,就会进入一个新的名为tasks.json的文件编辑状态,填入如下内容.
1
2
3
4
5
6
7
8
9
10
11
12
13
14
15
16
17
18
19
20
21
22
23
24
25
26
27
28
29
30
31
32
33
34
35
36
37
38
39
40
{
// See https://go.microsoft.com/fwlink/?LinkId=733558
// for the documentation about the tasks.json format
"version": "2.0.0",
"tasks": [
{
"label": "cmake",
"type": "shell",
"command": "cd build && cmake ../",
"group": {
"kind": "build",
"isDefault": true
},
"presentation": {
"echo": true,
"reveal": "always",
"focus": false,
"panel": "shared"
},
"problemMatcher": []
},
{
"label": "make",
"type": "shell",
"command": "cd build && make",
"group": {
"kind": "build",
"isDefault": true
},
"presentation": {
"echo": true,
"reveal": "always",
"focus": false,
"panel": "shared"
},
"problemMatcher": []
}
]
}

创建程序主文件

  • 新建一个名为main.cpp的文件如下:
1
2
3
4
5
6
7
8
9
10
11
12
13
14
15
16
#include <iostream>
#include <opencv2/core.hpp>
#include <opencv2/highgui.hpp>
#include <opencv2/imgproc.hpp>

using namespace std;
using namespace cv;

int main(int argc,char *argv[])
{
cv::Mat srcImage = cv::imread("../../images/hand1.jpg");
cv::imshow("bitwise_add",bitImage);
cv::waitKey(0);
return 0;
}

创建Debug launch.json

  • 组合快捷键Ctrl+Shift+D 下拉选择Add Configurations...->选择C++(GDB/LLDB),就会进入一个新的名为launch.json的文件编辑状态,文件如下:
1
2
3
4
5
6
7
8
9
10
11
12
13
14
15
16
17
18
19
20
21
22
23
24
25
26
27
28
29
30
31
32
33
34
35
36
37
38
39
40
41
42
43
44
45
{
// Use IntelliSense to learn about possible attributes.
// Hover to view descriptions of existing attributes.
// For more information,visit: https://go.microsoft.com/fwlink/?linkid=830387
"version": "0.2.0",
"configurations": [

{
"name": "(gdb) Launch",
"type": "cppdbg",
"request": "launch",
"program": "${workspaceFolder}/build/chapter3",
"args": [],
"stopAtEntry": false,
"cwd": "${workspaceFolder}",
"environment": [],
"externalConsole": true,
"MIMode": "gdb",
//这一行是为了在调试前编译一次工程.
"preLaunchTask": "make",
"setupCommands": [
{
"description": "Enable pretty-printing for gdb",
"text": "-enable-pretty-printing",
"ignoreFailures": true
}
]
},
{
"name": "(gdb) Attach",
"type": "cppdbg",
"request": "attach",
"program": "${workspaceFolder}/build/chapter1",
"processId": "${command:pickProcess}",
"MIMode": "gdb",
"setupCommands": [
{
"description": "Enable pretty-printing for gdb",
"text": "-enable-pretty-printing",
"ignoreFailures": true
}
]
}
]
}

测试运行

  • 现在就可以用组合快捷键Ctrl+Shift+B先运行cmake再运行make就能生成出目标文件了.
  • F9在源文件里下断点,F5运行 GDB 调试.
  • 工程的目录结构如下:
1
2
3
4
5
6
7
8
9
10
~/opencv_chapter3$ ls -a
. .. build CMakeLists.txt main.cpp .vscode
~/opencv_chapter3$ tree .vscode/
.vscode/
├── c_cpp_properties.json
├── launch.json
└── tasks.json

0 directories,3 files

  • 显而易见的,在根目录下有一个.vscode的隐藏目录,里面有我刚创建的三个文件.

Qt工程开发(qmake)

1
2
3
4
5
6
7
8
9
10
11
12
13
14
15
16
{
"configurations": [
{
"name": "Linux",
"includePath": [
"${workspaceFolder}/**"
],
"defines": [],
"compilerPath": "/usr/bin/clang-3.5",
"cStandard": "c11",
"cppStandard": "c++11",
"intelliSenseMode": "linux-clang-x64"
}
],
"version": 4
}
  • launch.json
1
2
3
4
5
6
7
8
9
10
11
12
13
14
15
16
17
18
19
20
21
22
23
24
25
26
27
28
29
30
31
32
33
34
35
36
37
38
39
40
41
42
43
44
45
{
// Use IntelliSense to learn about possible attributes.
// Hover to view descriptions of existing attributes.
// For more information,visit: https://go.microsoft.com/fwlink/?linkid=830387
"version": "0.2.0",
"configurations": [
{
"name": "(gdb) Launch",
"type": "cppdbg",
"request": "launch",
"program": "${workspaceFolder}/vscode_build/output/myapp",
"args": [],
"stopAtEntry": false,
"cwd": "${fileDirname}",
"environment": [],
"externalConsole": false,
"linux": {
"MIMode": "gdb",
"miDebuggerPath": "/usr/bin/gdb"
},
"osx": {
"MIMode": "lldb"
},
"windows": {
"MIMode": "gdb",
"miDebuggerPath": "C:\\MinGw\\bin\\gdb.exe"
},
"setupCommands": [
{
"description": "Enable pretty-printing for gdb",
"text": "-enable-pretty-printing",
"ignoreFailures": true
}
],
// ${env.HOME} 是指Linux下的 $HOME 变量.
"visualizerFile": "${env:HOME}/qt5.natvis", // (https://github.com/inviwo/inviwo/tree/master/tools/natvis)
"showDisplayString": true, // 开启可以显示对像的内容,但是太慢了, 不如vs2019的效果.
"logging": {
"engineLogging": true,
"trace": true,
"traceResponse": true
}
}
]
}
  • tasks.json
1
2
3
4
5
6
7
8
9
10
11
12
13
14
15
16
17
18
19
20
21
22
23
24
25
26
27
28
29
30
31
32
33
34
35
36
37
38
39
40
41
42
43
44
45
46
47
48
49
50
51
52
53
54
55
56
57
58
59
60
61
62
63
64
65
66
67
68
69
70
71
72
73
74
75
76
77
78
79
80
81
82
83
84
85
86
87
88
89
90
91
92
{
"version": "2.0.0",
"tasks": [
{
"label": "Create build dir",
"type": "shell",
"linux": {
"command": "[ ! -d ./vscode_build ] && mkdir -p ./vscode_build"
},
"windows": {
"command": "cmd",
"args": [
"/C",
"if not exist .\\build\\release mkdir .\\build\\release"
]
}
},
{
"label": "Run qmake",
"type": "shell",
"command": "qmake -r ../<your project full path>.pro",
"options": {
"cwd": "vscode_build"
},
"presentation": {
"echo": true,
"reveal": "always",
"focus": false,
"panel": "shared"
},
"problemMatcher": []
},
{
"label": "Run make",
"type": "shell",
"command": "make -j$(grep -c processor /proc/cpuinfo) -f Makefile",
"options": {
"cwd": "vscode_build"
},
"presentation": {
"echo": true,
"reveal": "always",
"focus": false,
"panel": "shared"
},
"problemMatcher": []
},
{
"label": "Build",
"dependsOn": [
"Create build dir",
"Run qmake",
"Run make"
],
"group": {
"kind": "build",
"isDefault": true
},
"dependsOrder": "sequence",
"problemMatcher": []
},
{
"label": "Clear build folder",
"type": "shell",
"command": "make clean",
"options": {
"cwd": "vscode_build"
},
"presentation": {
"echo": true,
"reveal": "always",
"focus": false,
"panel": "shared"
},
"problemMatcher": []
},
{
"label": "Clean build",
"dependsOn": [
"Clear build folder",
"Run qmake",
"Run make"
],
"group": {
"kind": "build",
"isDefault": true
},
"dependsOrder": "sequence",
"problemMatcher": []
}
]
}

Python 开发环境

  • 相关的插件: - ms-python.python

创建工程

  • 这里 python 创建工程与上面类似,只是安装完成这个ms-python.python插件,有可能需要手动(如果没有自动)用pip安装一些依赖的 python 库,如:pylint,flake8,autopep8,yapf等,注意:pylint,flake8 开启只能二选一.

相关设置

settings.json

  • 选择解释器,组合快捷键Ctrl+Shift+P,输入Python会列出所有Python相关的设置.选择Python: Selecter Interpreter,选择之后也会在根目录下创建.vscode/settings.json,我的配置如下:
1
2
3
4
5
6
7
8
9
10
11
12
13
14
15
16
17
18
19
20
21
22
23
24
25
26
27
    {
//这里隐藏一些文件类型,不要让它在explorer上面显示.
"files.exclude": {
"**/.git": true,
"**/.svn": true,
"**/.hg": true,
"**/CVS": true,
"**/*.pyc":true,
"**/.DS_Store": true
},
//这里可以写入一个其它位置的解释器,默认就是/usr/bin/python
"python.pythonPath": "/fullpath/.pyenv/versions/py3dev/bin/python",
"python.autoComplete.extraPaths": [
"/fullpath/.pyenv/versions/py3dev/lib/python3.6/site-packages/",
"/fullpath/opencv-build-3.x-qt5-py3/lib/python3.6/site-packages"
],
"python.linting.flake8Path": "/fullpath/.pyenv/versions/3.6.5/envs/py3dev/bin/flake8",
"python.linting.pylintEnabled": false,
"python.linting.flake8Enabled": true,
"python.formatting.provider": "yapf",//格式化代码组合键: Ctrl+Shift+I
"python.formatting.yapfPath": "/fullpath/.pyenv/versions/3.6.5/envs/py3dev/bin/yapf",
"python.linting.enabled": true,
"python.linting.flake8Args": [
"--ignore=E501,E402,E401"
],
"python.linting.pylintPath": "/fullpath/.pyenv/versions/3.6.5/envs/py3dev/bin/pylint"
}

tasks.json

1
2
3
4
5
6
7
8
9
10
11
12
13
14
15
16
17
18
19
20
{
// See https://go.microsoft.com/fwlink/?LinkId=733558
// for the documentation about the tasks.json format
"version": "2.0.0",
"tasks": [
{
"label": "echo",
"type": "shell",
"command": "/fullpath/.pyenv/versions/py3dev/bin/python",
"args": [
"cameo.py" //当前要运行的脚本,也就是__main__ 所在的位置
],
"group": {
"kind": "build",
"isDefault": true
}
}
]
}

安装Arduino开发环境

  • Arduino 官方的 IDE 功能什么都好,开源库的下载管理,各种开发板的支持都很完善,就是欠缺编辑功能,如自动补全,函数定义跳转等功能.Choosing The Right Arduino IDE这里有几种其它方式的 ArduinoIDE 的实现.
    这里我就选取VS Code插件方式.它的安装方式都很简单如下:

  • Open VS Code and press F1 or Ctrl + Shift + P to open command palette,select Install Extension and type vscode-arduino.  Or launch VS Code Quick Open (Ctrl + P),paste the following command,and press enter.

1
ext install vscode-arduino
  • 使用方法与配置,直接参照vscode-arduino插件的Details描述就行了.注意要正确配置arduino.path的路径,我这里就直接指向Arduino官方IDE的目录,这样vscode就可以完全找到该系统安装的库与开发板的支持了.settings.json文件可以设置成全局用户配置,也可以设置成单独工程配置,放在工程目录.vscode下面.

.vscode/settings.json

1
2
3
4
5
6
7
8
9
{
"arduino.path": "C:/Program Files (x86)/Arduino",
"arduino.commandPath": "run-arduino.bat",
"arduino.additionalUrls": "",
"arduino.logLevel": "info",
"arduino.enableUSBDetection": true,
"arduino.disableTestingOpen": false,
"arduino.skipHeaderProvider": false,
}

.vscode/arduino.json under the workspace.

1
2
3
4
5
6
7
8
{
"sketch": "example.ino",
"port": "COM5",
"board": "adafruit:samd:adafruit_feather_m0",
"output": "../build",
"debugger": "jlink",
"prebuild": "bash prebuild.sh"
}

.vscode/c_cpp_properties.json

1
2
3
4
5
6
7
8
9
10
11
12
13
14
15
16
17
18
19
20
21
22
23
24
25
26
27
28
29
30
{
"configurations": [
{
"name": "Linux",
"includePath": [
"/fullpath/Arduino/libraries/Adafruit_SSD1306",
"/fullpath/Arduino/libraries/Adafruit_GFX_Library",
"/fullpath/.arduino15/packages/arduino/hardware/sam/1.6.11/cores/arduino",
"${workspaceFolder}/**"
],
"defines": [],
"compilerPath": "/usr/bin/clang",
"cStandard": "c11",
"cppStandard": "c++17",
"intelliSenseMode": "clang-x64",
"browse": {
"limitSymbolsToIncludedHeaders": false,
"path": [
"/fullpath/Arduino/libraries/Adafruit_GFX_Library",
"/fullpath/Arduino/libraries/Adafruit_SSD1306",
"/fullpath/Arduino/libraries/STM32duino_LwIP/src",
"/fullpath/arduino-1.8.3/hardware/arduino/avr/cores/arduino",
"/fullpath/arduino-1.8.3/hardware/arduino/avr/libraries/SPI/src",
"/fullpath/.arduino15/packages/arduino/hardware/sam/1.6.11/cores/arduino"
]
}
}
],
"version": 4
}

配置AVR开发环境

  • 安装gcc编译环境
1
~$ sudo apt-get install gcc-avr avrdue binutils-avr avr-libc
  • 安装AVR Helper Extension
  • 进入到工程目录下,按F1,选择C/C++ :edit configurations (JSON),写入如下的内容:
1
2
3
4
5
6
7
8
9
10
11
12
13
14
15
16
17
18
~$ .vscode/c_cpp_properties.json
{
"configurations": [
{
"name": "AVR",
"intelliSenseMode": "${default}",
"cStandard": "c11",
"cppStandard": "c++14",
"compilerPath": "/usr/bin/avr-gcc",
"includePath": ["/usr/lib/avr/include"],
"compilerArgs": [
"-mmcu=attiny85",
"-DF_CPU=8000000UL"
]
}
],
"version": 4
}
  • F1,输入avr过滤到选择AVR Helper: Perform initial setup,按提示输入gcc,avrdude的绝对路径.
  • 继续选择AVR Helper: Select programmer,按提示选择正确的烧写器,与烧写参数,最终生成的内容如下:
1
2
3
4
5
6
7
8
9
10
11
12
~$ .vscode/settings.json
{
"AVR.source.compiler": "/usr/bin/avr-gcc",
"AVR.programmer.tool": "/usr/bin/avrdude",
"AVR.device.type": "attiny85",
"AVR.device.frequency": 1000000,
"AVR.source.libraries": [],
"AVR.programmer.type": "c232hm",
"AVR.programmer.port": "/dev/ttyUSB0",
"AVR.programmer.rate": 19200
}

PlatformIO集成

快速开始

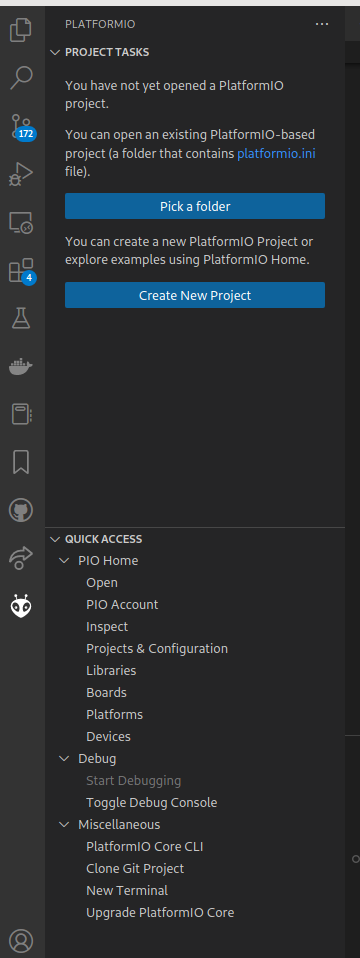
  • 在此之前需要先安装git客户端。查找安装platformio这个扩展。因为网络的原因,可能在线安装需要很长的时间,安装成功后,会在左边栏(Panel)下方出现它的图标。

  • platformio-panel.png

  • 通过QUICK ACCESS -> PIO Home -> Platforms安装不同的平台的支持文件,如:Atmel AVR,Atmel SAM,Espressif 32,Raspberry Pi RP2040.

  • 通过QUICK ACCESS -> PIO Home -> Boards查看的各种平台板子的详细参数,如:Heltec WiFi LoRa 32 (V3),AI Thinker ESP32-CAM,ESP-32 Dev Kit C V4

  • 通过QUICK ACCESS -> PIO Home -> Libraries安装不同的库支持文件,如:U8g2,Blinker,TFT_eSPI

  • 通过QUICK ACCESS -> PIO Home -> Devices创建连接本机的板子串口。

使用pio命令行接口安装platform packages.

1
2
~$ echo "export PATH=\$HOME/.platformio/penv/bin:\$PATH" >> ~/.bashrc
~$ pio pkg install --global --tool "espressif/toolchain-xtensa-esp32s3"
  • 或者
1
~$ pio pkg update -g -p espressif32

git 使用备忘

清除一个错误的提交.

  • How to delete a commit in git,local and remote

  • 查看commit的日志记录

    1
    2
    3
    4
    5
    $git log --pretty=oneline --abbrev-commit
    46cd867 Changed with mistake
    d9f1cf5 Changed again
    105fd3d Changed content
    df33c8a First commit
  • 如上面所示,我想清除掉46cd867提交,这里需指定HEAD~2,使用如下操作:

1
2
3
4
5
6
7
8
9
10
11
12
13
14
15
16
17
$git rebase -i HEAD~2

pick d9f1cf5 Changed again
pick 46cd867 Changed with mistake

# Rebase 105fd3d..46cd867 onto 105fd3d
#
# Commands:
# p,pick = use commit
# r,reword = use commit,but edit the commit message
# e,edit = use commit,but stop for amending
# s,squash = use commit,but meld into previous commit
# f,fixup = like "squash",but discard this commit's log message
# x,exec = run command (the rest of the line) using shell
#
# If you remove a line here THAT COMMIT WILL BE LOST.
# However,if you remove everything,the rebase will be aborted.
  • 如上面所示,只要把相应的commit记录行,删除并保存该文件既可,如果这里碰到冲突,需要解决完冲突才能继续.rebase成功如下:
1
2
3
4
$git log --pretty=oneline --abbrev-commit
d9f1cf5 Changed again
105fd3d Changed content
df33c8a First commit
  • 再使用强制push到远端仓库.这样本地与远端仓库都把这个错误提交清除了.
1
~$ git push -f

错误处理

1
Error loading webview: Error: Could not register service workers: InvalidStateError: Failed to register a ServiceWorker: The document is in an invalid state..
  • 删除本地缓存文件:rm -rf ~/.config/Code/Cache.

总结

  • 这里只是关于VSCode的最基本使用流程,后续会加上其它语言,其它平台的使用笔记进来.初步使用的感觉与效率都很适合我,我以前使用的Qt Creator时间比较长,总体来讲,使用难度曲线不高.

谢谢支持

刷机教程

常规错误

1
2
3
dl.google.com:443 failed to respond
Could not resolve com.android.tools.build:gradle:4.0.1
Could not resolve all artifacts for configuration ':classpath'
  • 上面错误,主要是目标文件不可以访问,原因有:在整个的repositories内找不到对应版本的目标文件,或者是网络无法访问到目标服务器.

Android-studio 3.1 error: style attribute ‘android:attr/keyboardNavigationCluster’ not found.

1
2
error: style attribute 'android:attr/keyboardNavigationCluster' not found.
Message{kind=ERROR, text=error: style attribute 'android:attr/keyboardNavigationCluster' not found., sources=[/home/michael/.gradle/caches/transforms-1/files-1.1/design-27.1.1.aar/e3f34410f8f84b1f2b297174f475b194/res/values-v26/values-v26.xml:3:5-6:13], original message=, tool name=Optional.of(AAPT)}
解决方案
  • 修改app下的 build.gradle
  • dependences 里改成 implementation 'com.android.support:appcompat-v7:27.1.0'
  • 同时修改成compileSdkVersion 26,targetSdkVersion 26,要大于等于26的版本.
1
2
3
4
5
6
7
8
9
10
11
12
13
14
15
16
17
18
19
20
android {
compileSdkVersion 27
buildToolsVersion "27.0.3" // not needed since com.android.tools.build:gradle:3.0.0

defaultConfig {
minSdkVersion 14
targetSdkVersion 26
}

[...]

dependencies {
[...]
implementation 'com.android.support:appcompat-v7:27.1.1'
implementation 'com.android.support:design:27.1.1'
implementation 'com.android.support:recyclerview-v7:27.1.1'
[...]
}

}

吐血的Gradle sync failed.

1
2
3
4
5
6
7
[...]
Gradle Daemon started in 950 ms
Gradle Daemon started in 909 ms
Gradle Daemon started in 848 ms
Gradle Daemon started in 875 ms
Gradle Daemon started in 871 ms
[...]
  • 并且使用的内存一直不断上升,它不会因为使用内存过多而被内核Kill掉,内存用完之后就是使用硬盘Swap,直接卡死,如果恢复响应后,在Event log里必然显示下面信息:
1
Gradle sync failed: The first result from the daemon was empty. Most likely the process died immediately after connection
  • Gradle同步失败:管道无效,问题在于,Gradle守护进程会尝试使用IPv4而非IPv6.

  • 下面是我的一个取巧的方法.Android Studio打开工程时,它就自动Gradle Build时,在终端里用下面命令Kill掉.

1
2
3
4
~$ which jps
/fullpath/jdk1.8.0_112/bin/jps

~$ jps | grep "Gradle" | awk '{print $1}' | xargs kill -9
  • 通过终端去到工程目录下,使用gradlew build.
1
2
3
4
5
6
7
8
9
10
11
12
~$ ./gradlew build

[...]
BUILD SUCCESSFUL in 7s
1 actionable task: 1 executed

// 编译并打Debug包
~$ ./gradlew assembleDebug

// 编译并打Release的包
~$ ./gradlew assembleRelease

  • 如果在终端运行上面的命令,还是出现如下的错误, 是与IDE里的端终显示同一类的错误.
1
2
3
4
5
6
7
8
Starting a Gradle Daemon (subsequent builds will be faster)
Starting a Gradle Daemon, 1 busy Daemon could not be reused, use --status for details
Starting a Gradle Daemon, 2 busy Daemons could not be reused, use --status for details
Starting a Gradle Daemon, 3 busy Daemons could not be reused, use --status for details
Starting a Gradle Daemon, 4 busy Daemons could not be reused, use --status for details
Starting a Gradle Daemon, 5 busy Daemons could not be reused, use --status for details
Starting a Gradle Daemon, 6 busy Daemons could not be reused, use --status for details
[.....]
  • 现在来记录解决这个问题步骤,代理肯定是配置的,最优先配置使用工程目录下的gradle.properties,其次用户目录也有一个同名文件:
1
2
~$ ls ~/.gradle
caches daemon gradle.properties kotlin-profile native notifications workers wrapper
  • 根据上面终端提示use --status for details,可以打开~/.gradle/daemon/<gradle version>/daemon-xxx-out.log查看细节,如果里面包含如下行:
1
2
3
4
[...]
[DEBUG] [org.gradle.launcher.daemon.bootstrap.DaemonStartupCommunication] Completed writing the daemon greeting. Closing streams...
[ERROR] [org.gradle.internal.remote.internal.inet.TcpIncomingConnector] Cannot accept connection from remote address /192.168.1.100.
[...]
  • 并且,如果本机系统有开启IPv6,上面的无法连接可能是Gradle同步失败:管道无效,问题在于,Gradle 守护进程会尝试使用IPv4而非IPv6.设置Shell环境变量:export _JAVA_OPTIONS="-Djava.net.preferIPv6Addresses=true"再运行./gradlew assembleRelease尝试.gradle用户配置如下:
1
2
3
4
5
6
7
8
9
~$ cat ~/.gradle/gradle.properties
[...]
org.gradle.parallel=true
org.gradle.daemon=true
systemProp.https.proxyHost=127.0.0.1
systemProp.https.proxyPort=8123
systemProp.http.proxyHost=127.0.0.1
systemProp.http.proxyPort=8123
systemProp.https.nonProxyHosts=127.0.0.1|localhost|192.168.1.100
  • 把工程里的gradle/wrapper/gradle-wrapper.properties里的distributionUrl可以指成网络位置,也可以指定本地位置,如:distributionUrl=file\:///home/fullpath/sdkman/archives/gradle-6.4.1.zip. 如果是指定了本地的位置后,在File -> Project Structure -> Project --> Gradle Version就会是空,这里就保持为空,不要选择,如果选择了一项,它就会重写distributionUrl为官网的网络位置, 同时要确保指向本地位置版本的Gradle要与Bash Shell内指定是同一个版本.Gradle的版本兼容性,参考Android Gradle plugin release notes
  • 还有一个问题是,设置Android-Studiograldew使用同一个gradle实例,可以参考这里.
  • 解决方法 2:在Android Studiovmoptions文件中,将-Djava.net.preferIPv6Addresses=true行更改为-Djava.net.preferIPv6Addresses=true.
  • 最终该问题在Android Studio 3.6.3版本中配置Gradle Plugin 3.6.3Gradle 5.6.4,并通过Ctrl+Alt+S --> Build,Execution,Deployment --> GradleUse Gradle from设置成Specified location选择本地的SDKMAN安装目录的下gradle/5.6.4,上述设置后,再把所有的(工程|用户)gradle.properties加上这一行:org.gradle.jvmargs=-Djava.net.preferIPv6Addresses=true -Djava.net.preferIPv6Stack=true, 先在Bash shell运行一次./gradlew build后,再去到IDE时好像同步文件就正常了.
1
2
3
4
5
6
7
8
9
Build #AI-192.7142.36.36.6392135, built on April 14, 2020
Runtime version: 1.8.0_212-release-1586-b4-5784211 amd64
VM: OpenJDK 64-Bit Server VM by JetBrains s.r.o
Linux 5.5.13-20200327-lcy
GC: ParNew, ConcurrentMarkSweep
Memory: 1246M
Cores: 4
Registry: ide.new.welcome.screen.force=true
Non-Bundled Plugins: com.google.services.firebase`
  • 最终确定可能是系统里设置了iptables -t nat -A POSTROUTING -j MASQUERADE造成的,参考这里
  • 命令行(bash)里使用./gradlew build可以正常编译,在android studio里还是问题如故,因为命令行里读到了环境变量export _JAVA_OPTIONS="-Djava.net.preferIPv6Addresses=true". 因此需要修改android studio的启动脚本,它本身就是用脚本android-studio/studio.sh启动,在该脚本里添加上述的变量,就能正常使用了。

Android系统源码AOSP 下载.

同步源码

配置环境

1
2
3
4
~$ mkdir ~/bin
~$ PATH=~/bin:$PATH
~$ curl https://storage.googleapis.com/git-repo-downloads/repo > ~/bin/repo
~$ chmod a+x ~/bin/repo

下载源码

1
2
3
~$ mkdir Android-AOSP && cd Android-AOSP
~$ repo init -u https://android.googlesource.com/platform/manifest
~$ repo sync
1
2
3
4
5
6
7
8
9
10
11
12
13
14
~$ cat .repo/manifests.git/config
[core]
repositoryformatversion = 0
filemode = true
[filter "lfs"]
smudge = git-lfs smudge --skip -- %f
process = git-lfs filter-process --skip
[remote "origin"]
#url = https://android.googlesource.com/platform/manifest
url = https://aosp.tuna.tsinghua.edu.cn/platform/manifest
fetch = +refs/heads/*:refs/remotes/origin/*
[branch "default"]
remote = origin
merge = refs/heads/master
  • 我最终是改成清华大学镜像同步完成.2020-03-16同步完成后,目录体积显示是93G.后来对比了官方https://android.googlesource.com/device/与本地device目录,好像少了一些设备目录,比如:htc,samsung是没有看到的.

验证Git标记

  • 输入gpg --import后粘贴下面的PGP密钥数据.
1
2
3
4
5
6
7
8
9
10
11
12
13
14
15
16
17
18
19
20
21
22
23
24
25
26
27
28
29
30
31
32
~$ gpg --import
-----BEGIN PGP PUBLIC KEY BLOCK-----
Version: GnuPG v1.4.2.2 (GNU/Linux)

mQGiBEnnWD4RBACt9/h4v9xnnGDou13y3dvOx6/t43LPPIxeJ8eX9WB+8LLuROSV
lFhpHawsVAcFlmi7f7jdSRF+OvtZL9ShPKdLfwBJMNkU66/TZmPewS4m782ndtw7
8tR1cXb197Ob8kOfQB3A9yk2XZ4ei4ZC3i6wVdqHLRxABdncwu5hOF9KXwCgkxMD
u4PVgChaAJzTYJ1EG+UYBIUEAJmfearb0qRAN7dEoff0FeXsEaUA6U90sEoVks0Z
wNj96SA8BL+a1OoEUUfpMhiHyLuQSftxisJxTh+2QclzDviDyaTrkANjdYY7p2cq
/HMdOY7LJlHaqtXmZxXjjtw5Uc2QG8UY8aziU3IE9nTjSwCXeJnuyvoizl9/I1S5
jU5SA/9WwIps4SC84ielIXiGWEqq6i6/sk4I9q1YemZF2XVVKnmI1F4iCMtNKsR4
MGSa1gA8s4iQbsKNWPgp7M3a51JCVCu6l/8zTpA+uUGapw4tWCp4o0dpIvDPBEa9
b/aF/ygcR8mh5hgUfpF9IpXdknOsbKCvM9lSSfRciETykZc4wrRCVGhlIEFuZHJv
aWQgT3BlbiBTb3VyY2UgUHJvamVjdCA8aW5pdGlhbC1jb250cmlidXRpb25AYW5k
cm9pZC5jb20+iGAEExECACAFAknnWD4CGwMGCwkIBwMCBBUCCAMEFgIDAQIeAQIX
gAAKCRDorT+BmrEOeNr+AJ42Xy6tEW7r3KzrJxnRX8mij9z8tgCdFfQYiHpYngkI
2t09Ed+9Bm4gmEO5Ag0ESedYRBAIAKVW1JcMBWvV/0Bo9WiByJ9WJ5swMN36/vAl
QN4mWRhfzDOk/Rosdb0csAO/l8Kz0gKQPOfObtyYjvI8JMC3rmi+LIvSUT9806Up
hisyEmmHv6U8gUb/xHLIanXGxwhYzjgeuAXVCsv+EvoPIHbY4L/KvP5x+oCJIDbk
C2b1TvVk9PryzmE4BPIQL/NtgR1oLWm/uWR9zRUFtBnE411aMAN3qnAHBBMZzKMX
LWBGWE0znfRrnczI5p49i2YZJAjyX1P2WzmScK49CV82dzLo71MnrF6fj+Udtb5+
OgTg7Cow+8PRaTkJEW5Y2JIZpnRUq0CYxAmHYX79EMKHDSThf/8AAwUIAJPWsB/M
pK+KMs/s3r6nJrnYLTfdZhtmQXimpoDMJg1zxmL8UfNUKiQZ6esoAWtDgpqt7Y7s
KZ8laHRARonte394hidZzM5nb6hQvpPjt2OlPRsyqVxw4c/KsjADtAuKW9/d8phb
N8bTyOJo856qg4oOEzKG9eeF7oaZTYBy33BTL0408sEBxiMior6b8LrZrAhkqDjA
vUXRwm/fFKgpsOysxC6xi553CxBUCH2omNV6Ka1LNMwzSp9ILz8jEGqmUtkBszwo
G1S8fXgE0Lq3cdDM/GJ4QXP/p6LiwNF99faDMTV3+2SAOGvytOX6KjKVzKOSsfJQ
hN0DlsIw8hqJc0WISQQYEQIACQUCSedYRAIbDAAKCRDorT+BmrEOeCUOAJ9qmR0l
EXzeoxcdoafxqf6gZlJZlACgkWF7wi2YLW3Oa+jv2QSTlrx4KLM=
=Wi5D
-----END PGP PUBLIC KEY BLOCK-----
EOF
  • 测试验证tag
1
2
3
4
5
6
7
8
9
10
11
12
13
14
15
~$ cd device/generic/mini-emulator-arm64
~$ git tag -v android-5.0.0_r1
object 743dd408af5c662761bafc05eacdb18ade88cf3a
type commit
tag android-5.0.0_r1
tagger The Android Open Source Project <initial-contribution@android.com> 1415119682 -0800

Android 5.0.0 release 1
gpg: Signature made Wed 05 Nov 2014 12:48:02 AM CST
gpg: using DSA key E8AD3F819AB10E78
gpg: Good signature from "The Android Open Source Project <initial-contribution@android.com>" [unknown]
gpg: WARNING: This key is not certified with a trusted signature!
gpg: There is no indication that the signature belongs to the owner.
Primary key fingerprint: 4340 D135 70EF 945E 8381 0964 E8AD 3F81 9AB1 0E78

Android Material组件

Android图标资源

  • 参考链接:

  • 之前开发时,还去不同网站上去下载图标下来,放到app/src/main/res/drawable或者是``app/src/main/res/icons内,其实使用[Image Asset Studio](https://developer.android.com/studio/write/image-asset-studio)是最方便的.它可以满足各种类型的图标创建,包括自适应图标.还可以使用[Android-Iconics](https://github.com/mikepenz/Android-Iconics),它集成多个图标资源在一起,比如:FontAwesome`.

导入PNG图标

  • Project窗口中,选择Android视图,右键点击res文件夹,然后依次选择New > Image Asset.Icon Type可以选:启动器图标,操作栏和标签页图标,通知图标.
  • 选中Asset TypeClip Art时,点击下方的Clip Art就会弹出一个内置的图标列表,选择一个图标编辑后,按完成就会提示,保存到app/src/main/res/drawable下面.
  • 选中Asset TypeImage时,下面的Path可以选择一个本地位置的PNG文件,可以先把material-design-icons同步下来,再通过该步骤编辑导入到工程去.
  • 也可以手动复制自定义的PNG文件放到工程里的app/src/main/res/drawable.

导入SVG图标

  • Project窗口中,选择Android视图,右键点击res文件夹,然后依次选择New > Vector Asset.
  • 选中Asset TypeClip Art时,点击下方的Clip Art就会弹出一个内置的图标列表,选择一个图标编辑后,按完成就会提示,保存到app/src/main/res/drawable下面.
  • 选中Asset TypeLocal file(SVG,PSD)时,下面的Path可以选择一个本地位置的矢量文件,可以先把material-design-icons同步下来,再通过该步骤编辑导入到工程去.
  • 也可以手动复制自定义的SVG文件放到工程里的app/src/main/res/drawable.

使用Android Material Design Icon Generator插件


谢谢支持

OpenCV 整套代码是基于 C 和 C++实现的,在 Android 上调用存在两种方式:

  • Java Native 代码实现
  • C++ NDK 代码实现

** 其中 Java Native 代码实现是直接通过 Java OpenCV API 编写算法实现部分,相对应的特点在于:**

  • 环境搭建简单:直接引入官方 OpenCV-for-Android 的对应 jar 包即可
  • 代码维护繁琐:由于OpenCV-for-AndroidJava APIC++不完全相同,任何算法的更新都需要重写 => 在存在 Windows、iOS 等多平台更新时比较麻烦
  • 运行效率低:Java 代码会在内部进行 C++翻译,运行时性能损耗较大

** 而直接采用 C++代码导入的方式的特点在于:**

  • 环境搭建复杂:往往需要现自行编译对应的库,再进行NDK、Cmakelistsbuild.gradle的配置.
  • 代码维护简单:由于直接采用 C++实现算法部分,与其他平台的兼容性极好,能与 Android 程序员分离开发 => 算法升级时替换对应的算法库文件即可.
  • 运行效率高:不存在内部执行时的代码转换问题,性能最好.
  • 总结来看,Java Native 代码实现是爽一时但是后面会不爽很久,对于有时间精力且要求较高的开发任务,强烈建议多花点时间搭建 C++ NDK 方式.

如果自己不从源码编译也可去这里下载,网上很多配置教程都是基于这里下载的 SDK 而写的.如: Android Studio 集成 OpenCV


Python 脚本编译

  • 依赖工具
    • CMake > 3.7
    • ninja-build
    • ccache
    • python

安装编译工具

1
2
3
4
5
6
7
~$ apt-get install ninja-build  ccache
~$ export ANDROID_SDK=/fullpath/Android/Sdk
~$ export ANDROID_NDK=/fullpath/Android/Sdk/android-ndk-r16b

~$ mkdir build
~$ cd build ../opencv-3.4.1/platforms/android/build_sdk.py --no_ccache --extra_module=/fullpath/opencv_contrib-3.4.1/modules --config=ndk-16.config.py build-ndk ../opencv-3.4.1

  • 使用opencv-3.4.1/platforms/android/build_sdk.py 脚本安装,可以一次编译多种平台的 SDK,相关的一些配置要参照文件ndk-16.config.py.
  • 如果没有出错误的话,build-ndk目录结构如下:
1
2
3
4
5
6
7
8
9
10
11
12
13
14
15
16
17
18
19
20
21
22
23
24
25
26
27
28
29
30
31
32
33
34
35
36
37
38
39
40
41
42
43
44
45
46
47
48
49
50
51
52
53
54
55
56
57
58
59
60
61
62
63
64
65
66
67
68
69
70
71
72
73
74
75
76
77
78
79
80
81
82
~$ tree build-ndk -L 1
build-ndk
├── build_service_arm64-v8a
├── build_service_armeabi
├── build_service_armeabi-v7a
├── build_service_x86
├── build_service_x86_64
├── o4a
└── OpenCV-android-sdk

7 directories, 0 files

~$ tree build-ndk/OpenCV-android-sdk/ -L 2
build-ndk/OpenCV-android-sdk/
├── apk
│   ├── OpenCV_3.4.1_Manager_3.41_arm64-v8a.apk
│   ├── OpenCV_3.4.1_Manager_3.41_armeabi.apk
│   ├── OpenCV_3.4.1_Manager_3.41_armeabi-v7a.apk
│   ├── OpenCV_3.4.1_Manager_3.41_x86_64.apk
│   ├── OpenCV_3.4.1_Manager_3.41_x86.apk
│   └── readme.txt
├── LICENSE
├── README.android
├── samples
│   ├── 15-puzzle
│   ├── camera-calibration
│   ├── color-blob-detection
│   ├── example-15-puzzle.apk
│   ├── example-camera-calibration.apk
│   ├── example-color-blob-detection.apk
│   ├── example-face-detection.apk
│   ├── example-image-manipulations.apk
│   ├── example-tutorial-1-camerapreview.apk
│   ├── example-tutorial-2-mixedprocessing.apk
│   ├── example-tutorial-3-cameracontrol.apk
│   ├── face-detection
│   ├── image-manipulations
│   ├── tutorial-1-camerapreview
│   ├── tutorial-2-mixedprocessing
│   └── tutorial-3-cameracontrol
└── sdk
├── build.gradle
├── etc
├── java
└── native

14 directories, 17 files

~$ tree build-ndk/OpenCV-android-sdk/sdk/native -L 2
build-ndk/OpenCV-android-sdk/sdk/native
├── 3rdparty
│   └── libs
├── jni
│   ├── abi-arm64-v8a
│   ├── abi-armeabi
│   ├── abi-armeabi-v7a
│   ├── abi-x86
│   ├── abi-x86_64
│   ├── android.toolchain.cmake
│   ├── include
│   ├── OpenCV-arm64-v8a.mk
│   ├── OpenCV-armeabi.mk
│   ├── OpenCV-armeabi-v7a.mk
│   ├── OpenCVConfig.cmake
│   ├── OpenCVConfig-version.cmake
│   ├── OpenCV.mk
│   ├── OpenCV-x86_64.mk
│   └── OpenCV-x86.mk
├── libs
│   ├── arm64-v8a
│   ├── armeabi
│   ├── armeabi-v7a
│   ├── x86
│   └── x86_64
└── staticlibs
├── arm64-v8a
├── armeabi
├── armeabi-v7a
├── x86
└── x86_64

21 directories, 9 files

CMake 编译方式

编译环境

  • android-ndk-r14b

  • tools_r25.2.5

  • 这里可能要注意, 本次编译测试必須使用**[tools_r25.2.5]**

  • 建议使用**[tools_r25.2.5]**测试编译,不然有可能会出现如下错误

1
2
3
4
5
6
7
8
9
10
--     SDK target:  android_sdk_target-NOTFOUND

[...]
The "android" command is deprecated.
For manual SDK, AVD, and project management, please use Android Studio.
For command-line tools, use tools/bin/sdkmanager and tools/bin/avdmanager
*************************************************************************
Invalid or unsupported command "--silent create lib-project --path /fullpath/opencv-3.4.1/build-android/android_sdk --target android_sdk_target-NOTFOUND --name OpenCV --package org.opencv"
[...]

CMake 单独编译参数

1
2
3
4
5
6
7
8
9
10
11
12
13
14
15
16
17
18
19
20
21
22
23
24
25
26
27
28
29
30
31
32
33
34
35
36
37
38
39
40
41
42
43
44
45
46
47
48
49
50
51
52
53
54
55
56
57
58
59
60
61
62
63
64
65
66
67
68
69
70
71
72
73
74
75
76
77
78
79
80
81
82
83
84
85
86
87
88
89
90
91
92
93
94
95
96
97
98
99
100
101
102
103
104
105
106
107
108
109
110
111
112
113
114
115
116
117
118
119
120
121
122
~$ cd /fullpath/Android/Sdk
~$ ln -svf tools_r25.2.5 tools
~$ ln -svf android-ndk-r14b ndk-bundle
~$ export ANDROID_NDK=/fullpath/Android/Sdk/ndk-bundle
~$ cmake
-D ANDDROID_ABI=armeabi-v7a
-D ANDROID_FUNCTION_LEVEL_LINKING=ON
-D ANDROID_NATIVE_API_LEVEL=19
-D ANDROID_NDK_HOST_X64=ON
-D ANDROID_NDK_NOEXECSTACK=ON
-D ANDROID_STL=gnustl_static
-D BUILD_JPEG=ON
-D BUILD_PNG=ON
-D BUILD_PACKAGE=ON
-D CMAKE_TOOLCHAIN_FILE=/fullpath/opencv-3.4.1/platforms/android/android.toolchain.cmake
-D ANDROID_SDK=/fullpath/Android/Sdk
-D ANDROID_FORCE_ARM_BUILD=OFF
-D ANDROID_NO_UNDEFINED=ON
-D BUILD_ANDROID=ON
-D BUILD_ANDROID_EXAMPLES=ON
-D OPENCV_EXTRA_MODULES_PATH=/fullpath/opencv_contrib-3.4.1/modules
-D BUILD_PYTHON_SUPPORT=ON
-D BUILD_opencv_python3=ON
-D PYTHON_DEFAULT_EXECUTABLE=$HOME/.pyenv/versions/3.6.5/bin/python3.6m
-D PYTHON_INCLUDE_DIRS=$HOME/.pyenv/versions/3.6.5/include/python3.6m
-D PYTHON_EXECUTABLE=$HOME/.pyenv/versions/3.6.5/bin/python3.6
-D PYTHON_LIBRARY=$HOME/.pyenv/versions/3.6.5/lib/libpython3.6m.so.1.0
-D BUILD_JDK=ON
-D BUILD_opencv_java=ON
-D CMAKE_INSTALL_PREFIX=/fullpath/opencv3-android-ndk ../

[...]
-- Linker flags (Release): -Wl,--fix-cortex-a8 -Wl,--no-undefined -Wl,-allow-shlib-undefined -Wl,--gc-sections -Wl,-z,noexecstack -Wl,-z,relro -Wl,-z,now
-- Linker flags (Debug): -Wl,--fix-cortex-a8 -Wl,--no-undefined -Wl,-allow-shlib-undefined -Wl,--gc-sections -Wl,-z,noexecstack -Wl,-z,relro -Wl,-z,now
-- ccache: NO
-- Precompiled headers: NO
-- Extra dependencies: z dl m log
-- 3rdparty dependencies: libcpufeatures libprotobuf libjpeg libwebp libpng libtiff libjasper IlmImf tegra_hal
--
-- OpenCV modules:
-- To be built: aruco bgsegm bioinspired calib3d ccalib core datasets dnn dnn_objdetect dpm face features2d flann fuzzy hfs highgui img_hash imgcodecs imgproc java_bindings_generator line_descriptor ml objdetect optflow phase_unwrapping photo plot python_bindings_generator reg rgbd saliency shape stereo stitching structured_light superres surface_matching text tracking ts video videoio videostab xfeatures2d ximgproc xobjdetect xphoto
-- Disabled: js world
-- Disabled by dependency: -
-- Unavailable: cnn_3dobj cudaarithm cudabgsegm cudacodec cudafeatures2d cudafilters cudaimgproc cudalegacy cudaobjdetect cudaoptflow cudastereo cudawarping cudev cvv dnn_modern freetype hdf java matlab ovis python2 python3 sfm viz
-- Applications: tests perf_tests
-- Documentation: NO
-- Non-free algorithms: NO
--
-- Android:
-- Android ABI: armeabi-v7a
-- STL type: gnustl_static
-- Native API level: android-19
-- SDK target: android-19
-- Android NDK: /fullpath/Android/Sdk/ndk-bundle-r14b (toolchain: arm-linux-androideabi-4.9)
-- android tool: /fullpath/3TB-DISK/Android/Sdk/tools/android (Android SDK Tools, revision 25.2.5.)

--
-- GUI:
--
-- Media I/O:
-- ZLib: z (ver 1.2.3)
-- JPEG: build (ver 90)
-- WEBP: build (ver encoder: 0x020e)
-- PNG: build (ver 1.6.34)
-- TIFF: build (ver 42 - 4.0.9)
-- JPEG 2000: build (ver 1.900.1)
-- OpenEXR: build (ver 1.7.1)
[...]
-- Java: export all functions
-- ant: /fullpath/ant/current/bin/ant (ver 1.10.1)
-- Java wrappers: YES
-- Java tests: YES
[...]
-- Install to: /fullpath/opencv3-android-ndk

~$ make -j4
[...]

# 编译成功的标志
BUILD SUCCESSFUL
Total time: 6 seconds
[100%] Built target example-color-blob-detection
[100%] Copy project sources: example-tutorial-1-camerapreview
COPYFILES: ... 1 entries (SRC_COPY)
COPYFILES: ... directory '.../android/tutorial-1-camerapreview' with 5 files
COPYFILES: All files are up-to-date.
[100%] Built target example-tutorial-1-camerapreview_copy_src
Scanning dependencies of target example-tutorial-1-camerapreview
[100%] Updating Android project at /fullpath/opencv-3.4.1/samples/android/tutorial-1-camerapreview. SDK target: android-19
[100%] Generating example-tutorial-1-camerapreview-debug.apk

BUILD SUCCESSFUL
Total time: 6 seconds
[100%] Built target example-tutorial-1-camerapreview
[100%] Copy project sources: example-tutorial-2-mixedprocessing
COPYFILES: ... 1 entries (SRC_COPY)
COPYFILES: ... directory '.../android/tutorial-2-mixedprocessing' with 5 files
COPYFILES: All files are up-to-date.
[100%] Built target example-tutorial-2-mixedprocessing_copy_src
[100%] Built target mixed_sample
Scanning dependencies of target example-tutorial-2-mixedprocessing
[100%] Updating Android project at /fullpath/opencv-3.4.1/samples/android/tutorial-2-mixedprocessing. SDK target: android-19
[100%] Generating example-tutorial-2-mixedprocessing-debug.apk

BUILD SUCCESSFUL
Total time: 6 seconds
[100%] Built target example-tutorial-2-mixedprocessing
[100%] Copy project sources: example-tutorial-3-cameracontrol
COPYFILES: ... 1 entries (SRC_COPY)
COPYFILES: ... directory '.../android/tutorial-3-cameracontrol' with 6 files
COPYFILES: All files are up-to-date.
[100%] Built target example-tutorial-3-cameracontrol_copy_src
Scanning dependencies of target example-tutorial-3-cameracontrol
[100%] Updating Android project at /fullpath/opencv-3.4.1/samples/android/tutorial-3-cameracontrol. SDK target: android-19
[100%] Generating example-tutorial-3-cameracontrol-debug.apk

BUILD SUCCESSFUL
Total time: 6 seconds
[100%] Built target example-tutorial-3-cameracontrol


~$ make install
  • 运行完成make install后,所有相关的库文件都会安装到**/fullpath/opencv3-android-ndk**,目录如下:
1
2
3
4
5
6
7
8
9
10
11
12
13
14
15
16
17
18
19
20
21
22
23
24
25
26
27
opencv3-android-ndk$ tree -L 3
.
├── apk
│   └── readme.txt
├── LICENSE
├── README.android
└── sdk
├── build.gradle
├── etc
│   ├── haarcascades
│   ├── lbpcascades
│   ├── valgrind_3rdparty.supp
│   └── valgrind.supp
├── java
│   ├── AndroidManifest.xml
│   ├── gen
│   ├── lint.xml
│   ├── project.properties
│   ├── res
│   └── src
└── native
├── 3rdparty
├── jni
├── libs
└── staticlibs

14 directories, 9 files

Android Studio 集成 OpenCV 测试

  • 这里可以直接导入一个 OpenCV Samples 工程做测试,我编译安装完上述 SDK 后,使用了samples/tutorial-1-camerapreview这个工程做测试,正常情况下,app 会通过 opencv 打开摄像头.

原有工程,添加 OpenCV 支持

  • 创建一个支持 C++的 Android 工程
  • 导入模块, File->New->Import Module ,选择**/fullpath/opencv3-android-ndk** ,这里我把它命名为**:opencv_sdk**, Finish.
  • 如果 IDE 没有报错,
  • 进入 File>Project Structure. 选择app ,点击Dependencides,点击+->3 Module dependency->模块名,
  • 等几分钟,IDE 就会处理完导入库的操作.
  • 如果在File>Project Structure没有看到一个新的模块名opencv_sdk,但是它的目录已经复制到工程目录的根目录下了,就在settings.gradle里的include后面加上如: include ‘:app’,’opencv_sdk’
  • 因为我本次使用的是Android-Studio 3.1的版本,要把build.gradle里的修改成 26以上,不然会出错:
1
2
3
4
5
6
7
8
9
10
11
12
android {
compileSdkVersion 27
//buildToolsVersion "27.0.3" // not needed since com.android.tools.build:gradle:3.0.0

defaultConfig {
minSdkVersion 14
targetSdkVersion 26
}

[...]
}

  • 导入模块后,IDE 会把 opencv 相关复制工程根目录下,目录名为opencv_sdk.导入后 Android 工程目录如下:
1
2
3
4
5
6
7
8
9
10
11
12
13
14
15
16
17
18
19
20
21
22
23
24
25
26
27
28
29
30
31
32
33
34
35
36
37
38
39
40
41
42
43
44
45
46
47
48
49
50
51
52
53
54
55
56
57
58
59
60
61
62
63
64
65
66
67
68
69
70
71
72
73
74
75
76
77
78
79
80
81
82
83
84
85
86
87
88
89
90
91
92
93
94
95
96
97
98
99
100
101
102
103
104
105
106
107
~$ tree -L 1
.
├── app
├── build.gradle
├── gradle
├── gradle.properties
├── gradlew
├── gradlew.bat
├── local.properties
├── opencv3_android.iml
├── opencv_sdk
└── settings.gradle

~$ tree app -L 4
app
├── app.iml
├── build.gradle
├── CMakeLists.txt
├── libs
├── proguard-rules.pro
└── src
├── androidTest
│   └── java
│   └── com
├── main
│   ├── AndroidManifest.xml
│   ├── cpp
│   │   └── native-lib.cpp
│   ├── java
│   │   └── com
│   └── res
│   ├── drawable
│   ├── drawable-v24
│   ├── layout
│   ├── menu
│   ├── mipmap-anydpi-v26
│   ├── mipmap-hdpi
│   ├── mipmap-mdpi
│   ├── mipmap-xhdpi
│   ├── mipmap-xxhdpi
│   ├── mipmap-xxxhdpi
│   ├── raw
│   └── values
└── test
└── java
└── com

25 directories, 6 files

~$ tree opencv_sdk -L 3
opencv_sdk
├── build.gradle
├── etc
│   ├── haarcascades
│   │   ├── haarcascade_eye_tree_eyeglasses.xml
│   │   ├── haarcascade_eye.xml
│   │   ├── haarcascade_frontalcatface_extended.xml
│   │   ├── haarcascade_frontalcatface.xml
│   │   ├── haarcascade_frontalface_alt2.xml
│   │   ├── haarcascade_frontalface_alt_tree.xml
│   │   ├── haarcascade_frontalface_alt.xml
│   │   ├── haarcascade_frontalface_default.xml
│   │   ├── haarcascade_fullbody.xml
│   │   ├── haarcascade_lefteye_2splits.xml
│   │   ├── haarcascade_licence_plate_rus_16stages.xml
│   │   ├── haarcascade_lowerbody.xml
│   │   ├── haarcascade_profileface.xml
│   │   ├── haarcascade_righteye_2splits.xml
│   │   ├── haarcascade_russian_plate_number.xml
│   │   ├── haarcascade_smile.xml
│   │   └── haarcascade_upperbody.xml
│   ├── lbpcascades
│   │   ├── lbpcascade_frontalcatface.xml
│   │   ├── lbpcascade_frontalface_improved.xml
│   │   ├── lbpcascade_frontalface.xml
│   │   ├── lbpcascade_profileface.xml
│   │   └── lbpcascade_silverware.xml
│   ├── valgrind_3rdparty.supp
│   └── valgrind.supp
├── java
│   ├── AndroidManifest.xml
│   ├── gen
│   ├── lint.xml
│   ├── project.properties
│   ├── res
│   │   └── values
│   └── src
│   └── org
├── native
│   ├── 3rdparty
│   │   └── libs
│   ├── jni
│   │   ├── abi-armeabi-v7a
│   │   ├── android.toolchain.cmake
│   │   ├── include
│   │   ├── OpenCV-armeabi-v7a.mk
│   │   ├── OpenCVConfig.cmake
│   │   ├── OpenCVConfig-version.cmake
│   │   └── OpenCV.mk
│   ├── libs
│   │   └── armeabi-v7a
│   └── staticlibs
│   └── armeabi-v7a
└── opencv_sdk.iml

19 directories, 34 files

JNI C++开发,调用 OPENCV

  • 如果我们要在 Android 工程里的使用 JNI 直接调用 opencv 的 API 函数,如上面工程 src/main/cpp/native-lib.cpp.
    需要在app/build.gradleandroid结点里添加相关路径:
1
2
3
4
5
6
7
8
9
10
11
12
13
14
15
16
17

android {

[...]
externalNativeBuild {
cmake {
path "CMakeLists.txt"
}
}

sourceSets {
main {
jni.srcDirs = [jni.srcDirs,'../opencv_sdk/native/jni/include']
jniLibs.srcDirs = [jniLibs.srcDirs,'../opencv_sdk/native/3rdparty/libs','../opencv_sdk/native/libs']
}
}
}
  • app/CMakeLists.txt里要包含如下信息:

    1
    2
    3
    4
    5
    6
    7
    8
    9
    10
    11
    12
    13
    14
    15
    16
    17
    18

    set(pathToOpenCV ${CMAKE_CURRENT_SOURCE_DIR}/../open_sdk )
    include_directories(${pathToOpenCV}/native/jni/include) # Not needed for CMake >= 2.8.11

    set(CMAKE_VERBOSE_MAKEFILE on)
    set(CMAKE_CXX_FLAGS "${CMAKE_CXX_FLAGS} -std=gnu++11")
    add_library( lib_opencv STATIC IMPORTED )
    set_target_properties(lib_opencv PROPERTIES IMPORTED_LOCATION
    ${pathToOpenCV}/native/libs/${ANDROID_ABI}/libopencv_java3.so)
    target_link_libraries( # Specifies the target library.
    native-lib

    # Links the target library to the log library
    # included in the NDK.
    ${log-lib}
    lib_opencv # 要加上这lib_opencv 才能链接到opencv的库.
    )

  • 添加上述路径之后,就可以在src/main/cpp/native-lib.cpp 里添加#include <opencv2/opencv.hpp>.

  • 上述 JNI 方式开发就是写原生的 C++代码调用 API,编译成功后会生成.so的文件,通过 JNI 方式加载这个库文件,或者升级更新这个库文件,不需要修改 Android 的文件.但是不能像 PC 下那样使用,如:imshow(),namedWindow(),createTrackBar(),waitKey(),这些函数是不能用.


谢谢支持

获取源码并安装可用的 Feeds

1
2
3
4
$ git clone git://git.openwrt.org/openwrt.git
$ cd openwrt
$ ./scripts/feeds update -a
$ ./scripts/feeds install -a
  • 如果下载不了,或者很慢,或者bash里的代理对于curl无效,可以使用如下补丁
1
2
3
4
5
6
7
8
9
10
11
12
13
diff --git a/scripts/download.pl b/scripts/download.pl
index 33e1e12c1e..0e98b9d172 100755
--- a/scripts/download.pl
+++ b/scripts/download.pl
@@ -82,7 +82,7 @@ sub download_cmd($) {
}

return $have_curl
- ? (qw(curl -f --connect-timeout 20 --retry 5 --location),
+ ? (qw(curl -f --connect-timeout 60 --retry 6 -x socks5://127.0.0.1:3080 --location),
$check_certificate ? () : '--insecure',
shellwords($ENV{CURL_OPTIONS} || ''),
$url)

编译固件,配置与编译

1
2
3
$ make defconfig
$ make prereq
$ make menuconfig

简单配置

  • 选择 CPU 型号

    1
    2
    3
    Target System (MediaTek Ralink MIPS)  -->
    Subtarget (MT7620 based boards) --->
    Target Profile (Lenovo Y1S) --->
  • LUCI 配置

    1
    2
    LuCI > 1. Collections > luci
    LuCI > 2. Modules > Translations > Chinese (zh-cn)

Privoxy

  • proxy
    1
    2
    3
    4
    5
    6
    7
    8
    9
    10
    11
    12
    13
    14
    15
    16
    17
    18
    19
    20
    21
    22
    23
    24
    ~# cat /etc/config/privoxy
    config privoxy 'privoxy'
    option confdir '/etc/privoxy'
    option logdir '/var/log'
    option logfile 'privoxy.log'
    list filterfile 'default.filter'
    list actionsfile 'match-all.action'
    list actionsfile 'default.action'
    option toggle '1'
    option enable_remote_toggle '1'
    option enable_edit_actions '1'
    option forwarded_connect_retries '0'
    option keep_alive_timeout '300'
    list permit_access '192.168.1.0/24'
    option debug_512 '1'
    option debug_4096 '1'
    option debug_8192 '1'
    list listen_address '192.168.1.1:8123'
    # 把privoxy接受来的Http转到本机的Socks5(ss-local).
    list forward_socks5 '/ 127.0.0.1:1080 .'

    config system 'system'
    option boot_delay '10'

Dynamic DNS

  • 这里安装动态域名,是为了通过IPv6去暴露内网的服务,或者方便远程管路由器了.
    1
    2
    3
    4
    5
    6
    7
    8
    9
    10
    LuCI-> 3. Applications -> luci-app-ddns
    [...]
    Network ->
    -> IP Address and Names
    <*> ddns-scripts_cloudflare.com-v4..... CloudFlare.com API v4 (requires cURL)
    <*> ddns-scripts_freedns_42_pl
    <*> ddns-scripts_godaddy.com-v1................... GoDaddy.com (require cURL)
    < > ddns-scripts_no-ip_com...................... DDNS extension for No-IP.com
    < > ddns-scripts_nsupdate................. DDNS extension using Bind nsupdate
    <*> ddns-scripts_route53-v1....................... Amazon AWS Route 53 API v1

注册 dynv6.com

  • 这里就使用dynv6.com的免费域名.注册帐号->激活帐号->创建域名.测试的过程中在Luci里添加后参数,生成脚本有错误,下面直接改配置文件处理.
    1
    2
    3
    4
    5
    6
    7
    8
    9
    10
    11
    12
    13
    14
    15
    16
    17
    18
    19
    20
    21
    22
    23
    24
    25
    26
    27
    28
    29
    30
    31
    32
    33
    root@OpenWrt:~# cat  /etc/config/ddns

    config ddns 'global'
    option ddns_dateformat '%F %R'
    option ddns_loglines '250'
    option ddns_rundir '/var/run/ddns'
    option ddns_logdir '/var/log/ddns'

    config service 'myddns_ipv4'
    option lookup_host 'yourhost.example.com'
    option domain 'yourhost.example.com'
    option username 'your_username'
    option password 'your_password'
    option interface 'wan'
    option ip_source 'network'
    option ip_network 'wan'
    option service_name 'dyn.com'
    option enabled '0'

    config service 'myddns_ipv6'
    option use_ipv6 '1'
    option enabled '1'
    option force_unit 'minutes'
    option service_name 'dynv6.com'
    option retry_unit 'seconds'
    option interface 'pppoe-wan' # 这里使用的接口是WAN_6,从ISP获取来的.这个就是把路由的IPv6的公网地址上传了.
    option ip_interface 'pppoe-wan'
    option ip_source 'interface'
    option password '<HTTP Tokens>' # dynv6.com 里生成的要Keys.
    option check_unit 'seconds'
    option username 'your_username'
    option lookup_host 'ipv6.dynv6.com'
    option domain 'xxxxx.dynv6.net' # 注册的动态域名.

dnsmasq 配置问题

  • 开启了重绑定保护不能通过内网与本地访问该服务,默认拒绝解析包含私有IP地址的域名.如果打开了no-resolv,同时又不设置resolv-file的话,dnsmasq就会找不到默认的dns服务器来解析xx.com域名,如果你的代理服务器正好属于这类域名,将导致你无法连接到你的服务器.
    1
    2
    3
    4
    5
    6
    7
    8
    9
    10
    11
    server=/.google.com/127.0.0.1#5053
    server=/.gstatic.com/127.0.0.1#5053
    server=/.googleusercontent.com/127.0.0.1#5053
    server=/.appspot.com/127.0.0.1#5053
    server=/.googlecode.com/127.0.0.1#5053
    server=/.googleapis.com/127.0.0.1#5053
    server=/.gmail.com/127.0.0.1#5053
    server=/.google-analytics.com/127.0.0.1#5053
    server=/.youtube.com/127.0.0.1#5053
    server=/.blogspot.com/127.0.0.1#5053
    server=/.blogger.com/127.0.0.1#5053
  • DNS测试,https://www.dnsleaktest.com,http://entropy.dns-oarc.net/test/,https://dnssec.vs.uni-due.de/

转发到内网服务

1
2
3
4
5
6
7
8
9
10
11
root@OpenWrt:~# cat /etc/config/firewall
[....]
config rule
option src 'wan'
option name 'camera'
option target 'ACCEPT'
option family 'ipv6'
option dest 'lan'
list proto 'tcp'
option dest_port '8888'
list dest_ip '2409:xxxx:0007:ebff:fe21:67f2' # 局域网服务器IP.
  • 如果要用到IPv6端口转发,要选择安装Kernel Modules --> Netfilter Extensions --> kmod-ipt-nat6,否则会有下面提示错误:
    1
    2
    3
    4
    5
    6
    7
    root@OpenWrt:~# /etc/init.d/firewall restart
    [...]
    * Rule 'camera'
    ! Skipping due to different family of ip address
    [...]
    * Running script '/etc/firewall.ss-rules'
    ss-rules: Skipping ipv6. Requires ip6tables-mod-nat

其它个性化配置

  • 安装shadowsocks-libev

    1
    2
    3
    4
    5
    6
    7
    8
    9
    10
    11
    12
    LuCI-> 3. Applications -> luci-app-shadowsocks-libev
    -> luci-app-adblock
    -> luci-app-simple-adblock
    -> luci-app-https-dns-proxy
    -> luci-app-shadowsocks-libev
    [...]
    Network-> Web Servers/Proxies
    ^ -> shadowsocks-libev-ss-local
    -> shadowsocks-libev-ss-redir
    -> shadowsocks-libev-ss-rules
    -> shadowsocks-libev-ss-server
    -> shadowsocks-libev-ss-tunnel
  • 使用luci-app-https-dns-proxy要特别意,选择后备服务器如:谷歌的/usr/sbin/https-dns-proxy -a 127.0.0.1 -p 5053 -b 8.8.8.8,8.8.4.4 -r https://dns.google/dns-query -u nobody -g nogroup -4,一定要有一个可用的https_proxy服务器,不然它会占用很高的CPU,使用socks5代理也不行.要在/etc/config/https-dns-proxy加上一行,如:option proxy_server 'http:127.0.0.1:1080',然而Cloudflare运行的很好,不需要代理也行.

1
2
3
4
5
6
7
8
9
10
11
12
~# nslookup openwrt.org 127.0.0.1
Server: 127.0.0.1
Address: 127.0.0.1#53

Name: openwrt.org
Address 1: 139.59.209.225
Address 2: 2a03:b0c0:3:d0::1af1:1

// 添加一个自定义转发查询.
~# uci add_list dhcp.@dnsmasq[0].server="/baidu.com/114.114.114.114"
~# uci commit dhcp
~# /etc/init.d/dnsmasq restart
  • 添加ChinaDNS支持,参照这里ChinaDNS,这个项目因为很久没有更新,所以要谨慎使用吧.首先进入到openwrt源码目录里,执行下面命令.
    1
    2
    3
    4
    5
    6
    7
    ~$ cd openwrt
    ~$ pushd package
    ~$ git clone https://github.com/clowwindy/ChinaDNS.git
    ~$ popd
    ~$ make menuconfig # 选择 Network/ChinaDNS,可以选择成M或者Y.
    ~$ make -j
    ~$ make V=99 package/ChinaDNS/openwrt/compile

WireGuard支持

  • 配置选择,Wireguard setup Openwrt

    1
    2
    Kernel modules -> Network Support -> kmod-wireguard
    LuCI-> 3. Protocols -> luci-proto-wireguard
  • 安装完成后,进入到路由器Shell里生成公私钥,

    1
    2
    3
    ~$ ssh root@192.168.1.1
    ~$ mkdir /etc/wireguard/ && cd /etc/wireguard
    ~$ wg genkey | tee privatekey | wg pubkey > publickey
  • 再进入到路由器的WEB界面,这里演示的是把openwrt路由器做为一个客户端Peer示例.打开Network->Interaces菜单,新建一个接口,协议选择WireGuard VPN,输入一个名字后点击新建,Private key就填入上面的privatekey里的内容,IP Addresses填入一个VPN的内网地址段如:172.16.0.5/24,再打开Peer选项,添加一个Peer.Public Key是对端服务器端的Public key,Allowed IPs写入172.16.0.5/24,Endpoint Host就是对端服务器IP或域名,Endpoint Port默认是51820,Persistent Keep Alive建议写25如果在一个NAT后面的话,点击保成并使配置生效.

  • 还要在防火墙上加一条规则:WAN口端任何源端口是51820来的访问都要接受.

添加 USB WIFI [Atheros AR9170+AR9101] 支持(非必需)

1
Bus 001 Device 003: ID 0846:9001 NetGear, Inc. WN111(v2) RangeMax Next Wireless [Atheros AR9170+AR9101]
  • 支持WN111(v2)网卡的选项, Kernel modules -> Wirless Drivers
    1
    2
    3
    4
    5
    6
    7
    8
    9
    10
    [...]
    -*- kmod-ath...................................... Atheros common driver part -->
    [*] Force Atheros drivers to respect the user\'s regdomain settings
    [*] Atheros wireless debugging # 这里为可选.
    [*] Enable DFS support
    [*] Atheros spectral scan support
    [...]
    #下面这两项为必选
    <*> kmod-ath9k-htc........................ Atheros 802.11n USB device support
    <*> kmod-carl9170....................... Driver for Atheros AR9170 USB sticks

mt7601u

编译,刷机

  • 如果原来镜像,有选择编译了Luci->Modules->luci-mode-failsafe模块时,可以通过路由器界面上的failsafe上传更新.刷新前最好下载备份(如:backup-OpenWrt-2020-03-24.tar.gz)路由器的配置,如果上传备份文件重启之后不生效的话,可以把它解压出来是一个etc目录,使用rsync etc route:/.
1
2
3
4
5
$ make -j1 V=s  # 可以详细输出编译日志
$ scp bin/targets/ramips/mt7628/lede-ramips-mt7628-hc5661a-squashfs-sysupgrade.bin root@192.168.199.1:/tmp/
$ ssh root@192.168.199.1
$ mtd write /tmp/lede-ramips-mt7628-hc5661a-squashfs-sysupgrade.bin firmware
reboot

单独编译一个包

  • 有时在编译openwrt时忘记勾选某个功能包时,可以在不需要重新编译整个系统时单独增量编译一个包.
    1
    2
    ~$ cd openwrt
    ~$ make menuconfig # 用<M>选择需要编译的包.

备份,恢复

1
2
3
4
5
6
7
8
9
~# cat /proc/mtd
dev: size erasesize name
mtd0: 00030000 00001000 "u-boot"
mtd1: 00010000 00001000 "u-boot-env"
mtd2: 00010000 00001000 "factory"
mtd3: 00fb0000 00001000 "firmware"
mtd4: 001a0583 00001000 "kernel"
mtd5: 00e0fa7d 00001000 "rootfs"
mtd6: 008c8000 00001000 "rootfs_data"
  • 备份自定义系统信息,包括新安装的软件

    1
    ~# dd if=/dev/mtd6 of=/mnt/overlay.bin
  • 恢复备份设置

    1
    ~# mtd -r write /mnt/overlay.bin rootfs_data
  • 仅备份/恢复系统设置

    1
    2
    3
    ~# sysupgrade -b /mnt/back.tar.gz
    # restore
    ~# sysupgrade -r /mnt/back.tar.gz
  • 恢复默认设置

    1
    2
    3
    ~# rm -rf /overlay/* && reboot
    # or
    ~# mtd -r erase rootfs_data
  • 修改系统配置文件,如:net.netfilter.nf_conntrack_max=16384,默认最大连接数是16k,如果下BT肯定是不够的.因此这里要修改成64k,不能修改/etc/sysctl.d/11-nf-conntrack.conf,因为重启后又恢复到16k,因该修改成如下:

    1
    2
    3
    ~$ cat /overlay/upper/etc/sysctl.conf
    # Defaults are configured in /etc/sysctl.d/* and can be customized in this file
    net.netfilter.nf_conntrack_max=65535

通过curl访问控制ubus

  • ubus
    1
    2
    3
    4
    5
    6
    7
    8
    9
    10
    11
    12
    13
    read  -p  'Login Name:' username
    read -sp 'Login Password:' password
    echo
    LOGIN="{\"jsonrpc\":\"2.0\",\"id\":1,\"method\":\"call\",\"params\":[\"00000000000000000000000000000000\",\"session\",\"login\",{\"username\":\"$username\",\"password\":\"$password\"}]}"
    ROUTE_URL='https://192.168.1.1/ubus'
    SESSION=`curl -k -d $LOGIN $ROUTE_URL | jq '.result[1].ubus_rpc_session'`
    PPPOE_RESTART="[{\"jsonrpc\":\"2.0\",\"id\":1,\"method\":\"call\",\"params\":[$SESSION,\"file\",\"exec\",{\"command\":\"/sbin/ifup\",\"params\":[\"lan\"],\"env\":null}]},{\"jsonrpc\":\"2.0\",\"id\":43,\"method\":\"call\",\"params\":[$SESSION,\"file\",\"exec\",{\"command\":\"/sbin/ifup\",\"params\":[\"wan\"],\"env\":null}]}]"
    READ_BLACKLIST="{\"jsonrpc\":\"2.0\",\"id\":1,\"method\":\"call\",\"params\":[$SESSION,\"file\",\"read\",{\"path\":\"/etc/adblock/adblock.blacklist\"}]}"
    # curl -k -d $PPPOE_RESTART $ROUTE_URL
    # jq can encode for @sh @json @text @csv @tsv @uri
    JSONRPC=$(echo $READ_BLACKLIST | jq -cRr @text)
    # echo $JSONRPC
    curl -s -k -d "$JSONRPC" $ROUTE_URL

IPv6应用支持

IPv6-PD模式

  • pppoe拨号成功,会创建一个WAN_6的接口,同时会从ISP获得一个IPv6公网地址与IPv6-PD的前缀.同时在防火墙里有几条规则是可以让内网的机器可以获得ISP的分配的公网地址,同时可以直接从公网ping6到内网的公网IPv6的址.
1
2
3
4
5
6
7
8
9
10
11
12
13
14
15
16
17
18
19
20
21
22
23
24
25
26
27
28
29
30
31
32
33
34
35
36
37
38
39
40
41
root@OpenWrt:~# uci show firewall
[...]
# 允许dhcpv6协议进入到内网
firewall.@rule[3]=rule
firewall.@rule[3].name='Allow-DHCPv6'
firewall.@rule[3].src='wan'
firewall.@rule[3].proto='udp'
firewall.@rule[3].src_ip='fc00::/6'
firewall.@rule[3].dest_ip='fc00::/6'
firewall.@rule[3].dest_port='546'
firewall.@rule[3].family='ipv6'
firewall.@rule[3].target='ACCEPT'
firewall.@rule[4]=rule
# 允许ICMP协议进入到内网
firewall.@rule[4].name='Allow-MLD'
firewall.@rule[4].src='wan'
firewall.@rule[4].proto='icmp'
firewall.@rule[4].src_ip='fe80::/10'
firewall.@rule[4].icmp_type='130/0' '131/0' '132/0' '143/0'
firewall.@rule[4].family='ipv6'
firewall.@rule[4].target='ACCEPT'
# 允许ICMPv6协议进入到内网
firewall.@rule[5]=rule
firewall.@rule[5].name='Allow-ICMPv6-Input'
firewall.@rule[5].src='wan'
firewall.@rule[5].proto='icmp'
firewall.@rule[5].icmp_type='echo-request' 'echo-reply' 'destination-unreachable' 'packet-too-big' 'time-exceeded' 'bad-header' 'unknown-header-type' 'router-solicitation' 'neighbour-solicitation' 'router-advertisement' 'neighbour-advertisement'
firewall.@rule[5].limit='1000/sec'
firewall.@rule[5].family='ipv6'
firewall.@rule[5].target='ACCEPT'
# 允许ICMPv6协议进入到内网,就是可以ping到内网.
firewall.@rule[6]=rule
firewall.@rule[6].name='Allow-ICMPv6-Forward'
firewall.@rule[6].src='wan'
firewall.@rule[6].dest='*'
firewall.@rule[6].proto='icmp'
firewall.@rule[6].icmp_type='echo-request' 'echo-reply' 'destination-unreachable' 'packet-too-big' 'time-exceeded' 'bad-header' 'unknown-header-type'
firewall.@rule[6].limit='1000/sec'
firewall.@rule[6].family='ipv6'
firewall.@rule[6].target='ACCEPT'
firewall.@rule[6].enabled='0'
  • 转发内网服务,下面这条规则相当于,是开放lan里的所有ipv68888端的tcp访问.这条规规还可以限定dest_ip,但是这个IPv6-PD是在一定时间后或重启后动态改变的,IPv6-PD改变之后这条规则就失效了.
1
2
3
4
5
6
7
8
config rule
option src 'wan'
option name 'camera'
option target 'ACCEPT'
option family 'ipv6'
option dest 'lan'
list proto 'tcp'
option dest_port '8888'

NAT6模式

修改ULA前缀参数

  • 修改ULA-Prefix,这个不是必需的,只是为了与内部地址区分开来.从Luci界面操作就是打开Network-->Interfaces-->Global network options-->IPv6 ULA-Prefix,把第一个fd0c:xxxx:xxxx::/48这样的字串,最前面那个f->d.uci命令行接口操作如下:
1
2
3
root@OpenWrt:~#  uci set network.globals.ula_prefix="$(uci get network.globals.ula_prefix | sed -e "s/^./d/")"
root@OpenWrt:~# uci commit network
root@OpenWrt:~# /etc/init.d/network restart

修改DHCPv6参数

  • 打开Interfaces->Interfaces->LAN->DHCP Server->IPv6 Settings.
    1. DHCPv6-Service 改选成 disabled.
    2. NDP-Proxy 改选成disabled.
    3. 勾选上Always announce default router.保存并应用.
  • uci本看显示如下所示:
    1
    2
    3
    4
    5
    6
    7
    8
    9
    10
    11
    12
    root@OpenWrt:~# uci show dhcp.lan
    dhcp.lan=dhcp
    dhcp.lan.interface='lan'
    dhcp.lan.start='100'
    dhcp.lan.limit='150'
    dhcp.lan.leasetime='12h'
    dhcp.lan.ra='server'
    dhcp.lan.ra_slaac='1'
    dhcp.lan.ra_flags='managed-config' 'other-config'
    dhcp.lan.ra_default='1'
    dhcp.lan.dhcpv6='server'
    dhcp.lan.ra_management='1'

NAT6转发脚本(用处不大)

编译其它未支持的网卡驱动(加载出错)

  • 这里尝式编译一个Bus 001 Device 003: ID 0bda:0811 Realtek Semiconductor Corp. 驱动,使用的源码是aircrack-ng/rtl8812au
1
2
3
4
5
6
7
8
9
10
11
12
13
14
15
16
17
18
19
20
21
~$ git clone https://github.com/aircrack-ng/rtl8812au
~$ cd rtl8812au
# 依照Makefile的文件格式,添加有如下内容在Makefile里.
~$ cat Makefile
[....]
CONFIG_PLATFORM_MIPS_MT7620 = y
[....]
ifeq ($(CONFIG_PLATFORM_MIPS_MT7620), y)
EXTRA_CFLAGS += -DCONFIG_IOCTL_CFG80211 -DRTW_USE_CFG80211_STA_EVENT
ARCH := mips
CROSS_COMPILE := mipsel-openwrt-linux-musl-
STAGING_DIR := ./
KSRC := /home/alex/test_openwrt/tmp/linux-2.6.30.9
endif
[.....]

# openwrt编译成功后,会看下面的目录 .
~$ export STAGING_DIR=/fullpath/openwrt/staging_dir
~$ export PATH=$STAGING_DIR/toolchain-mipsel_24kc_gcc-7.5.0_musl/bin:$PATH
~$ export KERNEL_SRC=/fullpath/openwrt/build_dir/target-mipsel_24kc_musl/linux-ramips_mt7620/linux-4.14.171
~$ ARCH=mips CROSS_COMPILE=mipsel-openwrt-linux-musl- make KVER=4.14.171 KSRC=$KERNEL_SRC

DNS配置篇

https-dns-proxy

  • 安装完成https-dns-proxy,添加一个实例(instances),如果update_dnsmasq_config='*',它会自动去更新覆盖dnsmasq区域的配置.如果选择DnsPod.cn,AliDNS这样的Resolver直接可以用,如果其它的可以配置代理proxy_server='socks5://192.168.1.1:1080',前提是,确保代理可以正常连接使用.
1
2
3
4
5
6
7
8
9
10
11
12
~$ uci show https-dns-proxy
https-dns-proxy.config=main
https-dns-proxy.config.update_dnsmasq_config='*'
https-dns-proxy.config.force_dns='0'
https-dns-proxy.@https-dns-proxy[0]=https-dns-proxy
https-dns-proxy.@https-dns-proxy[0].user='nobody'
https-dns-proxy.@https-dns-proxy[0].group='nogroup'
https-dns-proxy.@https-dns-proxy[0].listen_addr='127.0.0.1'
https-dns-proxy.@https-dns-proxy[0].listen_port='5053'
https-dns-proxy.@https-dns-proxy[0].bootstrap_dns='208.67.222.222,208.67.220.220'
https-dns-proxy.@https-dns-proxy[0].resolver_url='https://doh.opendns.com/dns-query'
https-dns-proxy.@https-dns-proxy[0].proxy_server='socks5://192.168.1.1:1080'
  • 崩溃错误
    1
    2
    3
    4
    Sun May 30 19:01:37 2021 kern.info kernel: [ 1121.538642] do_page_fault(): sending SIGSEGV to https-dns-proxy for invalid read access from 3b303000
    Sun May 30 19:01:37 2021 kern.info kernel: [ 1121.548165] epc = 00402689 in https-dns-proxy[400000+5000]
    Sun May 30 19:01:37 2021 kern.info kernel: [ 1121.553786] ra = 00402679 in https-dns-proxy[400000+5000]
    Sun May 30 19:01:37 2021 daemon.info procd: Instance https-dns-proxy::instance1 s in a crash loop 6 crashes, 108 seconds since last crash

dnscrypt-proxy篇

  • 安装dnscrypt-proxy,创建一个服务实例,选择一个合适的resolver,这里设置当wan_6就绪后启动,查看一下启动日志是否连接正常.配置完成应用后,它会去自动更新dnsmasq里的DNS forwarding服务器,也就是说,点击Save& Apply后,它会把https-dns-proxy里的list server '127.0.0.1#5053设置清掉,反过来也是一样,所以如果要同时使用https-dns-proxy,dnscrypt-proxy配置完成一个,要把另一个手动加入到dnsmasqlist server里.
1
2
3
4
5
6
7
uci show dnscrypt-proxy
dnscrypt-proxy.@global[0]=global
dnscrypt-proxy.@global[0].procd_trigger='wan_6'
dnscrypt-proxy.@dnscrypt-proxy[0]=dnscrypt-proxy
dnscrypt-proxy.@dnscrypt-proxy[0].address='127.0.0.1'
dnscrypt-proxy.@dnscrypt-proxy[0].port='6353'
dnscrypt-proxy.@dnscrypt-proxy[0].resolver='acsacsar-ams-ipv6'
  • 查看启动日志
    1
    2
    3
    4
    5
    6
    7
    8
    9
    10
    11
    12
    13
    14
    15
    16
    17
    18
    19
    20
    21
    Sun May 30 17:00:07 2021 daemon.info dnscrypt-proxy[3601]: dnscrypt-proxy Refetching server certificates
    Sun May 30 17:00:07 2021 daemon.info dnscrypt-proxy[3601]: dnscrypt-proxy Server certificate with serial #1 received
    Sun May 30 17:00:07 2021 daemon.info dnscrypt-proxy[3601]: dnscrypt-proxy This certificate is valid
    Sun May 30 17:00:07 2021 daemon.info dnscrypt-proxy[3601]: dnscrypt-proxy Chosen certificate #1 is valid from [2021-05-30] to [2021-05-31]
    Sun May 30 17:00:07 2021 daemon.info dnscrypt-proxy[3601]: dnscrypt-proxy Using version 2.0 of the DNSCrypt protocol
    Sun May 30 17:00:07 2021 daemon.info dnscrypt-proxy[3601]: dnscrypt-proxy Server key fingerprint is 5C20:893F:7DCA:78BF:D98D:D412:6EC0:3C4D:D5CC:B3E1:EB3C:16A4:A464:DD12:1334:F04B
    Sun May 30 17:04:39 2021 daemon.notice dnscrypt-proxy[3601]: dnscrypt-proxy Stopping proxy
    Sun May 30 17:04:39 2021 daemon.info dnscrypt-proxy[3601]: dnscrypt-proxy UDP listener shut down
    Sun May 30 17:04:39 2021 daemon.info dnscrypt-proxy[3601]: dnscrypt-proxy TCP listener shut down
    Sun May 30 17:04:40 2021 user.info : dnscrypt-proxy + DNS Security Extensions are supported
    Sun May 30 17:04:40 2021 user.info : dnscrypt-proxy + Provider supposedly doesn\'t keep logs
    Sun May 30 17:04:40 2021 daemon.notice dnscrypt-proxy[29586]: dnscrypt-proxy Starting dnscrypt-proxy 1.9.5
    Sun May 30 17:04:40 2021 daemon.info dnscrypt-proxy[29586]: dnscrypt-proxy Generating a new session key pair
    Sun May 30 17:04:40 2021 daemon.info dnscrypt-proxy[29586]: dnscrypt-proxy Done
    Sun May 30 17:04:40 2021 daemon.info dnscrypt-proxy[29586]: dnscrypt-proxy Server certificate with serial #1 received
    Sun May 30 17:04:40 2021 daemon.info dnscrypt-proxy[29586]: dnscrypt-proxy This certificate is valid
    Sun May 30 17:04:40 2021 daemon.info dnscrypt-proxy[29586]: dnscrypt-proxy Chosen certificate #1 is valid from [2021-05-30] to [2021-05-31]
    Sun May 30 17:04:40 2021 daemon.info dnscrypt-proxy[29586]: dnscrypt-proxy Using version 2.0 of the DNSCrypt protocol
    Sun May 30 17:04:40 2021 daemon.info dnscrypt-proxy[29586]: dnscrypt-proxy Server key fingerprint is 5C20:893F:7DCA:78BF:D98D:D412:6EC0:3C4D:D5CC:B3E1:EB3C:16A4:A464:DD12:1334:F04B
    Sun May 30 17:04:40 2021 daemon.notice dnscrypt-proxy[29586]: dnscrypt-proxy Proxying from 127.0.0.1:6353 to 51.158.166.97:443

加速国内DNS分流解析

  • felixonmars/dnsmasq-china-list

  • 首先是从felixonmars/dnsmasq-china-list下载源码,把dnsmasq-china-list/*.conf复制到路由器内的/etc/dnsmasq.d目录下,这里刚好对应如下设置:

    1
    2
    3
    4
    ~$ mkdir /etc/dnsmasq.d
    ~$ uci set dhcp.@dnsmasq[0].confdir='/etc/dnsmasq.d'
    ~$ uci show dhcp.@dnsmasq[0].confdir
    dhcp.cfg01411c.confdir='/tmp/dnsmasq.d'
  • 加入这些配置的原理是,这些配置文件是一些,如:server=/0-100.com/114.114.114.114bogus-nxdomain=123.125.81.12dnsmasq配置参数项,众人维护的一个静态条目列表,把它用一种包含(include)的方式,加入dnsmasq配置文件里.所以dnsmasq启动时会看到如下:

    1
    2
    3
    4
    ~$ logread
    Sun May 30 18:14:31 2021 daemon.info dnsmasq[13226]: using nameserver 114.114.114.114#53 for domain doubleclick.net
    Sun May 30 18:14:34 2021 daemon.info dnsmasq[13226]: using 69201 more nameservers

dnsmasq配置

  • dnsmasq配置最终如下,加入一些静态的服务器列表配置项,指定两个list server实例.

    1
    2
    3
    4
    5
    6
    7
    8
    9
    10
    11
    12
    13
    14
    15
    16
    17
    18
    19
    ~$ cat /etc/config/dhcp

    config dnsmasq
    option domainneeded '1'
    option localise_queries '1'
    option local '/lan/'
    option domain 'lan'
    option expandhosts '1'
    option authoritative '1'
    option readethers '1'
    option leasefile '/tmp/dhcp.leases'
    option localservice '1'
    option nohosts '1'
    option serversfile '/tmp/dnsmasq.d/adb_list.overall'
    option rebind_protection '0'
    list interface 'br-lan'
    option confdir '/etc/dnsmasq.d/'
    list server '127.0.0.1#5053'
    list server '127.0.0.1#6353'
  • dnsmasq遇到OOM-kill.参照OOM invoked with plenty of free swap,设置vm.min_free_kbytes = 2048,原来是1638416M,本机内存是256MB.

1
2
3
[ 1543.949424] oom-kill:constraint=CONSTRAINT_NONE,nodemask=(null),global_oom,task_memcg=/,task=dnsmasq,pid=14453,uid=453
[ 1543.960654] Out of memory: Killed process 14453 (dnsmasq) total-vm:12308kB, anon-rss:10996kB, file-rss:0kB, shmem-rss:0kB, UID:453 pgtables:24kB oom_score_adj:0
[ 1543.989680] oom_reaper: reaped process 14453 (dnsmasq), now anon-rss:0kB, file-rss:0kB, shmem-rss:0kB

golang 编译

1
2
$ export GO111MODULE=on
$ export GOPROXY=https://goproxy.cn
1
2
3
4
5
~$ CGO_CFLAGS="-Os -pipe -mno-branch-likely -mtune=24kc -fno-caller-saves -fno-plt -fhonour-copts -Wno-error=unused-but-set-variable -Wno-error=unused-result -msoft-float -go-0.4.3 -Wformat -Werror=format-security -fstack-protector -D_FORTIFY_SOURCE=1 -Wl,-z,now -Wl,-z,relro"
GOOS="linux"
GOMIPS="softfloat"
GOARCH="mipsle"
CGO_ENABLED=1

802.11s Mesh网络

asus-internals-default.png

  • 下面是描述如何让一台AP做为扩展AP节点,扩展的意思是扩展信号覆盖的面积.两台路由器都是OpenWrt系统.使用5G来做MESH网络.

主路由节点

  • 主路由节点网关是newifi y1s,带有5G/2.4G双频,做为网关.先要添加一个wireless接口,有三种方法:通过luci图形界面,使用命令行uci,直接在/etc/config/wireless里添加.下面是通过UCI接口的示例.
1
2
3
4
5
6
7
8
9
10
11
12
~$ uci set wireless.mesh0='wifi-iface'
~$ uci set wireless.mesh0.device='radio0'
~$ uci set wireless.mesh0.mode='mesh'
~$ uci set wireless.mesh0.mesh_id='homemesh0'
~$ uci set wireless.mesh0.encryption='sae'
~$ uci set wireless.mesh0.key='<your passwd>'
~$ uci set wireless.mesh0.mesh_rssi_threshold=0
~$ uci set wireless.mesh0.network='lan'
~$ uci set wireless.mesh0.mesh_fwding=0
~$ uci set wireless.mesh0.ifname='mesh0'
~$ uci commit wireless
~$ wifi reload
  • 如上所示,MESH网络配置有几个要注意的点,节点之间的channel,mesh_id,key,encryption必须是一致,才能相互通信.这边是把它桥接到lan网络区域,勾选设置Network -> Interface -> LAN -> Physical Settings里面的Enable STPEnable IGMP snooping两项.
  • 节点之间的key最好是使用xxd -l 16 -p /dev/random这种方式生成.

扩展节点

  • 扩展也是添加相同的接口,这里是使用LUCI添加的,查看配置如下:

    1
    2
    3
    4
    5
    6
    7
    8
    9
    10
    ~$ uci show wireless.wifinet2
    wireless.wifinet2=wifi-iface
    wireless.wifinet2.device='radio0'
    wireless.wifinet2.mode='mesh'
    wireless.wifinet2.mesh_id='homemesh0'
    wireless.wifinet2.mesh_fwding='1'
    wireless.wifinet2.mesh_rssi_threshold='0'
    wireless.wifinet2.encryption='sae'
    wireless.wifinet2.key='<your passwd>'
    wireless.wifinet2.network='lan'
  • 如上所示,该接点也是桥接到lan网络,这里设置lan与主节点稍有不同,主节点lan地址是192.168.1.1,所以这里指定扩展节点的lan为静态地址:192.168.1.2,并把网关指向192.168.1.1,屏蔽lan上的DHCP Server. 选上Ignore Interface.

  • 设置如下:

    1
    2
    3
    4
    5
    6
    7
    8
    9
    10
    11
    12
    13
    14
    15
    16
    17
    18
    19
    20
    21
    22
    23
    24
    25
    26
    27
    28
    29
    ~# uci show network.lan
    network.lan=interface
    network.lan.type='bridge'
    network.lan.ifname='eth0.1'
    network.lan.proto='static'
    network.lan.ipaddr='192.168.1.2'
    network.lan.netmask='255.255.255.0'
    network.lan.ip6assign='60'
    network.lan.gateway='192.168.1.1'
    network.lan.stp='1'
    network.lan.igmp_snooping='1'

    ~# uci show dhcp.lan
    dhcp.lan=dhcp
    dhcp.lan.interface='lan'
    dhcp.lan.dhcpv4='server'
    dhcp.lan.dhcpv6='server'
    dhcp.lan.ra='server'
    dhcp.lan.ra_slaac='1'
    dhcp.lan.ra_flags='managed-config' 'other-config'
    dhcp.lan.ra_management='1'
    dhcp.lan.ignore='1'

    ~# uci show dhcp.mesh
    dhcp.mesh=dhcp
    dhcp.mesh.interface='mesh'
    dhcp.mesh.start='100'
    dhcp.mesh.limit='150'
    dhcp.mesh.leasetime='12h'
  • 默认OpenWrt里的wifi-iface都是桥接到lan的,所以整体示意图如下:

    1
    2
    3
    4
    5
    6
    7

    AP(5G) AP(5G)
    ^ ^
    | |
    WAN <---> LAN(192.168.1.1) LAN(192.168.1.2)
    | |
    +---(homemesh0)-------------(homemesh0)--+
  • 当两个节点连接成功时,可以使用iw dev wifinet2 station dump查看连接的详情.但是我边里没有成功,而且我用的版本是master最新的.

  • iw: use correct type in policy check for mesh

    1
    2
    ~$ iw dev mesh0 station dump
    failed to parse nested attributes!
  • 查看wifi状态

    1
    2
    3
    4
    5
    6
    7
    8
    9
    10
    11
    12
    13
    14
    15
    16
    17
    18
    19
    20
    21
    22
    23
    24
    25
    26
    27
    28
    29
    30
    31
    32
    33
    34
    35
    36
    37
    38
    39
    40
    41
    42
    43
     wifi status
    {
    "radio0": {
    "up": true,
    "pending": false,
    "autostart": true,
    "disabled": false,
    "retry_setup_failed": false,
    "config": {
    "hwmode": "11a",
    "path": "pci0000:00/0000:00:00.0/0000:01:00.0",
    "htmode": "VHT80",
    "cell_density": 0,
    "channel": "36"
    },
    "interfaces": [
    {
    "section": "wifinet2",
    "ifname": "mesh0",
    "config": {
    "mode": "mesh",
    "mesh_id": "homemesh0",
    "mesh_fwding": true,
    "mesh_rssi_threshold": 0,
    "encryption": "sae",
    "key": "<your passwd>",
    "ifname": "mesh0",
    "mode": "mesh",
    "network": [
    "lan"
    ]
    },
    "vlans": [

    ],
    "stations": [

    ]
    },
    {
    "section": "wifinet3",
    "ifname": "wlan0-1",
    [...]

B.A.T.M.A.N网络

  • B.A.T.M.A.N
  • B.A.T.M.A.N. OpenWrt configuration
  • 关联到Batman-adv接口
    1
    2
    3
    4
    5
    6
    7
    8
    9
    10
    11
    12
    13
    14
    15
    16
    17
    18
    19
    20
    21
    22
    23
    24
    25
    26
    27
    28
    29
    30
    31
    32
    33
    34
    35
    36
    37
    38
    39
    40
    41
    42
    uci set network.bat0="interface"
    uci set network.bat0.proto="batadv"
    uci set network.bat0.routing_algo="BATMAN_IV"
    uci set network.bat0.aggregated_ogms=1
    uci set network.bat0.ap_isolation=0
    uci set network.bat0.bonding=0
    uci set network.bat0.gw_mode="off"
    uci set network.bat0.log_level=0
    uci set network.bat0.orig_interval=1000
    uci set network.bat0.bridge_loop_avoidance=1
    uci set network.bat0.distributed_arp_table=1
    uci set network.bat0.multicast_mode=1
    uci set network.bat0.network_coding=0
    uci set network.bat0.hop_penalty=30
    uci set network.bat0.isolation_mark="0x00000000/0x00000000"

    uci set network.nwi_mesh0="interface"
    uci set network.nwi_mesh0.mtu=1536
    uci set network.nwi_mesh0.proto="batadv_hardif"
    uci set network.nwi_mesh0.master="bat0"

    uci set network.bat0_hardif_eth0="interface"
    uci set network.bat0_hardif_eth0.mtu=1536
    uci set network.bat0_hardif_eth0.proto="batadv_hardif"
    uci set network.bat0_hardif_eth0.master="bat0"
    uci set network.bat0_hardif_eth0.ifname="eth0"
    uci set network.bat0_hardif_eth0.elp_interval=500
    uci set network.bat0_hardif_eth0.hop_penalty=15
    uci set network.bat0_hardif_eth0.throughput_override="1mbit"

    uci set network.bat0_lan="interface"
    uci set network.bat0_lan.proto="static"
    uci set network.bat0_lan.ipaddr="10.0.10.1"
    uci set network.bat0_lan.netmask="255.255.255.0"
    uci set network.bat0_lan.ip6assign=60

    uci set network.my_bat_vlan1="interface"
    uci set network.my_bat_vlan1.proto="batadv_vlan"
    uci set network.my_bat_vlan1.ipaddr="bat0.1"
    uci set network.my_bat_vlan1.ap_isolation=1

    uci commit network
  • 这里按照上面文档,测试了一下配置,但是没得到预期的结果,同时对它的理解,使用场景不清楚.

路由漫游

主节点路由网关

  • 配置里的NAS ID,R1 Key Holder都使用该接口的BSSID去除的6字节.

  • r0kh的配置:

    1
    2
    3
      MAC,MAC除去:号,16字节密鈅
    '22:76:93:XX:XX:XX,227693XXXXXX,465f4da81a559fbaa41ab6fba36df0fc'
    '22:76:93:XX:XX:XX,227693XXXXXX,465f4da81a559fbaa41ab6fba36df0fc'
  • r1kh的配置:

    1
    2
    3
      MAC,MAC,16字节密鈅
    '22:76:93:XX:XX:XX,22:76:93:XX:XX:XX,465f4da81a559fbaa41ab6fba36df0fc'
    '22:76:93:XX:XX:XX,22:76:93:XX:XX:XX,465f4da81a559fbaa41ab6fba36df0fc'
1
2
3
4
5
6
7
8
9
10
11
12
13
14
15
16
17
18
~# uci show wireless.wifinet2
wireless.wifinet2=wifi-iface
wireless.wifinet2.device='radio0'
wireless.wifinet2.mode='ap'
wireless.wifinet2.ssid='OpenWrt-5G'
wireless.wifinet2.encryption='sae-mixed'
wireless.wifinet2.key='<your AP key>'
wireless.wifinet2.network='lan'
wireless.wifinet2.ieee80211r='1'
wireless.wifinet2.nasid='227693XXXXXX'
wireless.wifinet2.ft_over_ds='1'
wireless.wifinet2.r1_key_holder='227693XXXXXX'
wireless.wifinet2.pmk_r1_push='1'
wireless.wifinet2.ft_psk_generate_local='0'
wireless.wifinet2.r0kh='22:76:93:XX:XX:XX,227693XXXXXX,465f4da81a559fbaa41ab6fba36df0fc' '22:76:93:XX:XX:XX,227693XXXXXX,465f4da81a559fbaa41ab6fba36df0fc'
wireless.wifinet2.mobility_domain='ab1e'
wireless.wifinet2.r1kh='22:76:93:XX:XX:XX,22:76:93:XX:XX:XX,465f4da81a559fbaa41ab6fba36df0fc' '22:76:93:XX:XX:XX,22:76:93:XX:XX:XX,465f4da81a559fbaa41ab6fba36df0fc'

扩展节点

1
2
3
4
5
6
7
8
9
10
11
12
13
14
15
16
17
18
19
~# uci show wireless.wifinet3
wireless.wifinet3=wifi-iface
wireless.wifinet3.device='radio0'
wireless.wifinet3.mode='ap'
wireless.wifinet3.encryption='sae-mixed'
wireless.wifinet3.disassoc_low_ack='0'
wireless.wifinet3.key='<your AP key>'
wireless.wifinet3.network='lan'
wireless.wifinet3.ssid='OpenWrt-5G'
wireless.wifinet3.ieee80211r='1'
wireless.wifinet3.nasid='227693XXXXXX'
wireless.wifinet3.ft_over_ds='1'
wireless.wifinet3.r1_key_holder='227693XXXXXX'
wireless.wifinet3.pmk_r1_push='1'
wireless.wifinet3.mobility_domain='ab1e'
wireless.wifinet3.ft_psk_generate_local='0'
wireless.wifinet3.ieee80211w='1'
wireless.wifinet3.r0kh='22:76:93:XX:XX:XX,227693XXXXXX,465f4da81a559fbaa41ab6fba36df0fc' '22:76:93:XX:XX:XX,227693XXXXXX,465f4da81a559fbaa41ab6fba36df0fc'
wireless.wifinet3.r1kh='22:76:93:XX:XX:XX,22:76:93:XX:XX:XX,465f4da81a559fbaa41ab6fba36df0fc' '22:76:93:XX:XX:XX,22:76:93:XX:XX:XX,465f4da81a559fbaa41ab6fba36df0fc'
  • 错误设置,会造成radioX接口无法启动
    1
    2
    3
    4
    5
    6
    7
    8
    Sun May 16 22:03:06 2021 daemon.notice hostapd: Configuration file: /var/run/hostapd-phy0.conf (phy wlan0-1) --> new PHY
    Sun May 16 22:03:06 2021 daemon.err hostapd: Invalid R0KH MAC address: '22:76:93:XX:XX:XX'
    Sun May 16 22:03:06 2021 daemon.err hostapd: Invalid R0KH MAC address: '22:76:93:XX:XX:XX'
    Sun May 16 22:03:06 2021 daemon.err hostapd: Invalid R1KH MAC address: '22:76:93:XX:XX:XX'
    Sun May 16 22:03:06 2021 daemon.err hostapd: Invalid R1KH MAC address: '22:76:93:XX:XX:XX'
    Sun May 16 22:03:06 2021 daemon.err hostapd: 4 errors found in configuration file '/var/run/hostapd-phy0.conf'
    Sun May 16 22:03:06 2021 daemon.err hostapd: Failed to set up interface with /var/run/hostapd-phy0.conf
    Sun May 16 22:03:06 2021 daemon.notice netifd: radio0 (8461): Command failed: Invalid argument

tcpdump & wireshark

1
~$ nc -l 36000 |sudo wireshark -k -i -
  • And then running the following the shell command into the openwrt device.
1
~$ tcpdump -s 0 -i <DEVICE: etc eth0,> -U -w - | nc <my desktop linux ip> 36000
  • The wireshark will receive data from pipeline.

错误

  • 更新后Web界面出现如下错误:
    1
    2
    3
    4
    5
    /usr/lib/lua/luci/dispatcher.lua:427: /etc/config/luci seems to be corrupt, unable to find section 'main'

    local function determine_request_language()
    local conf = require "luci.config"
    assert(conf.main, "/etc/config/luci seems to be corrupt, unable to find section 'main'")

总结

  • 烧写好固件,路由器的网关为192.168.1.1 , 密码:无. 另外要注的是,如果要使用 2.4G 11N 的模式,一定把Allow legacy 802.11b rates 默认勾选去掉,不然会出现能连接不能上网的问题,它位于 UCI Wireless 编辑里的 Device Configuration->Advanced Settings.或者这样说吧,把所有的 AP 里的Allow legacy 802.11b rates 勾选去掉,但是这个选项在chaos_calmer这个旧的稳定版里没有的.联想 newifi y1s 2.4G 里如果不把上面这个勾选去掉,内核会一直报错ieee80211 phy3: rt2x00queue_write_tx_frame: Error - Dropping frame due to full tx queue 2,困扰我很久的问题.

歌华路由

1
2
3
4
5
6
7
8
9
~$ cat /proc/mtd
dev: size erasesize name
mtd0: 00030000 00010000 "Bootloader"
mtd1: 00010000 00010000 "Config"
mtd2: 00010000 00010000 "Factory"
mtd3: 0016f610 00010000 "Kernel"
mtd4: 00d409f0 00010000 "RootFS"
mtd5: 00100000 00010000 "Storage"
mtd6: 00eb0000 00010000 "Firmware_Stub"
  • 上传breed-mt7621-gehua-ghl-r-001.bin到路由器里/tmp. 再使用mtd或者mtd_write进行直接烧写。
1
~$ mtd_write write -r /tmp/breed-mt7621-gehua-ghl-r-001.bin Bootloader
  • 如果出现如下面的分区表,也就是没有看到有Bootloader,需要对它进行降级(降低固件版本)。
1
2
3
4
5
6
7
8
9
10
11
12
13
~# cat /proc/mtd
dev: size erasesize name
mtd0: 00030000 00001000 "u-boot"
mtd1: 00010000 00001000 "u-boot-env"
mtd2: 00010000 00001000 "factory"
mtd3: 00fb0000 00001000 "firmware"
mtd4: 001a0583 00001000 "kernel"
mtd5: 00e0fa7d 00001000 "rootfs"
mtd6: 008c8000 00001000 "rootfs_data"


~$ mtd_write write -r /tmp/breed-mt7621-gehua-ghl-r-001.bin firmware

  • 烧写完成后会自动重启。

  • 编译含有golang相关的,需要开启代理.export GOPROXY=https://goproxy.cn,direct.否则可能编译失败或者和很慢。

  • 烧入openwrt后的网络如下。

1
2
3
4
5
6
7
8
root@OpenWrt:~# brctl show
bridge name bridge id STP enabled interfaces
br-lan 7fff.54a31b349abc no lan2
phy0-ap0
lan3
phy1-ap0
lan1

谢谢支持

[相关链接]github opencv
opencv_contrib
pyenv

安装 pyenv

  • 详细安装参照pyenv README.
1
2
3
4
5
$ git clone https://github.com/pyenv/pyenv.git ~/.pyenv
$ echo 'export PYENV_ROOT="$HOME/.pyenv"' >> ~/.bash_profile
$ echo 'export PATH="$PYENV_ROOT/bin:$PATH"' >> ~/.bash_profile
$ exec "$SHELL"
$ pyenv install 3.6.5 # 安装python 3.6.5 版本

编译 OpenCV3

  • 如果要编译extra_modules ,要与 opencv是同版本号,不然会出现奇奇怪怪的编译错误,这里都选3.4.1版本号
1
2
$ wget -c https://github.com/opencv/opencv_contrib/archive/3.4.1.tar.gz
$ tar xvf 3.4.1.tar.gz
  • 或者
1
2
3
4
5
6
7
8
9
10
11
12
13
14
15
16
17
18
19
20
21
22
23
24
25
26
27
28
29
30
31
32
33
34
35
36
37
38
39
40
41
42
43
44
45
46
47
48
49
50
51
52
53
54
55
56
57
58
59
60
61
62
63
64
65
66
67
68
69
70
71
72
73
74
75
76
77
78
79
80
81
82
83
84
85
86
87
88
89
$ git clone https://github.com/opencv/opencv
$ git checout -b 3.4.1 # checkout 一个 Release 版本.
# 或者下载源码包
$ wget -c https://github.com/opencv/opencv/archive/3.4.1.tar.gz
$ cd opencv && mkdir build && cd build
$ cmake
-D CMAKE_PREFIX_PATH=/fullpath/Qt5.7/5.7/gcc_64 # 本机 QT5 的安装位置
-D CMAKE_INSTALL_PREFIX=/fullpath/opencv-build-3.x-qt5-py3
-D WITH_QT=ON # QT 与 GTK 只能二选 一
-D WITH_V4L=ON
-D BUILD_TESTS=OFF
-D WITH_TBB=ON
-D INSTALL_C_EXAMPLES=ON
-D INSTALL_PYTHON_EXAMPLES=ON
-D WITH_OPENMP=ON
-D WITH_OPENEXR=ON
-D WITH_UNICAP=ON
-D BUILD_PYTHON_SUPPORT=ON
-D BUILD_opencv_python3=ON
-D PYTHON_DEFAULT_EXECUTABLE=$HOME/.pyenv/versions/3.6.5/bin/python3.6m
-D PYTHON_INCLUDE_DIRS=$HOME/.pyenv/versions/3.6.5/include/python3.6m
-D PYTHON_EXECUTABLE=$HOME/.pyenv/versions/3.6.5/bin/python3.6
-D PYTHON_LIBRARY=$HOME/.pyenv/versions/3.6.5/lib/libpython3.6m.so.1.0
-D WITH_OPENGL=ON ../

[...]
-- GUI:
-- QT: YES (ver 5.7.0)
-- QT OpenGL support: YES (Qt5::OpenGL 5.7.0)
-- GTK+: NO
-- OpenGL support: YES (/usr/lib/x86_64-linux-gnu/libGLU.so /usr/local/lib/libGL.so)
-- VTK support: YES (ver 6.3.0)
--
-- Media I/O:
-- ZLib: /usr/lib/x86_64-linux-gnu/libz.so (ver 1.2.8)
-- JPEG: /usr/lib/x86_64-linux-gnu/libjpeg.so (ver )
-- WEBP: /usr/lib/x86_64-linux-gnu/libwebp.so (ver encoder: 0x0209)
-- PNG: /usr/lib/x86_64-linux-gnu/libpng.so (ver 1.6.28)
-- TIFF: /usr/lib/x86_64-linux-gnu/libtiff.so (ver 42 / 4.0.8)
-- JPEG 2000: /usr/lib/x86_64-linux-gnu/libjasper.so (ver 1.900.1)
-- OpenEXR: build (ver 1.7.1)
--
-- Video I/O:
-- DC1394: NO
-- FFMPEG: YES
-- avcodec: YES (ver 57.89.100)
-- avformat: YES (ver 57.71.100)
-- avutil: YES (ver 55.58.100)
-- swscale: YES (ver 4.6.100)
-- avresample: YES (ver 3.5.0)
-- GStreamer: NO
-- UniCap: NO
-- UniCap ucil: NO
-- libv4l/libv4l2: NO
-- v4l/v4l2: linux/videodev.h linux/videodev2.h
-- gPhoto2: YES
--
-- Parallel framework: OpenMP
--
-- Trace: YES (with Intel ITT)
--
-- Other third-party libraries:
-- Intel IPP: 2017.0.3 [2017.0.3]
-- at: /fullpath/opencv-3.4.1/build-qt5-py3/3rdparty/ippicv/ippicv_lnx
-- Intel IPP IW: sources (2017.0.3)
-- at: /fullpath/opencv-3.4.1/build-qt5-py3/3rdparty/ippicv/ippiw_lnx
-- Lapack: NO
-- Eigen: YES (ver 3.3.2)
-- Custom HAL: NO
-- Protobuf: build (3.5.1)
--
-- NVIDIA CUDA: NO
--
-- OpenCL: YES (no extra features)
-- Include path: /fullpath/opencv-3.4.1/3rdparty/include/opencl/1.2
-- Link libraries: Dynamic load
--
-- Python 3:
-- Interpreter: /home/michael/.pyenv/shims/python3 (ver 3.6.5)
-- Libraries: /home/michael/.pyenv/versions/3.6.5/lib/libpython3.6m.so.1.0 (ver 3.6.5)
-- numpy: /home/michael/.pyenv/versions/3.6.5/lib/python3.6/site-packages/numpy/core/include (ver 1.14.2)
-- packages path: lib/python3.6/site-packages
--
-- Python (for build): /home/michael/.pyenv/versions/3.6.5/bin/python3.6m
[...]

$ make -j4
$ make install

ERROR

1
2
3
4
CMake Error at /home/michael/3TB-DISK/SOFT-LIBRAR/opencv_contrib/modules/datasets/CMakeLists.txt:5 (ocv_append_source_files_cxx_compiler_options):
Unknown CMake command "ocv_append_source_files_cxx_compiler_options".

-- Configuring incomplete, errors occurred!

QtCreator 创建工程测试

  • 可以创建 qmake 或者 cmake 的工程,这里以 cmake 为例.
  • CMakeLists.txt
1
2
3
4
5
6
7
8
9
10
11
12
project(cmake_opencv3)
cmake_minimum_required(VERSION 2.8)
aux_source_directory(. SRC_LIST)
add_subdirectory(utils)
add_executable(${PROJECT_NAME} ${SRC_LIST} utils/multipleimagewindow.cpp)
include_directories(/fullpath/opencv-build-3.x-qt5/include )
link_directories(/fullpath/opencv-build-3.x-qt5/lib )
find_package( OpenCV 3.4.1 HINTS /fullpath/opencv-build-3.x-qt5 )
MESSAGE("OpenCV version : ${OpenCV_VERSION} ")
MESSAGE("source list : ${SRC_LIST} ")
#add_definitions(-DDISABLE_OPENCV_24_COMPATIBILITY)
target_link_libraries(cmake_opencv3 ${OpenCV_LIBS} )
  • main.cpp
1
2
3
4
5
6
7
8
9
10
11
12
#include <opencv2/opencv.hpp>
#include <iostream>
using namespace cv;
using namespace std;
int main(int argc, char *argv[])
{
Mat img = imread("1.jpg");
namedWindow("test");
imshow("test",img);
waitKey(100);
return 1;
}

使用Python3测试OpenCV

1
2
3
4
5
6
7
8
9
10
11
12
13
14
15
16
17
18
19
20
21
22
23
24
25
26
27
28
29
30
31
32
33
34
~$ pyenv global 3.5.6
~$ git clone https://github.com/pyenv/pyenv-virtualenv ~/.pyenv/plugins/pyenv-virtualenv
source ~/.bashrc
~$ mkdir virtual_env
~$ cd virtual_env/
~/virtual_env$ pyenv virtualenv pycv3dev
Using base prefix '/home/michael/.pyenv/versions/3.6.5'
New python executable in /home/michael/.pyenv/versions/3.6.5/envs/pycv3dev/bin/python3.6
Also creating executable in /home/michael/.pyenv/versions/3.6.5/envs/pycv3dev/bin/python
Installing setuptools, pip, wheel...done.
Requirement already satisfied: setuptools in /home/michael/.pyenv/versions/3.6.5/envs/pycv3dev/lib/python3.6/site-packages
Requirement already satisfied: pip in /home/michael/.pyenv/versions/3.6.5/envs/pycv3dev/lib/python3.6/site-packages

~/virtual_env$ pyenv activate pycv3dev
pyenv-virtualenv: prompt changing will be removed from future release. configure `export PYENV_VIRTUALENV_DISABLE_PROMPT=1' to simulate the behavior.
(pycv3dev) ~/virtual_env$ pip install matplotlib jupyter
[...]

(pycv3dev) ~/virtual_env$ jupyter notebook # 使用jupyter 运行一个网页版notebook,不是必须的,也可以用ipython 运行.
[I 10:25:24.424 NotebookApp] Writing notebook server cookie secret to /run/user/1000/jupyter/notebook_cookie_secret
[I 10:25:24.753 NotebookApp] Serving notebooks from local directory: /home/michael
[I 10:25:24.753 NotebookApp] 0 active kernels
[I 10:25:24.753 NotebookApp] The Jupyter Notebook is running at:
[I 10:25:24.753 NotebookApp] http://localhost:8888/?token=7d4657c804326fc3e4bad99509cd69b55cd39b7383c26936
[I 10:25:24.753 NotebookApp] Use Control-C to stop this server and shut down all kernels (twice to skip confirmation).
[C 10:25:24.754 NotebookApp]

Copy/paste this URL into your browser when you connect for the first time,
to login with a token:
http://localhost:8888/?token=7d4657c804326fc3e4bad99509cd69b55cd39b7383c26936
[I 10:25:25.334 NotebookApp] Accepting one-time-token-authenticated connection from ::1
[23504:23541:0428/102525.341812:ERROR:browser_gpu_channel_host_factory.cc(103)] Failed to launch GPU process.
Created new window in existing browser session.

1
2
3
4
5
6
import matplotlib.pyplot as plt
import sys
sys.path.append('/fullpath/opencv-build-3.x-qt5-py3/lib/python3.6/site-packages')
import cv2
img = cv2.imread("1.jpg")
plt.imshow(img)
  • 如果没有出错,会出现一张图片.

交叉编译 QT5.15.2问题

1
2
3
4
5
6
7
8
9
10
11
12
13
14
15
16
17
18
19
20
21
22
23
24
25
26
27
28
29
30
31
32
33
34
35
36
37
38
39
40
41
42
43
44
45
46
47
48
49
50
51
52
53
54
55
56
57
58
59
60
61
62
63
64
65
66
67
68
69
70
71
72
73
74
75
76
77
78
79
80
81
82
83
84
85
86
87
88
89
90
91
92
93
94
95
96
cd ${CACHE}
if test ! -e patches; then
git clone --depth=1 https://github.com/desktop-app/patches.git
fi
if test ! -e qt_${QT}; then
git clone -b ${QT_TAG} --depth=1 https://code.qt.io/qt/qt5.git qt_${QT}
fi

cd qt_${QT}
perl init-repository --module-subset=qtbase,qtwayland,qtimageformats,qtsvg
git submodule update qtbase qtwayland qtimageformats qtsvg
cd qtbase
find ../../patches/qtbase_${QT} -type f -print0 | sort -z | xargs -r0 git apply
cd ../qtwayland
find ../../patches/qtwayland_${QT} -type f -print0 | sort -z | xargs -r0 git apply
cd ../
# https://gcc.gnu.org/onlinedocs/gcc/MIPS-Options.html
# https://docs.zecwallet.co/setting-up-build-env/
# http://codecepts.de/en/cross-compiling-qt-5-15-with-qtwebengine-for-raspberry-pi-3/
# https://rm5248.com/cross-compile-qt-for-arm/
# https://doc.qt.io/qt-5/linux-requirements.html
mkdir -pv qtbase/mkspecs/linux-mips64el-g++
cat >qtbase/mkspecs/linux-mips64el-g++/qmake.conf<<EOF
#
# qmake configuration for building with mips64el-linux-gnuabi64-g++
#

MAKEFILE_GENERATOR = UNIX
CONFIG += incremental
QMAKE_INCREMENTAL_STYLE = sublib

include(../common/linux.conf)
include(../common/gcc-base-unix.conf)
include(../common/g++-unix.conf)

# modifications to g++.conf
QMAKE_CC = mips64el-linux-gnuabi64-gcc
QMAKE_CXX = mips64el-linux-gnuabi64-g++
QMAKE_LINK = mips64el-linux-gnuabi64-g++
QMAKE_LINK_SHLIB = mips64el-linux-gnuabi64-g++

QT_QPA_DEFAULT_PLATFORM = xcb

# modifications to linux.conf
QMAKE_AR = mips64el-linux-gnuabi64-ar cqs
QMAKE_OBJCOPY = mips64el-linux-gnuabi64-objcopy
QMAKE_NM = mips64el-linux-gnuabi64-nm -P
QMAKE_STRIP = mips64el-linux-gnuabi64-strip

QMAKE_LFLAGS = -static -static-libgcc -pthread
QMAKE_LIBS_X11 = -lX11-xcb -lXi -lSM -lXau -lX11 -lXfixes -lXext -lxcb -lXau -ldl -lpthread

# QMAKE_LIBS_XCB = \$\$QMAKE_LIBS_X11

LIBS = -L/opt/crossbuild/deps/usr/local/lib \$\$QMAKE_LIBS_X11


load(qt_config)
EOF
cp qtbase/mkspecs/{linux-aarch64-gnu-g++/qplatformdefs.h,linux-mips64el-g++/qplatformdefs.h}
# rm -rf config.* .qmake.stash .config.notes && \
PKG_CONFIG_PATH="${PREFIX}/share/pkgconfig:${PREFIX}/lib/pkgconfig" \
LDFLAGS="-L${PREFIX}/lib -L/usr/mips64el-linux-gnuabi64/lib" \
LD_LIBRARY_PATH="${PREFIX}/lib:/usr/mips64el-linux-gnuabi64/lib" \
./configure -prefix ${PREFIX}/qt5 \
-release \
-opensource \
-confirm-license \
-xplatform linux-mips64el-g++ \
-device-option CROSS_COMPILE=${HOST} \
-nomake tests \
-xkbcommon \
-xcb \
-xcb-xlib \
-static \
-qt-libpng \
-qt-libjpeg \
-qt-harfbuzz \
-qt-pcre \
-qt-zlib \
-qt-freetype \
-no-icu \
-no-gtk \
-no-feature-xcb-sm \
-no-feature-wayland-server \
-dbus-runtime \
-no-opengl \
-I "${PREFIX}/include" \
-I "/usr/mips64el-linux-gnuabi64/include" \
-L "${PREFIX}/lib" \
-L "/usr/mips64el-linux-gnuabi64/lib" \
-openssl-linked \
OPENSSL_LIBS="${PREFIX}/lib/libssl.a ${PREFIX}/lib/libcrypto.a ${PREFIX}/lib/libz.a -ldl -lpthread" \
-plugin-sql-sqlite \
-nomake examples && \
make -j$(nproc) && make install
  • 因为这里是为mips架构静态交叉编译的,而且还需要支持XCB,所以先要把XCB的依赖如:libXau,libX11,libxcb… 先编译完成.
    使用./configure -xcb的方式可能是不能测试过的, 在Qt5.15之前是有一个-qt-xcb选项的,它是为了减少对系统的xcb
    的依赖,后来因为有BUG在该版本后就删除了.错误如下:
1
2
3
4
5
6
7
8
9
10
11
WARNING: Feature xcb-sm is insignificant in this configuration, ignoring related command line option(s).

ERROR: Feature 'xcb' was enabled, but the pre-condition 'features.thread && libs.xcb && tests.xcb_syslibs && features.xkbcommon-x11' failed.

ERROR: Feature 'xcb-xlib' was enabled, but the pre-condition 'features.xlib && libs.xcb_xlib' failed.

Check config.log for details.

# 查看`config.log`,大多数会显示undefined reference
> /usr/lib/gcc-cross/mips64el-linux-gnuabi64/8/../../../../mips64el-linux-gnuabi64/bin/ld: xcb_auth.c:(.text+0xa4c): undefined reference to `XauDisposeAuth'

  • 一. 处理上面的错误,首先是要排查它链接的库中是会真的没有这个函数的要定义,还有链接库的顺先也会出现这种问题,处理这种问题的步骤如下:

    1. 查看库文件是会存在,能被链到.
    2. 查看库文件是否有对应的函数定义.
    3. 调整链接库的顺序,尝试链接.
  • 二. Qt5的configure后会生成config.cache,config.opt,config.tests/目录与文件,先要确定config.log内的测试错误,是可以通过手动编译链接
    成功的.因为我没有找出configure时如何生成config.tests/目录的来源,这里只能通过非正常途径来处理这个问题.第一次configure时会生成上述
    文件与目录,如果删了config.cache就会重新生成config.tests/,否则下一次的configure会根据config.cache的内容来更新.且因为我这里手
    动验证了xcb,xcb_xlib...等库是可以静态编译链接成功的.所以,这里只需要在config.cache里有如下标志:

    1
    2
    3
    4
    5
    6
    7
    8
    9
    10
    11
    12
    13
    14
    15
    16
    17
    grep "cache.xcb.*.result =" volumes/cache/qt_5_15_2/config.cache
    cache.xcb.result = true
    cache.xcb_icccm.result = true
    cache.xcb_util.result = true
    cache.xcb_shm.result = true
    cache.xcb_image.result = true
    cache.xcb_keysyms.result = true
    cache.xcb_randr.result = true
    cache.xcb_render.result = true
    cache.xcb_renderutil.result = true
    cache.xcb_shape.result = true
    cache.xcb_sync.result = true
    cache.xcb_xfixes.result = true
    cache.xcb_xinerama.result = true
    cache.xcb_xkb.result = true
    cache.xcb_syslibs.result = true
    cache.xcb_xlib.result = true


    * 再运行一次configure就可以正常配置完成了.

在Debian下交叉编译Qt_5.15.2-mips64el

  • 安装交叉编译工具链
1
2
3
4
5
6
7
8
9
10
11
12
13
14
15
16
17
18
19
20
21
22
23
24
25
26
27
28
29
30
31
32
33

~$ apt-get install -y cpp-8-mips64el-linux-gnuabi64 \
g++-8-mips64el-linux-gnuabi64 \
g++-8-multilib-mips64el-linux-gnuabi64 \
gcc-8-mips64el-linux-gnuabi64 \
gcc-8-mips64el-linux-gnuabi64-base:amd64 \
gcc-8-multilib-mips64el-linux-gnuabi64 \
lib32atomic1-mips64el-cross \
lib32gcc-8-dev-mips64el-cross \
lib32gcc1-mips64el-cross \
lib32gomp1-mips64el-cross \
lib32stdc++-8-dev-mips64el-cross \
lib32stdc++6-mips64el-cross \
libatomic1-mips64el-cross \
libc6-dev-mips32-mips64el-cross \
libc6-dev-mips64el-cross \
libc6-dev-mipsn32-mips64el-cross \
libc6-mips32-mips64el-cross \
libc6-mips64el-cross \
libc6-mipsn32-mips64el-cross \
libgcc-8-dev-mips64el-cross \
libgcc1-mips64el-cross \
libgomp1-mips64el-cross \
libn32atomic1-mips64el-cross \
libn32gcc-8-dev-mips64el-cross \
libn32gcc1-mips64el-cross \
libn32gomp1-mips64el-cross \
libn32stdc++-8-dev-mips64el-cross \
libn32stdc++6-mips64el-cross \
libstdc++-8-dev-mips64el-cross \
libstdc++6-mips64el-cross \
linux-libc-dev-mips64el-cross

  • 使用Multiarch来安装一些依赖的其它库,可以结省大量编译的时间.
1
2
3
4
5
6
7
8
9
10
11
12
13
14
15
16
17
18
19
20
21
22
23

~$ sudo dpkg --add-architecture mips64el

~$ sudo apt-get update -y

~$ apt-get install -y libegl1:mips64el libxkbcommon0:mips64el \
libxkbcommon-x11-0:mips64el \
libegl1-mesa-dev:mips64el \
libssl1.1:mips64el \
zlib1g-dev:mips64el \
libxcb1-dev:mips64el \
libxcb-glx0-dev:mips64el \
libx11-xcb1:mips64el \
libxcb-dri3-dev:mips64el \
libssl-dev:mips64el \
libdrm-dev:mips64el

~$ ls /usr/lib/mips64el-linux-gnuabi64/
~$ ls /usr/mips64el-linux-gnuabi64/
~$ ls /lib/mips64el-linux-gnuabi64
~$ ls /usr/mips64el-linux-gnuabi64/include

~$ ls /usr/lib/mips64el-linux-gnuabi64/pkgconfig/
  • Qt 动态编译
    1
    2
    3
    4
    5
    6
    7
    8
    9
    10
    11
    12
    13
    14
    15
    16
    17
    18
    19
    20
    21
    22
    23
    24
    25
    26
    27
    28
    29
    30
    31
    32
    33
    34
    35
    36
    37
    38
    39
    40
    41
    42
    43
    44

    export HOST='mips64el-linux-gnuabi64'
    export CC=${HOST}-gcc
    export CXX=${HOST}-g++
    export AR=${HOST}-ar
    export LD=${HOST}-ld
    export RANLIB=${HOST}-ranlib
    export STRIP=${HOST}-strip
    export PREFIX=${SYSROOT}/usr/local
    export QT="5_15_2"
    export QT_TAG="v5.15.2"
    export PREFIX="/usr/mips64el-linux-gnuabi64/qt5"

    PKG_CONFIG_LIBDIR="/usr/lib/mips64el-linux-gnuabi64/pkgconfig" \
    ./configure -prefix ${PREFIX} \
    -release \
    -opensource \
    -confirm-license \
    -xplatform linux-mips64el-g++ \
    -device-option CROSS_COMPILE=${HOST} \
    -nomake tests \
    -xkbcommon \
    -opengl es2 \
    -egl \
    -xcb \
    -xcb-xlib \
    -qt-libpng \
    -qt-libjpeg \
    -qt-harfbuzz \
    -qt-pcre \
    -qt-zlib \
    -qt-freetype \
    -no-icu \
    -no-gtk \
    -no-feature-xcb-sm \
    -no-feature-wayland-server \
    -dbus-runtime \
    -openssl-linked \
    -L "/usr/lib/mips64el-linux-gnuabi64" \
    OPENSSL_LIBS="-lssl -lcrypto -lz -ldl -lpthread" \
    -plugin-sql-sqlite \
    -nomake examples


1
OPENSSL_LIBS="/usr/lib/mips64el-linux-gnuabi64/libssl.a /usr/lib/mips64el-linux-gnuabi64/libcrypto.a /usr/lib/mips64el-linux-gnuabi64/libz.a -ldl -lpthread" \

谢谢支持

#Windows下 Perl 运行环境

Perl脚本语言在windows下有三个实现可以用,一般网上会建议安装ActivePerl的免费社区版本,我在winxp下安装不成功选了另一个DWIN Perl,还有一个StrawberryPerl没有试过.

  • 默认安装在C:\Dwimperl,完成之后把它添加到环境变量,或者运行它自带的脚本C:\Dwimperl\update_env.pl.bat.

Cygwin,MinGW,MSYS

-windows下一些GNU工具套装介绍,摘自网络.

  1. MinGWwindows版本的gcc集合,不需要依赖中间层.
  2. MSYS 是小型的linux的环境的模拟,可以与MinGW结合来模拟linux环境下使用MinGWgcc,但是好久都不更新了,现在网有一个MSYS2,但是这两个环境在winxp下安装不成功,之前是可以安装msys.可以进入这里:谁在使用msys2
  3. Cygwin是功能强大的linux环境,由于有cygwin1.dll实现了底层的windows apilinux api的转化.所以在Cygwin里开发就相当于在linux上开发,对于开发人员来说就相当于调用linux类型的api,所以这样开发的程序也可以直接移植到linux上.但是如果这样的程序要在windows上执行的话,运行时必须要cygwin1.dll支持.

安装Qt MinGW版本的 IDE

  • 本人还是喜欢使用Qt来现在界面程,惟一缺点就是生成静态库的执行程序有比较大,Qtwin下面有两个版本,GCC,MSVC.我下面要做的编译基础库都是基于QT安装自带的MinGW GCC,这样在QT中再调用这些库就不会出现一些奇奇怪怪的问题了.

Zlib

##MinGW编译

  • 下截zlib最新版本,解压到出来.打开一个命令行窗口,执行Qt MinGW环境脚本C:\WINDOWS\system32\cmd.exe /A /Q /K C:\Qt\Qt5.7.1\5.7\mingw53_32\bin\qtenv2.bat,一般装完Qt会有指向这个脚本的快捷方式,点击运行即可.
1
2
3
4
5
6
7
8
9
10
11
12

D:\zlib-1.2.11\zlib-1.2.11>mingw32-make -f win32/Makefile.gcc
gcc -O3 -Wall -c -o adler32.o adler32.c
gcc -O3 -Wall -c -o compress.o compress.c
gcc -O3 -Wall -c -o crc32.o crc32.c

...

strip example_d.exe
gcc -o minigzip_d.exe minigzip.o libz.dll.a
strip minigzip_d.exe

按上面编译成功后,会当前目录下生成zlib1.dll,libz.dll.a ,libz等库文件,把这些库文件与头文件复到一个目录,包含并链接它们就可以了.

MSVC编译

x86 32bit

1
2
3
4
5
6
7
8
9
10
11
12
13
14
15
16
17
18
19
20
21
22

D:\SourceBuild\zlib-1.2.11>vcvarsall.bat
Setting environment for using Microsoft Visual Studio 2010 x86 tools.
D:\SourceBuild\zlib-1.2.11>nmake /f win32/Makefile.msc

Microsoft (R) 程序维护实用工具 10.00.30319.01 版
版权所有(C) Microsoft Corporation.保留所有权利.

cl -c -D_CRT_SECURE_NO_DEPRECATE -D_CRT_NONSTDC_NO_DEPRECATE -nologo -MD
-W3 -O2 -Oy- -Zi -Fd"zlib" .\adler32.c
adler32.c
cl -c -D_CRT_SECURE_NO_DEPRECATE -D_CRT_NONSTDC_NO_DEPRECATE -nologo -MD
-W3 -O2 -Oy- -Zi -Fd"zlib" .\compress.c
compress.c

...

fest -outputresource:example_d.exe;1
link -nologo -debug -incremental:no -opt:ref -out:minigzip_d.exe minigzi
p.obj zdll.lib
if exist minigzip_d.exe.manifest mt -nologo -manifest minigzip_d.exe.ma
nifest -outputresource:minigzip_d.exe;1

编译完成后会生成zlib.lib,zlib1.dll等一些文件.

x86_amd64

1
2
3
4
5
6
7
8
9
10
11
12
13
14
15
16
17
18
19
20
21
22
23
D:\SourceBuild\zlib-1.2.11>vcvarsx86_amd64.bat
Setting environment for using Microsoft Visual Studio 2010 x64 cross tools.


D:\SourceBuild\zlib-1.2.11>nmake /f win32/Makefile.msc

Microsoft (R) 程序维护实用工具 10.00.30319.01 版
版权所有(C) Microsoft Corporation.保留所有权利.

cl -c -D_CRT_SECURE_NO_DEPRECATE -D_CRT_NONSTDC_NO_DEPRECATE -nologo -MD
-W3 -O2 -Oy- -Zi -Fd"zlib" .\adler32.c
adler32.c
cl -c -D_CRT_SECURE_NO_DEPRECATE -D_CRT_NONSTDC_NO_DEPRECATE -nologo -MD
-W3 -O2 -Oy- -Zi -Fd"zlib" .\compress.c
compress.c

...

fest -outputresource:example_d.exe;1
link -nologo -debug -incremental:no -opt:ref -out:minigzip_d.exe minigzi
p.obj zdll.lib
if exist minigzip_d.exe.manifest mt -nologo -manifest minigzip_d.exe.ma
nifest -outputresource:minigzip_d.exe;1

OpenSSL

  • 下载openssl-1.1.0e,解压出来,仔细阅读里面NOTES.WIN,INSTALL这两个文本文档,里面有详细的编译安装说明.里面调用nmakenative 编译的,要确保机器安装了Visual Stduio开发环境,winxp最高只能安装vs2010.这里没有找到使用MinGW编译的方法只能使用nmake来编译,开发启zlib支持就只能使用zlibMSVC的编译版本.
  • 编译前先初始化MSVC的环境变量,有分x86x86_amd64,确保C:\Program Files\Microsoft Visual Studio 10.0\VC加入用户的PATH变量里面.打开一个新命令行窗口执行:
1
2
3
4
5
6
7
8
9
10
11
12
13
14
15
16
17
18
19
20
21
22
23
24
25
26
27
28
29
30
31
32
33
34
35
36
37
D:\SourceBuild\openssl-1.1.0e>vcvarsall.bat
Setting environment for using Microsoft Visual Studio 2010 x86 tools.

D:\SourceBuild\openssl-1.1.0e> perl Configure VC-WIN32
Configuring OpenSSL version 1.1.0e (0x1010005fL)
no-asan [default] OPENSSL_NO_ASAN
no-crypto-mdebug [default] OPENSSL_NO_CRYPTO_MDEBUG
no-crypto-mdebug-backtrace [default] OPENSSL_NO_CRYPTO_MDEBUG_BACKTRACE
no-ec_nistp_64_gcc_128 [default] OPENSSL_NO_EC_NISTP_64_GCC_128
no-egd [default] OPENSSL_NO_EGD
no-fuzz-afl [default] OPENSSL_NO_FUZZ_AFL
no-fuzz-libfuzzer [default] OPENSSL_NO_FUZZ_LIBFUZZER
no-heartbeats [default] OPENSSL_NO_HEARTBEATS
no-md2 [default] OPENSSL_NO_MD2 (skip dir)
no-msan [default] OPENSSL_NO_MSAN
no-rc5 [default] OPENSSL_NO_RC5 (skip dir)
no-sctp [default] OPENSSL_NO_SCTP
no-ssl-trace [default] OPENSSL_NO_SSL_TRACE
no-ssl3 [default] OPENSSL_NO_SSL3
no-ssl3-method [default] OPENSSL_NO_SSL3_METHOD
no-ubsan [default] OPENSSL_NO_UBSAN
no-unit-test [default] OPENSSL_NO_UNIT_TEST
no-weak-ssl-ciphers [default] OPENSSL_NO_WEAK_SSL_CIPHERS
no-zlib [default]
no-zlib-dynamic [default]
Configuring for VC-WIN32
CC =cl
CFLAG =-W3 -wd4090 -Gs0 -GF -Gy -nologo -DOPENSSL_SYS_WIN32 -DWIN32_LEAN
_AND_MEAN -DL_ENDIAN -D_CRT_SECURE_NO_DEPRECATE -DUNICODE -D_UNICODE /MD /O2
[...]

D:\SourceBuild\openssl-1.1.0e>nmake
[...]

D:\SourceBuild\openssl-1.1.0e>nmake test
[...]

C-ares

  • 下载C-ares-1.12,查看了它自带README,通过命令行使用nmake安装不成功,通过它的vc目录下的VC工程,要用vs2010IDE打开就可以编译在成功.生成了cares.lib,cares.dll.

Curl

  • 下载curl-7.53.1,解压出来,仔细阅读它的文档.winbuild/BUILD.WINDOWS.txt文档详细说明了如何编译安装.

  • 根据文档指示,如果依赖一些其它库要在它的同级目录新建如下结构的目录结构

    1
    2
    3
    4
    5
    6
    7
    8
    9
    10
    11
    If you wish to support zlib, openssl, c-ares, ssh2, you will have to download
    them separately and copy them to the deps directory as shown below:

    somedirectory
    |_curl-src
    | |_winbuild
    |
    |_deps
    |_ lib
    |_ include
    |_ bin
  • 目录结构如下

1
2
3
4
5
6
7
8
9
10
11
12
13
14
15
16
17
18
19
20
21
22
23
24
25
26
27
28
29
30
31
32
33
34
35
36
37
38
39
40
41
42
43
44
45
46
47
48
49
50
51
52
53
54
55
56
57
D:\SourceBuild\deps>tree /?
以图形显示驱动器或路径的文件夹结构.

TREE [drive:][path] [/F] [/A]

/F 显示每个文件夹中文件的名称.
/A 使用 ASCII 字符,而不使用扩展字符.


D:\SourceBuild\deps>tree /F
卷 新加卷 的文件夹 PATH 列表
卷序列号码为 0006EE44 E462:E6DB
D:.
├─include
│ │ ares.h
│ │ ares_build.h
│ │ ares_rules.h
│ │ ares_version.h
│ │ zconf.h
│ │ zlib.h
│ │
│ ├─internal
│ │ bio.h
│ │ comp.h
│ │ conf.h
│ │ constant_time_locl.h
│ │ dane.h
│ │ dso.h
│ │ err.h
│ │ numbers.h
│ │ o_dir.h
│ │ o_str.h
│ │ thread_once.h
│ │
│ └─openssl
│ aes.h
│ asn1.h
│ asn1t.h
│ asn1_mac.h
│ async.h
│ [...]
│ x509v3.h
│ x509_vfy.h
│ __DECC_INCLUDE_EPILOGUE.H
│ __DECC_INCLUDE_PROLOGUE.H

└─lib
cares.dll
cares.lib
libcrypto-1_1.dll
libcrypto.lib
libssl-1_1.dll
libssl.lib
zdll.lib
zlib.h
zlib.lib
zlib1.dll
  • 因为这个版本的CURL依赖openssl时,会连接libeay32.lib,ssleay32.lib.这里要在脚本文件\winbuild\MakefileBuild.vc里把它改成libssl.lib,libcrypto.lib.
1
2
3
D:\SourceBuild\curl-7.53.1\winbuild>nmake /f Makefile.vc mode=dll vc=10 with_ssl
=dll with_cares=dll with_zlib=dll machine=x86

  • 如果不出错就会产生几个新的文件夹如下:
1
2
3
4
5
6
7
8
9
10
11
12
13
D:\SourceBuild\curl-7.53.1\builds>tree
卷 新加卷 的文件夹 PATH 列表
卷序列号码为 0006EE44 E462:E6DB
D:.
├─libcurl-vc10-x86-release-dll-ssl-dll-cares-dll-zlib-dll-ipv6-sspi
│ ├─bin
│ ├─include
│ │ └─curl
│ └─lib
├─libcurl-vc10-x86-release-dll-ssl-dll-cares-dll-zlib-dll-ipv6-sspi-obj-curl
└─libcurl-vc10-x86-release-dll-ssl-dll-cares-dll-zlib-dll-ipv6-sspi-obj-lib
├─vauth
└─vtls

###MinGW下编译CURL

1
2
3
4
D:\SourceBuild\curl-7.53.1>mkdir mingwbuild
D:\SourceBuild\curl-7.53.1>cd mingwbuild
D:\SourceBuild\curl-7.53.1\mingwbuild>cmake -G "MinGW Makefiles" ../
D:\SourceBuild\curl-7.53.1\mingwbuild>mingw32-make
  • 会在当前目录下生成库文件与一些测试程序.

#MXE环境下交叉编译一些库

1
2
3
4
5
6
7
8
9
10
$cd mxe
mxe$ make MXE_TARGETS="i686-w64-mingw32.shared" curl libwebsockets

$ cd ~/mxe/download_src/c-ares-1.12.0/build$
$ export CROSS_COMPILER=i686-w64-mingw32.shared-
$ ../configure --prefix=/path/mxe/usr/i686-w64-mingw32.shared --host=i686-w64-mingw32
$ make && make install
$ ls /path/mxe/usr/i686-w64-mingw32.shared/lib/libcares.*
/path/mxe/usr/i686-w64-mingw32.shared/lib/libcares.dll.a /path/mxe/usr/i686-w64-mingw32.shared/lib/libcares.la

mosquitto

  • 下载Mosquitto-1.4.11,解压出来,看了一下它的readme-windows.txtwinxp下编译安装不成功,不管是MSVC还是MinGW.我根据错误提示做了一些源代码的修改,使用Qt MinGW还有MXE环境下编译成功了.修改如下:
1
2
3
4
5
6
7
8
9
10
11
12
13
14
15
16
17
18
19
20
21
22
23
24
25
26
27
28
29
30
31
32
33
34
35
36
37
38
39
40
41
42
43
44
45
46
47
48
49
50
51
52
53
54
55
56
57
58
59
60
61
62
63
64
65
66
67
68
69
70
71
72
73
74
75
76
77
78
79
80
81
82
83
84
85
86
87
88
89
90
91
92
93
94
95
96
97
98
99
100
101
102
103
104
105
106
107
108
109
110
111
112
113
114
115
116
117
118
119
120
121
122
123
124
125
126
127
128
129
130
131
132
133
134
135
136
137
138
139
140
141
142
143
144
145
146
147
148
149
150
151
152
153
154
155
156
157
158
159
160
161
162
163
164
165
166
167
168
169
170
171
172
$ diff -r mosquitto-1.4.11 mosquitto-1.4.11-lcy-changed
Only in mosquitto-1.4.11-lcy-changed: build
diff -r mosquitto-1.4.11/config.mk mosquitto-1.4.11-lcy-changed/config.mk
68c68
< WITH_WEBSOCKETS:=no
---
> WITH_WEBSOCKETS:=yes
diff -r mosquitto-1.4.11/lib/CMakeLists.txt mosquitto-1.4.11-lcy-changed/lib/CMakeLists.txt
7,8c7,12
< set (PTHREAD_LIBRARIES C:\\pthreads\\Pre-built.2\\lib\\x86\\pthreadVC2.lib)
< set (PTHREAD_INCLUDE_DIR C:\\pthreads\\Pre-built.2\\include)
---
> if (MINGW)
> set (PTHREAD_LIBRARIES -lpthread)
> else ( MINGW)
> set (PTHREAD_LIBRARIES C:\\pthreads\\Pre-built.2\\lib\\x86\\pthreadVC2.lib)
> set (PTHREAD_INCLUDE_DIR C:\\pthreads\\Pre-built.2\\include)
> endif (MINGW)
diff -r mosquitto-1.4.11/lib/mosquitto_internal.h mosquitto-1.4.11-lcy-changed/lib/mosquitto_internal.h
20a21
> #include <stdint.h>
diff -r mosquitto-1.4.11/lib/net_mosq.c mosquitto-1.4.11-lcy-changed/lib/net_mosq.c
29a30
> #define AI_ADDRCONFIG 0x400
diff -r mosquitto-1.4.11/lib/time_mosq.c mosquitto-1.4.11-lcy-changed/lib/time_mosq.c
45,47c45,48
< if(vi.dwMajorVersion > 5){
< tick64 = true;
< }
---
> if(vi.dwMajorVersion > 5 )
> {
> tick64 = true;
> }
56c57
< return GetTickCount64()/1000;
---
> return GetTickCount()/1000;
diff -r mosquitto-1.4.11/lib/tls_mosq.c mosquitto-1.4.11-lcy-changed/lib/tls_mosq.c
21a22
> # include <windows.h>
118,119c119,128
< ipv6_ok = InetPton(AF_INET6, hostname, &ipv6_addr);
< ipv4_ok = InetPton(AF_INET, hostname, &ipv4_addr);
---
> typedef INT (WSAAPI *ptrInetPton)( INT Family, PCTSTR pszAddrString, PVOID pAddrBuf);
> HMODULE h = LoadLibrary(L"ws2_32.dll");
> ptrInetPton func = (ptrInetPton)GetProcAddress(h,"InetPtonW");
>
> ipv6_ok = func(AF_INET6, hostname, &ipv6_addr);
> ipv4_ok = func(AF_INET, hostname, &ipv4_addr);
> FreeLibrary(h); h = NULL;
>
> //ipv6_ok = InetPton(AF_INET6, hostname, &ipv6_addr);
> //ipv4_ok = InetPton(AF_INET, hostname, &ipv4_addr);
diff -r mosquitto-1.4.11/src/conf.c mosquitto-1.4.11-lcy-changed/src/conf.c
33a34
> #define AI_ADDRCONFIG 0x400
diff -r mosquitto-1.4.11/src/loop.c mosquitto-1.4.11-lcy-changed/src/loop.c
27a28,107
> #include <windows.h>
> #if (_WIN32_WINNT < 0x0600)
>
> #define POLLIN 0x0001
> #define POLLPRI 0x0002
> #define POLLOUT 0x0004
> #define POLLERR 0x0008
> #define POLLHUP 0x0010
> #define POLLNVAL 0x0020
>
> #ifdef FD_SETSIZE
> #undef FD_SETSIZE
> #endif
>
> #define FD_SETSIZE 1000
>
> struct pollfd {
> SOCKET fd;
> short events;
> short revents;
> };
>
>
> int mingw_poll(struct pollfd *fds, unsigned int nfds, int timo)
> {
> struct timeval timeout, *toptr;
> fd_set ifds, ofds, efds, *ip, *op;
> int i, rc;
>
> /* Set up the file-descriptor sets in ifds, ofds and efds. */
> FD_ZERO(&ifds);
> FD_ZERO(&ofds);
> FD_ZERO(&efds);
> for (i = 0, op = ip = 0; i < nfds; ++i) {
> fds[i].revents = 0;
> if(fds[i].events & (POLLIN|POLLPRI)) {
> ip = &ifds;
> FD_SET(fds[i].fd, ip);
> }
> if(fds[i].events & POLLOUT) {
> op = &ofds;
> FD_SET(fds[i].fd, op);
> }
> FD_SET(fds[i].fd, &efds);
> }
>
> /* Set up the timeval structure for the timeout parameter */
> if(timo < 0) {
> toptr = 0;
> } else {
> toptr = &timeout;
> timeout.tv_sec = timo / 1000;
> timeout.tv_usec = (timo - timeout.tv_sec * 1000) * 1000;
> }
>
> //kWarning()<<QString("Entering select() sec=%1 usec=%2 ip=%3 op=%4").arg(timeout.tv_sec).arg(timeout.tv_usec).arg((long)ip).arg((long)op);
>
> rc = select(0, ip, op, &efds, toptr);
>
> //kWarning()<<"Exiting select rc="<<rc;
>
> if(rc <= 0)
> return rc;
>
> if(rc > 0) {
> for (i = 0; i < nfds; ++i) {
> int fd = fds[i].fd;
> if(fds[i].events & (POLLIN|POLLPRI) && FD_ISSET(fd, &ifds))
> fds[i].revents |= POLLIN;
> if(fds[i].events & POLLOUT && FD_ISSET(fd, &ofds))
> fds[i].revents |= POLLOUT;
> if(FD_ISSET(fd, &efds))
> /* Some error was detected ... should be some way to know. */
> fds[i].revents |= POLLHUP;
> //kWarning()<<QString("%1 %2 %3 revent = %4").arg(FD_ISSET(fd, &ifds)).arg(FD_ISSET(fd, &ofds)).arg(FD_ISSET(fd, &efds)).arg(fds[i].revents);
> }
> }
> return rc;
> }
> #endif
354c434,435
< fdcount = WSAPoll(pollfds, pollfd_index, 100);
---
> //fdcount = WSAPoll(pollfds, pollfd_index, 100);
> fdcount = mingw_poll(pollfds, pollfd_index, 100);
diff -r mosquitto-1.4.11/src/net.c mosquitto-1.4.11-lcy-changed/src/net.c
26a27
> #include <windows.h>
516a518,523
> #ifdef WIN32
>
> typedef PCTSTR (WSAAPI *ptrInetNtop)( INT Family, PVOID pAddr, PTSTR pStringBuf, size_t StringBufSize);
> HMODULE h = LoadLibrary(L"ws2_32.dll");
> ptrInetNtop func = (ptrInetNtop)GetProcAddress(h,"InetNtop");
> #endif
520a528,531
> #ifdef WIN32
> if(func(AF_INET, &((struct sockaddr_in *)&addr)->sin_addr.s_addr, buf, len)){
> return 0;
> #else
522a534
> #endif
524a537,540
> #ifdef WIN32
> if(func(AF_INET6, &((struct sockaddr_in6 *)&addr)->sin6_addr.s6_addr, buf, len)){
> return 0;
> #else
526a543
> #endif
529a547,549
> #ifdef WIN32
> FreeLibrary(h);
  • MXE编译参数如下,要先安装OPENSSL
1
cmake -DCMAKE_SHARED_LIBRARY_LINK_C_FLAGS="" -DCMAKE_SHARED_LIBRARY_LINK_CXX_FLAGS="" -DWIN32=ON -DMINGW=ON -DCMAKE_SYSTEM_NAME=Windows -DCMAKE_C_COMPILER=i686-w64-mingw32.shared-gcc  -DOPENSSL_ROOT_DIR=/path/usr/i686-w64-mingw32.shared ..
  • Qt MinGW编译
1
2
3
4
5
6
7
8
9
10
11
12
13
14
15
16
17
18
19
20
21
22
23
24
25
26
27
28
29
30
31
32
33
34
35
36

D:\SourceBuild\mosquitto-1.4.11-lcy-changed> mkdir build
D:\SourceBuild\mosquitto-1.4.11-lcy-changed> cd build
D:\SourceBuild\mosquitto-1.4.11-lcy-changed\build>cmake -G "MinGW Makefiles" ..
-- The C compiler identification is GNU 5.3.0
-- The CXX compiler identification is GNU 5.3.0
-- Check for working C compiler: C:/Qt/Qt5.7.1/Tools/mingw530_32/bin/gcc.exe
-- Check for working C compiler: C:/Qt/Qt5.7.1/Tools/mingw530_32/bin/gcc.exe --
works
-- Detecting C compiler ABI info
-- Detecting C compiler ABI info - done
-- Detecting C compile features
-- Detecting C compile features - done
-- Check for working CXX compiler: C:/Qt/Qt5.7.1/Tools/mingw530_32/bin/g++.exe
-- Check for working CXX compiler: C:/Qt/Qt5.7.1/Tools/mingw530_32/bin/g++.exe -
- works
-- Detecting CXX compiler ABI info
-- Detecting CXX compiler ABI info - done
-- Detecting CXX compile features
-- Detecting CXX compile features - done
-- Found OpenSSL: C:/Dwimperl/c/lib/libssleay32.a (found version "1.0.0d")
CMake Warning at lib/CMakeLists.txt:73 (message):
c-ares library not found.


-- Looking for getaddrinfo_a in anl
-- Looking for getaddrinfo_a in anl - not found
-- Configuring done
-- Generating done
-- Build files have been written to: D:/SourceBuild/mosquitto-1.4.11-lcy-changed
/build

D:\SourceBuild\mosquitto-1.4.11-lcy-changed\build> mingw32-make

[...]

MinGW编译rabbitmq-c

  • rabbitmq-cRabbitMQ的一个C语言客户实现,它的代码可以通过使用MinGW交叉编译到Windows上使用.
1
2
3
4
5
~$ git clone https://github.com/alanxz/rabbitmq-c
~$ cd rabbitmq-c && mkdir build
~$ cd build
~$ cmake -DWIN32=ON -DMINGW=ON -DCMAKE_SYSTEM_NAME=Windows -DCMAKE_C_COMPILER=x86_64-w64-mingw32.static-gcc -DOPENSSL_ROOT_DIR=/fullpath/usr/x86_64-w64-mingw32.static ..

错误处理

  • 如果出现下面错误,需要在CMakeLists.txt加下面的参数.

CMAKE出错

1
2
3
4
-- Check if compiler accepts -pthread
CMake Error: TRY_RUN() invoked in cross-compiling mode, please set the following cache variables appropriately:
THREADS_PTHREAD_ARG (advanced)

  • 加入下面三行到 CMakeLists.txt
1
2
3
SET( THREADS_PTHREAD_ARG
"PLEASE_FILL_OUT-FAILED_TO_RUN"
CACHE STRING "Result from TRY_RUN" FORCE)

编译tests出错

1
2
3
4
5
6
rabbitmq-c/tests/test_basic.c:34:22: fatal error: WinSock2.h: No such file or directory
compilation terminated.
tests/CMakeFiles/test_basic.dir/build.make:63: recipe for target 'tests/CMakeFiles/test_basic.dir/test_basic.c.obj' failed
make[2]: *** [tests/CMakeFiles/test_basic.dir/test_basic.c.obj] Error 1
CMakeFiles/Makefile2:406: recipe for target 'tests/CMakeFiles/test_basic.dir/all' failed
make[1]: *** [tests/CMakeFiles/test_basic.dir/all] Error 2
  • 1, 可以在CMAKE时不编译tests.
  • 2, 把WinSock2.h改成winsock2.h试试.

总结

  • 上面提到这些库都是可以通过MSVC或者MinGW可以编译出来,一整套的编译环境加上一大堆的依赖库,还要应对一些编译器带来的错误,一般是不会像上面这样一个一个的去编译,更好的方法是使用MXE去编译上面这些库,但是依赖的动态库文件会比较多.

谢谢支持

WinDDK

  • 初始化 DDK
1
2
3
4
5

C:\WinDDK\7600.16385.1\

C:\WinDDK\7600.16385.1\bin>setenv.bat C:\WinDDK\7600.16385.1 fre WXP
OACR monitor running already
  • WinDDK包自带了很多开发示例代码,可以直接编译,经过上一步设置了环境变量,如果在根目录下直接运行build,或者bcz就会把所有的示例全部编译出来.如下面只编译一个示例如下:
1
2
3
4
5
6
7
8
9
10
11
12
13
14
15
16
17
18
19
20
21
22
23
24
25
26
27
28
29
30
31
32
33
34
35
36
37

C:\WinDDK\7600.16385.1\src\print\monitors\localui>bcz
BUILD: Compile and Link for x86
BUILD: Start time: Thu Apr 06 13:02:47 2017
BUILD: Examining c:\winddk\7600.16385.1\src\print\monitors\localui directory for
files to compile.
c:\winddk\7600.16385.1\src\print\monitors\localui Auto-cleaning queue for 'W
DKSamples:x86fre' (5 of 5 file(s) removed)
Invalidating OACR warning log for 'WDKSamples:x86fre'
BUILD: rmdir /q/s .obj\src\print\monitors\localui
BUILD: Compiling c:\winddk\7600.16385.1\src\print\monitors\localui directory
Configuring OACR for 'WDKSamples:x86fre' - <OACR on>
_NT_TARGET_VERSION SET TO WINXP
Precompiling - precomp.h
Compiling - localui.c
Compiling - util.c
Compiling - dialogs.c
Compiling - config.c
Compiling - mem.c
Compiling - generating code...
Building Library - .obj\src\print\monitors\localui\objfre_wxp_x86\i386\ddklocalu
i.lib
BUILD: Linking for c:\winddk\7600.16385.1\src\print\monitors\localui directory
_NT_TARGET_VERSION SET TO WINXP
Compiling resources - localui.rc
_NT_TARGET_VERSION SET TO WINXP
Linking Executable - .obj\src\print\monitors\localui\objfre_wxp_x86\i386\ddkloca
lui.dll
BUILD: Finish time: Thu Apr 06 13:02:48 2017
BUILD: Done

10 files compiled
1 library built
1 executable built

C:\WinDDK\7600.16385.1\src\print\monitors\localui>

使用 QT 开发 windows 驱动

  本人也是从使用 VC++6.0 MFC 开始入门做开发,后来接触并使用 GTK,wxWidgets,QT 做过一些开发,现在来说对 MFC 的东西很抵触,.NET 与 VB 没有用过不好说,但是使用 QT,wxWidgets 做图形界面还是比较快捷的(对于本人来说).如果是纯软件,我一般都喜欢在 Linux 下用 QT 开发,交叉编译出一个静态 exe 放到 windows 下发布.但是如果是 WINDOWS 驱动开发,那就肯定只能在 WINDOWS 做开发了,vs2010 实在用不习惯,我还是装了 Qt 来折腾,Qt 加 MinGW 做驱动开发,主要是要用到 Qt 的图形界面,还有一些 QT 处理字符串的功能.

  之前开发都没有注意 windows 入口函数的问题 exe 的入口函数WinMain,DLL 的入口函数DllMain,通过这次开发了解一些 winAPI 的功能,和一些需要注意的事项.

  Windows 开发动态库都是使用 def 文件做导出的,以前 c/c++都是用 __declspec(dllexport)直接声明在函数头文件,如果使用 MinGW GCC 的编译器就会出现一个问题,可以参考这里,比如:要导出 DllMain 这个函数,它就会变成DllMain@12这样的符号,所以肯是加载不了这个 dll 的,在使用 VC ++ 6.0 时会有一个工具叫做dependency walker查看 dll 的依赖那些 DLL,导出了那些函数符号名,到 vs2010 就不自带了,现在要去单独下载.下载地址.使用 def 文件声明就没有这个问题了.如 QT 工程设置如下:

1
2
3
4

QMAKE_LFLAGS += $$PWD/print-mon.def
DEFINES += _UNICODE _UNICODE STRICT

def 文件如下:

1
2
3
4
5
6
7
8
LIBRARY        print-mon
;DESCRIPTION 'Redirected Port Monitor for Windows NT 5.0'
;DATA MULTIPLE SHARED
EXPORTS
DllMain
InitializePrintMonitor2
; InitializePrintMonitorUI

开发遇到的问题

  • 下面是我要开发一个打印机的监视器,参照MSDN API文档开发.

库版本差异问题

  • Qt中自带的MinGW的库文件如winspool.a是没有导出XcvDataW这个函数的,所以在链接时会出错,只是链接时出错,不是运行时.这里有两个办法可以解决.
  1. 我在Linux下交叉编译过Qt5.8,GCC-5.4,可以用nm查看了一下winspool.a是否有导出XcvDataW这个函数?我尝试把它拿过来,需要在QT里指定链接它LIBS +=-L$$PWD/lib -lwinspool,竟然编译通过,而且注意了,我在windows下的MinGW GCC-5.3,也是可以编译链接的.
  2. 下面这种是常用的,就是直接加载驱动程序文件,通过API取得它的函数入口地址如:
1
2
3
4
5
//定义函数指针
typedef BOOL (WINAPI *pfnXcvData)(HANDLE hXcv, LPCWSTR pszDataName,
PBYTE pInputData, DWORD cbInputData,
PBYTE pOutputData, DWORD cbOutputData, PDWORD pcbOutputNeeded,
PDWORD pdwStatus);
1
2
3
4
5
6
7
8
9
10
11
12
13
14
15

HINSTANCE hInstance = LoadLibrary(TEXT("winspool.drv"));
if (hInstance != NULL) {
pfnXcvData fpXcvData = NULL;

//取得函数地址
fpXcvData = (pfnXcvData)GetProcAddress(hInstance, "XcvDataW");
if (fpXcvData != NULL) {
//传入参数调用函数.
rc = fpXcvData(hXcv, L"AddPort",(PBYTE)pOut,
(wcslen(pOut) + 1)*sizeof(WCHAR),
dwOutputData, 0, &dwNeeded, &dwStatus);
}
FreeLibrary(hInstance);
}

字符串的问题

  • 使用Qt+MinGW还有一个问题就是字符串转换的问题,被这个问题困了四五天.举例说明,
    还是用XcvData这个函数举例,它的接口定义来自https://docs.microsoft.com/en-us/previous-versions//ff564255(v=vs.85)?redirectedfrom=MSDN
1
2
3
4
5
6
7
8
9
10
11
12

BOOL XcvData(
_In_ HANDLE hXcv,
_In_ PCTSTR pszDataName,
_In_opt_ PBYTE pInputData,
DWORD cbInputData, //这里这度必须是WCHAR的长度,(wcslen(pOut) + 1)*sizeof(WCHAR)
_Out_opt_ PBYTE pOutputData,
DWORD cbOutputData,
_Out_ PDWORD pcbOutputNeeded,
_Out_opt_ PDWORD pdwStatus
);

1
2
3
4
5
6
7
8
9
10
size_t cbSize =sizeof(PWSTR) * 6;
PWSTR pOut = (PWSTR)AllocSplMem(cbSize);
StringCbCopy((PWSTR)pOut,cbSize,L"Net3:");
pOut[5] = NULL;
pfnXcvData fpXcvData = NULL;
rc = XcvData(hXcv, L"AddPort",(PBYTE)pOut,
// 原来把面直接写成常数6,该函数执行成功,就是不返回下一步,调试其它一切正常,最后才把它改成用WCHAR的长度就OK了.
(wcslen(pOut) + 1)*sizeof(WCHAR),
dwOutputData, 0, &dwNeeded, &dwStatus);

所以总结一句,魔鬼在细节,windows开发,WCHAR等宽字符问题一定要注意.比如PBYTEQString,尝试了很多次都不成功,最后找到方法如下:

1
2
3
4
5
6
7
PBYTE pInputData = "Abc dddd";
QString::fromUtf16(reinterpret_cast<const unsigned short*>(pInputData));


QString t = "abc";
# QString 转 LPCWSTR
LPCWSTR tmp = (LPCWSTR)t.utf16();

总结

  • Windows 下开发驱动肯定少不了MSDN,调试要用到GetLastError 的 API 去取得错误码,重复性的操作最好是能用脚本来处理,比如:我开发调试一个打印监视器的驱动,每次要重启Spooler服务才能替换新的程序.写一个如下脚本省事又不出错:
1
2
3
4
5
6
7
8
9
10
11
12
13
14
15
16
17
18
19
20
21
22
23
24
@echo on
echo %1
set TARGET="C:\WINDOWS\system32\print-mon_i686.dll"

set UITARGET="C:\WINDOWS\system32\netmonui_i686.dll"

sc stop Spooler
;这个ping只是用来延时的
ping 8.8.8.8 -n1 -w 5 >nul
IF EXIST %TARGET% del /f %TARGET%
IF EXIST %UITARGET% del /f %UITARGET%
copy %1\netmon\debug\print-mon_i686.dll %TARGET%
copy %1\ui\debug\netmonui_i686.dll %UITARGET%
sc start Spooler

;一次不成功,再运行一次保险

sc stop Spooler
ping 8.8.8.8 -n1 -w 5 >nul
IF EXIST %TARGET% del /f %TARGET%
IF EXIST %UITARGET% del /f %UITARGET%
copy %1\netmon\debug\print-mon_i686.dll %TARGET%
copy %1\ui\debug\netmonui_i686.dll %UITARGET%
sc start Spooler

谢谢支持

  • 看到网上做的一些gif图片,突然想到做一个gif录屏的工具,win,iso肯定有这些工具,linux 下只发现了peek,这个工具就是用ffmpeg去录的屏幕.

  • 其实不需要这篇文章,只要安装了ffmpeg或者使用静态编译的ffmpeg,使用参数脚本也就能实现录屏功能,可以录成各种视频格式(avi,mp4,…),或者图片格式(png,jpeg,gif…).

编译安装ffmpeg,

Linux 版本

  • 这里使用最新的ffmpeg-3.2.2做演示.
  • 这里保留gif,rawvideo,png,huffyuv,avi的相关功能.

栽剪功能说明

  • –disable-ffprobe , 不编译ffprobe
  • –disable-ffserver, 不编译ffserver
  • […]
  • –disable-encoders –enable-encoder=’gif,rawvido,png’ –disable-decoders –enable-encoder=’gif,rawvideo,huffyuv,png’, 这里设置禁止编译所有编译功能,后面只开起gif,rawvideo,png的功能.
  • –disable-muxers –enable-muxer=’gif,rawvideo,avi,image2’ –disable-demuxers –enable-demuxer=’gif,rawvideo,avi,image2’ ,这里同上,image2是生成png要用到的
  • –disable-protocols –enable-protocol=’file,data,pipe’,这三个选项是最基本要,不然不能写文件与管道的.
  • –diable-outdevs , 这里没用到任何的输出设备,全部禁用.
  • –disable-hwaccels –disable-vdpau –disable-xvmc –disable-nvenc ,禁用硬件加速,怕兼容性有问题.
  • –disable-parsers –enable-parser=’png’ –disable-bsfs ,这两个大的功能可以完全剪掉,png也是后要生成高质量GIF所使用到调色板的设置.
  • –diable-filters –enable-filter=’scale,zscale,fps,palettegen,paletteuse’, 这里的scale 过滤器是必须,palettegen,paletteuse依赖于image2,png,因为为了加强GIF的质量要用到这个调色板,关于过滤器的很多魔法功能可以网上自行搜索.
  • –disable-indevs –enable-indev=’x11grab,x11grab_xcb’ , x11grab是已经过时的,x11grab_xcb的功能与**–extra-libs=-static冲突.信赖于–enable-gpl –enable-nonfree**.
1
2
3
4
5
6
7
8
9
10
11
12
13
14
15
16
17
18
19
20
21
22
23
24
25
26
27
28
29
30
31
32
33
34
35
36
37
38
39
40
41
42
43
44
45
46
47
48
49
50
51
52
53
54
55
56
57
58
59
60
61
62
63
64
65
66
67
68
69
70
71
72
73
74
75
76
77
78
79
80
81
82
83
84
85
86
87
88
89
90
91
92
93
94
95
96

$ tar xvf ffmpeg-3.2.2.tar.bz2
$ mkdir ffmpeg-3.2.2/build-linux && cd ffmpeg-3.2.2/build-linux

../configure --disable-ffplay --disable-ffprobe --disable-ffserver --disable-doc --disable-htmlpages --disable-manpages --disable-podpages --disable-txtpages --disable-logging --disable-protocols --enable-protocol='file,data,pipe' --disable-encoders --enable-encoder=gif,rawvideo,huffyuv,png --disable-decoders --enable-decoder='gif,rawvideo,huffyuv,png' --disable-outdevs --disable-filters --enable-filter='scale,zscale,fps,palettegen,paletteuse' --disable-muxers --enable-muxer='gif,rawvideo,avi,image2' --disable-demuxers --enable-demuxer='gif,rawvideo,avi,image2' --disable-hwaccels --disable-parsers --enable-parser='png' --disable-bsfs --disable-indevs --enable-indev='x11grab_xcb' --enable-x11grab --disable-shared --enable-static --extra-cflags=--static --disable-sdl2 --disable-bzlib --enable-gpl --enable-nonfree --disable-xvmc --disable-nvenc --disable-vdpau
install prefix /usr/local
source path /home/michael/Downloads/ffmpeg-3.2.2
C compiler gcc
C library glibc
ARCH x86 (generic)
big-endian no
runtime cpu detection yes
yasm yes
MMX enabled yes
MMXEXT enabled yes
3DNow! enabled yes
3DNow! extended enabled yes
SSE enabled yes
SSSE3 enabled yes
AESNI enabled yes
AVX enabled yes
XOP enabled yes
FMA3 enabled yes
FMA4 enabled yes
i686 features enabled yes
CMOV is fast yes
EBX available yes
EBP available yes
debug symbols yes
strip symbols yes
optimize for size no
optimizations yes
static yes
shared no
postprocessing support yes
new filter support yes
network support no
threading support pthreads
safe bitstream reader yes
SDL2 support no
opencl enabled no
JNI support no
texi2html enabled no
perl enabled yes
pod2man enabled yes
makeinfo enabled yes
makeinfo supports HTML yes

Enabled programs:
ffmpeg

External libraries:
iconv libxcb libxcb_shape libxcb_shm libxcb_xfixes xlib zlib

External libraries providing hardware acceleration:
vaapi

Libraries:
avcodec avdevice avfilter avformat avutil postproc swresample swscale

Enabled decoders:
gif huffyuv png rawvideo

Enabled encoders:
gif huffyuv png rawvideo

Enabled hwaccels:

Enabled parsers:
png

Enabled demuxers:
avi gif image2 rawvideo

Enabled muxers:
avi gif image2 rawvideo

Enabled protocols:
data file pipe

Enabled filters:
aformat anull atrim format fps null palettegen paletteuse scale setpts trim

Enabled bsfs:

Enabled indevs:
x11grab_xcb

Enabled outdevs:

License: nonfree and unredistributable
Creating config.mak, config.h, and doc/config.texi...


$ make

运行测试

  • 具体使用参数以ffmpeg为准.
1
2
3
$ ./ffmpeg -y -video_size 1024x768 -framerate 10  -f x11grab -i :0.0+0,0 -vf scale=1024:-1 -t 10  -pixel_format rgb24  -r 5  -vcodec gif output.gif
[...]

打包成静态库

  • 打包成静态库需要重命名ffmpeg.c 里的main 函数.

  • 需要修改ffmpeg.c,cmdutils.c如下

1
2
3
4
5
6
7
8
9
10
11
12
13
14
15
16
17
18
19
20
21
22
23
24
25
26
27
28
29
30
31
32
33
34
35
36
37
38
39
40
41
42
43
44
45
46
47
48
49
50
51
52
53
54
55
56
57
58
59
60
61
62
63
64
65
66
67
68
69
70
71
72
73
74
75
76
77
78
79
80
81
82
83
84
85
86
87
88
89
90
diff ffmpeg.c ~/ffmpeg-3.2.2/ffmpeg.c 
113d112
< int ffmpeg(int argc, char **argv);
323,325c322,323
<
< void sigterm_handler(int sig);
< void sigterm_handler(int sig)
---
> static void
> sigterm_handler(int sig)
596d593
<
4536,4545c4533
< static void my_logoutput(void* ptr, int level, const char* fmt,va_list vl){
< FILE *fp = fopen("my_log.txt","a+");
< if(fp){
< vfprintf(fp,fmt,vl);
< fflush(fp);
< fclose(fp);
< }
< }
<
< int ffmpeg(int argc, char **argv)
---
> int main(int argc, char **argv)
4552,4553c4540
<
< //register_exit(ffmpeg_cleanup);
---
> register_exit(ffmpeg_cleanup);
4580,4581c4567
< goto fail;
< // exit_program(1);
---
> exit_program(1);
4586,4591c4572
< for(int i = 0 ; i < argc;i++)
< {
< av_log(NULL, AV_LOG_WARNING, "Use -h to get full help or, even better, run %s\n", argv[i]);
< }
< goto fail;
< // exit_program(1);
---
> exit_program(1);
4597,4598c4578
< goto fail;
< // exit_program(1);
---
> exit_program(1);
4613c4593
< // exit_program(1);
---
> exit_program(1);
4621,4622c4601
< goto fail;
< // exit_program(69);
---
> exit_program(69);
4624,4635c4603
< //exit_program(received_nb_signals ? 255 : main_return_code);
< fail:
< ffmpeg_cleanup(received_nb_signals ? 255: main_return_code);
< nb_output_streams = 0;
< nb_filtergraphs = 0;
< nb_output_files = 0;
< nb_input_files = 0;
< nb_input_streams = 0;
< received_sigterm = 0;
< received_nb_signals = 0;
< transcode_init_done = 0;
< ffmpeg_exited = 0;
---
> exit_program(received_nb_signals ? 255 : main_return_code);
4638d4605
<


----------------------------------------------
diff cmdutils.c ~/ffmpeg-3.2.2/cmdutils.c
754d753
<
756,758c755
< //prepare_app_arguments(&argc, &argv);
<
<
---
> prepare_app_arguments(&argc, &argv);
851a849
>

  • 直接make 会报下面的错误无需理会
    1
    2
    3
    4
    5
    6
    7
    8

    libavutil/libavutil.a(reverse.o): warning: definition of `ff_reverse' overriding common
    libavutil/libavutil.a(eval.o): warning: common is here
    /usr/lib/gcc/x86_64-linux-gnu/4.9/../../../x86_64-linux-gnu/crt1.o: In function `_start':
    /build/glibc-qK83Be/glibc-2.19/csu/../sysdeps/x86_64/start.S:118: undefined reference to `main'
    collect2: error: ld returned 1 exit status
    /home/michael/3TB-DISK/Downloads/ffmpeg-3.2.2/Makefile:131: recipe for target 'ffmpeg_g' failed
    make: *** [ffmpeg_g] Error 1
  • 直接用脚本打包所有的点o文件.
1
$ find . -iname "*.o" | xargs ar crv libffmpeg-linux.a

MinGW 版本

  • MinGW版本与Linux 版本有一些小的区别,都是用GCC编译器,只是这里要指交叉编译器
  • 与上面Linux版相比,indev=gdigrab,添加了**–extra-libs-static –enable-cross-compile –target-os=mingw32 –arch=x64 –cross-prefix=i686-w64-ming32.static-**
  • windows ,有几个输入设备可以选,dshow,vfwcap可以用来做摄像头的输入
1
2
3
4
5
6
7
8
9
10
11
12
13
14
15
16
17
18
19
20
21
22
23
24
25
26
27
28
29
30
31
32
33
34
35
36
37
38
39
40
41
42
43
44
45
46
47
48
49
50
51
52
53
54
55
56
57
58
59
60
61
62
63
64
65
66
67
68
69
70
71
72
73
74
75
76
77
78
79
80
81
82
83
84
85
86
87
88
89
90
91
92
93
94
95
96
97
98
99
../configure  --disable-ffplay --disable-ffprobe --disable-ffserver --disable-doc --disable-htmlpages --disable-manpages --disable-podpages --disable-txtpages --disable-logging --disable-protocols --enable-protocol='file,data,pipe' --disable-encoders --enable-encoder='gif,rawvideo,huffyuv,png' --disable-decoders --enable-decoder='gif,huffyuv,png,rawvideo' --disable-outdevs --disable-filters --enable-filter='scale,zscale,fps,palettegen,paletteuse' --disable-muxers --enable-muxer='gif,avi,image2,rawvideo' --disable-demuxers --enable-demuxer='gif,avi,image2,rawvideo' --disable-hwaccels --disable-parsers --enable-parser=png --disable-bsfs --disable-indevs --enable-indev=gdigrab --disable-shared --enable-static --extra-libs=-static --extra-cflags=--static --disable-sdl2 --disable-bzlib --disable-vdpau --disable-xvmc --disable-nvenc --enable-gpl --enable-nonfree --enable-cross-compile --target-os=mingw32 --arch=x86 --cross-prefix=i686-w64-mingw32.static-


install prefix /usr/local
source path /home/michael/3TB-DISK/Downloads/ffmpeg-3.2.2
C compiler i686-w64-mingw32.static-gcc
C library mingw64
host C compiler gcc
host C library glibc
ARCH x86 (generic)
big-endian no
runtime cpu detection yes
yasm yes
MMX enabled yes
MMXEXT enabled yes
3DNow! enabled yes
3DNow! extended enabled yes
SSE enabled yes
SSSE3 enabled yes
AESNI enabled yes
AVX enabled yes
XOP enabled yes
FMA3 enabled yes
FMA4 enabled yes
i686 features enabled yes
CMOV is fast no
EBX available yes
EBP available yes
debug symbols yes
strip symbols yes
optimize for size no
optimizations yes
static yes
shared no
postprocessing support yes
new filter support yes
network support no
threading support w32threads
safe bitstream reader yes
SDL2 support no
opencl enabled no
JNI support no
texi2html enabled no
perl enabled yes
pod2man enabled yes
makeinfo enabled yes
makeinfo supports HTML yes

Enabled programs:
ffmpeg

External libraries:
iconv schannel

External libraries providing hardware acceleration:
dxva2

Libraries:
avcodec avdevice avfilter avformat avutil postproc swresample swscale

Enabled decoders:
bmp gif rawvideo

Enabled encoders:
gif

Enabled hwaccels:

Enabled parsers:

Enabled demuxers:
gif rawvideo

Enabled muxers:
gif rawvideo

Enabled protocols:
data file pipe

Enabled filters:
aformat anull atrim format null scale setpts trim

Enabled bsfs:

Enabled indevs:
dshow gdigrab vfwcap

Enabled outdevs:

License: nonfree and unredistributable
Creating config.mak, config.h, and doc/config.texi...

$ make
[...]

## PE32 是64bit的标识
$ file ffmpeg.exe
ffmpeg.exe: PE32 executable (console) Intel 80386 (stripped to external PDB), for MS Windows

windows下面运行测试

  • 如果直接用下面的命令参数直接生成GIF文件会很大的色差与抖动.
    1
    ffmpeg.exe -y  -framerate 10  -f gdigrab -i desktop -video_size vga -vf scale=1024:-1   -pixel_format rgb24  -r 5 -vcodec gif output.gif

打包成静态库

  • 打包方式同Linux版相同,替换ar 为 i686-w64-mingw32.static-ar.

QT C++工程调用

  • Qt的工程文件设置如下. 至于为什么要链接这些库,请参照编译时的config.mak文件
1
2
3
4
5
6
7
8
9
10
11
12
13
14
15
16
17
18
19
20
21
unix:!macx: LIBS += -L$$PWD/ -lffmpeg-linux -ldl -lxcb -lxcb-shm -lxcb \
-lxcb-xfixes -lxcb-render -lxcb-shape \
-lxcb -lxcb-shape -lxcb -lX11 -lm -llzma -lz -pthread

INCLUDEPATH += $$PWD/.
DEPENDPATH += $$PWD/.

unix:!macx: PRE_TARGETDEPS += $$PWD/libffmpeg-linux.a


win32:CONFIG(release, debug|release): LIBS += -L$$PWD/ -lffmpeg-win -lgdi32 -liconv -lsecur32 -lm -llzma -lz -lpsapi -ladvapi32 -lshell32 -static
else:win32:CONFIG(debug, debug|release): LIBS += -L$$PWD/ -lffmpeg-win -lgdi32 -liconv -lsecur32 -lm -llzma -lz -lpsapi -ladvapi32 -lshell32 -static

INCLUDEPATH += $$PWD/.
DEPENDPATH += $$PWD/.

win32-g++:CONFIG(release, debug|release): PRE_TARGETDEPS += $$PWD/libffmpeg-win.a
else:win32-g++:CONFIG(debug, debug|release): PRE_TARGETDEPS += $$PWD/libffmpeg-win.a
else:win32:!win32-g++:CONFIG(release, debug|release): PRE_TARGETDEPS += $$PWD/./release/ffmpeg-win.lib
else:win32:!win32-g++:CONFIG(debug, debug|release): PRE_TARGETDEPS += $$PWD/./debug/ffmpeg-win.lib

调用静态库函数

  • C++ 中需要导出三个函数,还要做如下的必要修改,才能被其它工程调用.
1
2
3
4
5
6
7
8
9
10
11
12
13
14
15
16
17
18
19
20
21
22
23
24
25
26
27
28
29
30
31
32
33
34
35
36
37
38
39
40
41
42
43
44
45
[...]

/* C++ 中需要导出三个函数 */
extern "C" {
int ffmpeg(int argc,char *argv[]) //原ffmpeg程序的入口函数
int sigterm_handler(int sig); // 终止ffmpeg程序
void av_log_set_callback(void (*callback)(void*, int, const char*, va_list)); // 设置日志打印的回调函数.
};

[...]

MainWindow::MainWindow(QWidget *parent) :
QMainWindow(parent),
//out(stdout, QIODevice::WriteOnly),
ui(new Ui::MainWindow),
{
[...]

QList<QByteArray> tmp;
tmp << "ffmpeg"
<< "-v" << "quiet" << "-y"
// Video Size 要在-f 的前面.
<< "-video_size" << wsize.toLocal8Bit()
<< "-framerate" << "15"
#if _WIN32
<< "-f" << "gdigrab"
<< "-i" << "desktop"
<< "-offset_x" << QString("%1").arg(QString::number(mWindow->pos().x())).toLocal8Bit()
<< "-offset_y" << QString("%1").arg(QString::number(mWindow->pos().x())).toLocal8Bit()
#else
<< "-f" << "x11grab"
<< "-i" << pos.toLocal8Bit()

#endif
<< "-vcodec" << "huffyuv"
<< "-pix_fmt" << "yuv422p"
<< outputvideo;

char *argv[tmp.size()+1] = {NULL};
for(int i =0 ;i < tmp.size() ;i++)
{
argv[i] = tmp[i].data();
}
ffmpeg(tmp.size(),argv);
[...]

录制效果图


谢谢支持