简介
Vivado安装
- Vivado的安装文件非常大,Web版本安装包Xilinx Unified Installer 2021.1:Linux Self Extracting Web Installer(BIN-301.28 MB),离线版安装包Xilinx Unified Installer2021.1SFD(TAR/GZIP-51.87GB).下载前,需要官网注册一个帐号,这里使用
Web安装没有成功,后面还是使用离线版安装成功的.
RISC-V
- Digilent Arty A7 with Xilinx Artix-7 Implementing SiFive FE310 RISC-V
- Building Symmathics Zero RISC-V
- 为ARTY-100T搭建RISC-V
- Open Source Risc-V on the Xilinx Artix-7 35T Arty – Part 1
- PetaLinux for Artix-7 Arty Base Project
- Build an open source MCU and program it with Arduino
- hBPF = eBPF in hardware
LiteX框架
- litex/wiki
- The LiteX framework provides a convenient and efficient infrastructure to create FPGA Cores/SoCs, to explore various digital design architectures and create full FPGA based systems.
Xc3sprog
- xc3sprog是一套实用程序套件,用于使用
Xilinx并行电缆和其他JTAG适配器对Xilinx FPGA,CPLD和EEPROM进行编程
OpenSBI
- riscv-software-src/opensbi
1
2
3
4
5
6
7
8
9
10
11
12
13
14
15
16
17
18
19
20
21
22
23
24
25
26
27
28
29
30
31
32
33
34
35
36
37
~$ git clone https://github.com/litex-hub/opensbi
~$ cd opensbi
~$ make PLATFORM_RISCV_XLEN=32 PLATFORM_RISCV_ABI=ilp32 CROSS_COMPILE=riscv32-unknown-elf- PLATFORM=litex/vexriscv
~$ tree build/platform/litex/vexriscv/
build/platform/litex/vexriscv/
├── firmware
│ ├── fw_dynamic.bin
│ ├── fw_dynamic.dep
│ ├── fw_dynamic.elf
│ ├── fw_dynamic.elf.ld
│ ├── fw_dynamic.o
│ ├── fw_jump.bin
│ ├── fw_jump.dep
│ ├── fw_jump.elf
│ ├── fw_jump.elf.ld
│ ├── fw_jump.o
│ ├── fw_payload.bin
│ ├── fw_payload.dep
│ ├── fw_payload.elf
│ ├── fw_payload.elf.ld
│ ├── fw_payload.o
│ └── payloads
│ ├── test.bin
│ ├── test.dep
│ ├── test.elf
│ ├── test.elf.ld
│ ├── test_head.dep
│ ├── test_head.o
│ ├── test_main.dep
│ ├── test_main.o
│ └── test.o
├── lib
│ └── libplatsbi.a
├── litex.dep
├── litex.o
├── platform.dep
└── platform.o
LibreSOC
自编译工具链(riscv64-unknown-elf-gcc)
- riscv-gnu-toolchain
- building-a-pure-rv32i-toolchain
- SiFive提供二进制的工具链,但是需要注册帐号才能下载,而且注册帐号和邮箱,还必须是公司或者是大学的.或者就下载使用开源的版本sifive/freedom-tools/releases.还有可以从Hex Five下载.这里还是自已去下载源码编译出来.这里
GCC编译环境就算是配置好,下面提据源码文档指导,完成工具链的编译.编译过程中它会去网上下载组件,第一次编译时间会比较长.
1 | ~$ git clone https://github.com/riscv/riscv-gnu-toolchain |
支持32位
newlib,--host=riscv32-unknown-elf-1
2
3~$ ./configure --prefix=/home/michael/riscv-toolchain --with-multilib-generator="rv32imac-ilp32--f*c" \
--with-abi=ilp32 --with-arch=rv32imc
~$ make支持64位
newlib,--host=riscv64-unknown-elf-1
2
3
4
5
6
7
8
9
10
11
12
13
14~$ ./configure --prefix=/home/michael/riscv64-toolchain --with-multilib-generator="rv32imac-ilp32--f*c" \
--enable-multilib --target=riscv64-multilib-elf
~$ make
~$ ~/riscv64-toolchain/bin/riscv64-unknown-elf-gcc -v
Using built-in specs.
COLLECT_GCC=/home/michael/riscv64-toolchain/bin/riscv64-unknown-elf-gcc
COLLECT_LTO_WRAPPER=/home/michael/riscv64-toolchain/libexec/gcc/riscv64-unknown-elf/11.1.0/lto-wrapper
Target: riscv64-unknown-elf
Configured with: /home/michael/3TB-DISK/github/risc-v/riscv-gnu-toolchain/riscv-gcc/configure --target=riscv64-unknown-elf --prefix=/home/michael/riscv64-toolchain --disable-shared --disable-threads --enable-languages=c,c++ --with-system-zlib --enable-tls --with-newlib --with-sysroot=/home/michael/riscv64-toolchain/riscv64-unknown-elf --with-native-system-header-dir=/include --disable-libmudflap --disable-libssp --disable-libquadmath --disable-libgomp --disable-nls --disable-tm-clone-registry --src=.././riscv-gcc --enable-multilib --with-multilib-generator='rv32imac-ilp32--f*c' --with-abi=lp64d --with-arch=rv64imafdc --with-tune=rocket 'CFLAGS_FOR_TARGET=-Os -mcmodel=medlow' 'CXXFLAGS_FOR_TARGET=-Os -mcmodel=medlow'
Thread model: single
Supported LTO compression algorithms: zlib zstd
gcc version 11.1.0 (GCC)支持64位
linux,--host=riscv64-unknown-linux-gnu-1
2
3
4
5
6
7
8
9
10
11
12
13
14~$ ./configure --prefix=/home/michael/riscv64-toolchain --with-multilib-generator="rv32imac-ilp32--f*c" -enable-multilib --target=riscv64-linux-multilib
~$ make linux
~$ ~/riscv64-toolchain/bin/riscv64-unknown-linux-gnu-gcc -v
Using built-in specs.
COLLECT_GCC=/home/michael/riscv64-toolchain/bin/riscv64-unknown-linux-gnu-gcc
COLLECT_LTO_WRAPPER=/home/michael/riscv64-toolchain/libexec/gcc/riscv64-unknown-linux-gnu/11.1.0/lto-wrapper
Target: riscv64-unknown-linux-gnu
Configured with: /home/michael/3TB-DISK/github/risc-v/riscv-gnu-toolchain/riscv-gcc/configure --target=riscv64-unknown-linux-gnu --prefix=/home/michael/riscv64-toolchain --with-sysroot=/home/michael/riscv64-toolchain/sysroot --with-system-zlib --enable-shared --enable-tls --enable-languages=c,c++,fortran --disable-libmudflap --disable-libssp --disable-libquadmath --disable-libsanitizer --disable-nls --disable-bootstrap --src=.././riscv-gcc --enable-multilib --with-abi=lp64d --with-arch=rv64imafdc --with-tune=rocket 'CFLAGS_FOR_TARGET=-O2 -mcmodel=medlow' 'CXXFLAGS_FOR_TARGET=-O2 -mcmodel=medlow'
Thread model: posix
Supported LTO compression algorithms: zlib zstd
gcc version 11.1.0 (GCC)上面命令编译完成后,它会自动安装到
prefix目录下.因为这边的PC系统就是x86_64的,所以就选择--enable-multilib --target=riscv64-multilib-elf,启用multilib就可通过传送-march=rv32来支持生成32位版的程序.查看它支持的目标架构信息
1
2
3
4
5
6
7
8
9
10
11
12
13
14
15
16
17
18
19
20
21
22
23
24
25
26
27
28
29
30
31
32
33
34
35
36
37
38
39
40
41
42~$ riscv64-unknown-elf-gcc -Q --help=target
The following options are target specific:
-mabi= lp64d
-malign-data= xlen
-march= rv64imafdc
-mbig-endian [disabled]
-mbranch-cost=N 3
-mcmodel= medlow
-mcpu=PROCESSOR
-mdiv [enabled]
-mexplicit-relocs [enabled]
-mfdiv [enabled]
-misa-spec= 2.2
-mlittle-endian [enabled]
-mplt [enabled]
-mpreferred-stack-boundary= 0
-mrelax [enabled]
-mriscv-attribute [enabled]
-msave-restore [disabled]
-mshorten-memrefs [enabled]
-msmall-data-limit=N 8
-mstack-protector-guard-offset=
-mstack-protector-guard-reg=
-mstack-protector-guard= global
-mstrict-align [enabled]
-mtune=PROCESSOR rocket
Supported ABIs (for use with the -mabi= option):
ilp32 ilp32d ilp32e ilp32f lp64 lp64d lp64f
Known code models (for use with the -mcmodel= option):
medany medlow
Supported ISA specs (for use with the -misa-spec= option):
2.2 20190608 20191213
Known data alignment choices (for use with the -malign-data= option):
natural xlen
Valid arguments to -mstack-protector-guard=:
global tls
SiFive Freedom
- 参考链接:
下载开源工具链
1 | ~$ wget -c https://static.dev.sifive.com/dev-tools/freedom-tools/v2020.12/riscv64-unknown-elf-toolchain-10.2.0-2020.12.8-x86_64-linux-ubuntu14.tar.gz |
编译Freedom
freedom这个项目已经进入归档状态,没有更新与维护了,按它的说明文档还是可以编译的.
1 | ~$ git clone --recursive https://github.com/sifive/freedom |
- 指定工具链的位置变量(RISCV)并编译
verilog与mcs.这里如果是使用Arty-A7-100T的板子,要设定成BOARD=arty_a7_100.1
2
3
4
5
6
7
8
9
10
11
12
13
14
15
16
17
18
19
20
21
22~$ export RISCV=/fullpath/riscv64-unknown-elf-toolchain-10.2.0-2020.12.8-x86_64-linux-ubuntu14
~$ export PATH=/fullpath/Xilinx/Vivado/2021.1/bin:$PATH
~$ make BOARD=arty -f Makefile.e300artydevkit clean
~$ make BOARD=arty -f Makefile.e300artydevkit verilog
~$ make BOARD=arty -f Makefile.e300artydevkit mcs
[...]
Writing file /home/michael/workspace-xilinx/RISC-V/freedom/builds/e300artydevkit/obj/E300ArtyDevKitFPGAChip.mcs
Writing log file /home/michael/workspace-xilinx/RISC-V/freedom/builds/e300artydevkit/obj/E300ArtyDevKitFPGAChip.prm
===================================
Configuration Memory information
===================================
File Format MCS
Interface SPIX4
Size 16M
Start Address 0x00000000
End Address 0x00FFFFFF
Addr1 Addr2 Date File(s)
0x00000000 0x0021728B Oct 31 16:43:46 2021 /home/michael/workspace-xilinx/RISC-V/freedom/builds/e300artydevkit/obj/E300ArtyDevKitFPGAChip.bit
0 Infos, 0 Warnings, 0 Critical Warnings and 0 Errors encountered.
write_cfgmem completed successfully
INFO: [Common 17-206] Exiting Vivado at Sun Oct 31 16:44:16 2021... - 下载开发板配置文件(board_files)到
Vivado目录下,如下面所示,因为我这里的板子是REV E版本,也就是最新版,所以选择new目录下的配置.1
2~$ git clone https://github.com/Digilent/vivado-boards.git
~$ cp -r vivado-boards/new/board_files ~/Xilinx/Vivado/2021.1/data/boards
烧写FPGA的mcs镜像
- 连接板子的
J10 USB接口:- 打开
Vivado 2021 > Tasks > Open Hardware Manager,点击Hardware下面的Auto Connect图标,连接设备. - 显示:
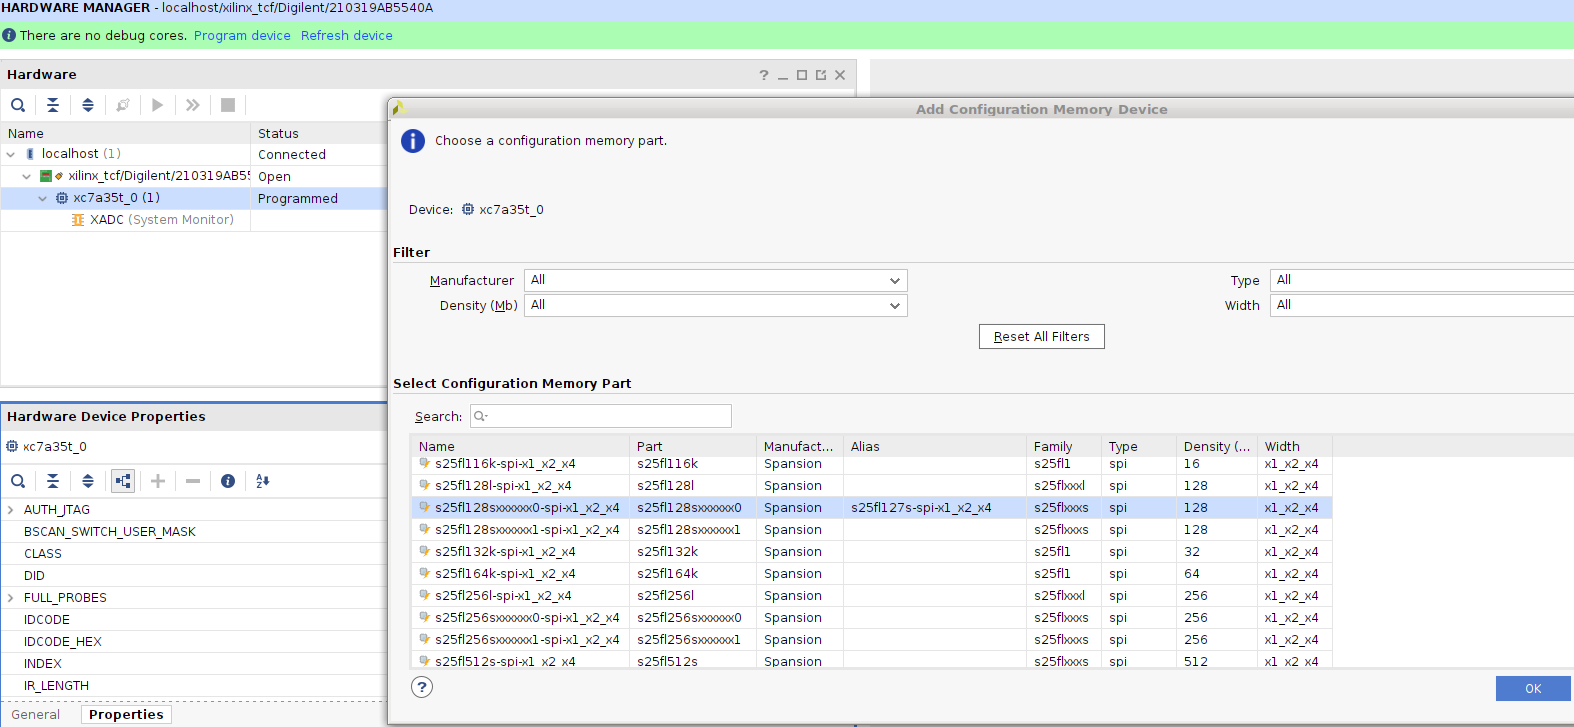
localhost(1) > xilinx_tcf/Digilent/21031xxxxxxx(1) > xc7a35t_0(1). - 在
xc7a35t_0(1)点击右键,选择Add Configuration Memory Device .... - 这里会一个选择内存的窗口例表,对应自已的板上型号去选择,因为这里是
REV E的版本,所以实际用的是s25fl128sxxxxxx0-spi-x1_x2_x4,厂商是Spansion的.
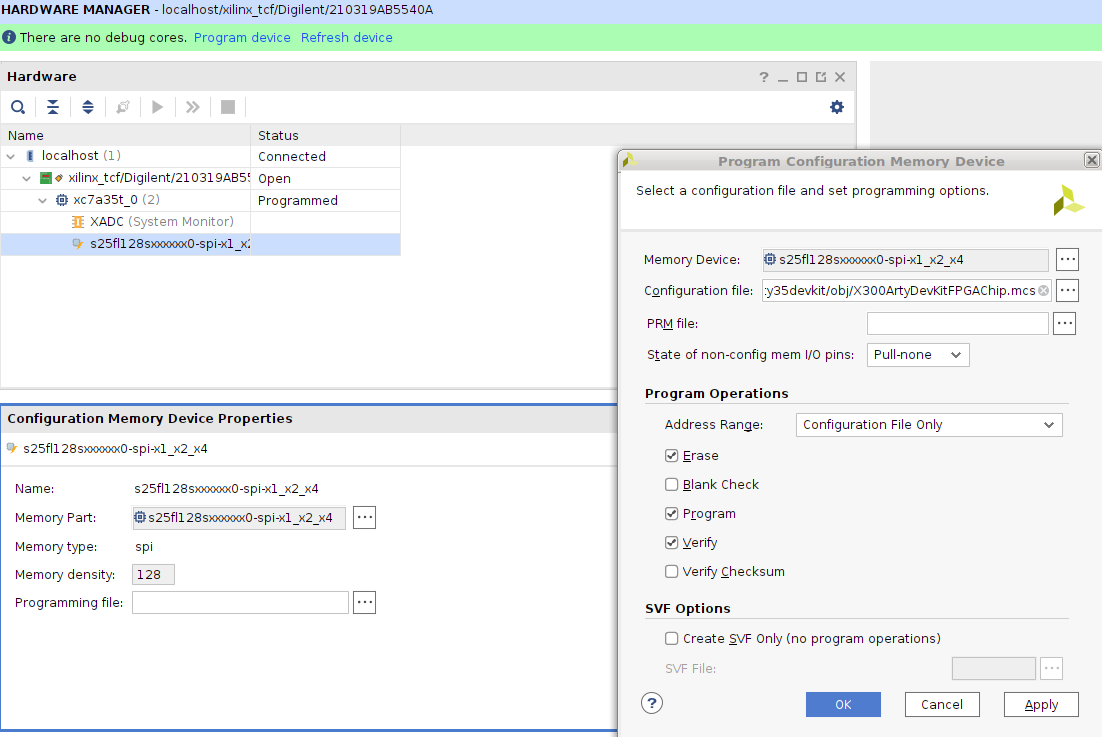
- 打开
- 添加完成内存,就会弹出一个
Program Configuration Memorg Device的窗口,在Configuration File里选择编译出来的mcs文件,位置在freedom/builds/e300artydevkit/obj/E300ArtyDevKitFPGAChip.mcs下,按完成进行烧写.成功后,按板上的PROG加载到FPGA运行.
Freedom-E-SDK(应用软件)示例
1 | ~$ git clone https://github.com/sifive/freedom-e-sdk.git |
- 这里需要设置两个环境变量:
RISCV_PATH,RISCV_OPENOCD_PATH,脚本里写的与sifive/freedom不一样.1
2
3
4
5
6~$ export RISCV_PATH=/fullpath/riscv64-unknown-elf-toolchain-10.2.0-2020.12.8-x86_64-linux-ubuntu14
~$ export RISCV_OPENOCD_PATH=/fullpath/riscv-openocd-0.10.0-2020.12.1-x86_64-linux-ubuntu14
~$ make BSP=metal PROGRAM=hello TARGET=freedom-e310-arty clean
~$ make BSP=metal PROGRAM=hello TARGET=freedom-e310-arty software - 注意,工程默认设置
OpenOCD配置文件支持Olimex OpenOCD JTAG ARM-USB-TINY-H调试器的,而我这边手上只有一个FTDI 232H的设备,所以要做一些配置的修改,这里是使用interface/ftdi/um232h.cfg的配置.对照Freedom E310 Arty FPGA Dev Kit Getting Started Guide与DS_FT232H.pdf两边的接口文档,以及interface/ftdi/um232h.cfg里的描述,连接如下:
1 | Arty-A7-35T JD Header FT232H |
- 再修改
freedom-e-sdk/bsp/freedom-e310-arty/openocd.cfg文件,把olimex-arm-usb-tiny-h.cfg换成um232h.cfg,也可以应用下面的补丁.
1 | diff --git a/bsp/freedom-e310-arty/openocd.cfg b/bsp/freedom-e310-arty/openocd.cfg |
烧写测试应用程序,先按板子上的
PROG键,确保FPGA跑起来,再upload,如果,无法通过JTAG烧入应用,该板子无任何输出的.1
2
3
4
5
6
7
8
9
10
11
12
13
14
15
16
17
18
19
20
21
22
23
24
25
26
27
28
29
30
31
32
33
34
35
36
37
38
39
40
41
42
43
44
45
46
47
48
49
50
51
52
53~$ make BSP=metal PROGRAM=hello TARGET=freedom-e310-arty upload
[....]
For bug reports:
https://github.com/sifive/freedom-tools/issues
DEPRECATED! use 'adapter speed' not 'adapter_khz'
Using JTAG
Info : auto-selecting first available session transport "jtag".To override use 'transport select <transport>'.
Info : ftdi: if you experience problems at higher adapter clocks, try the command "ftdi_tdo_sample_edge falling"
Info : clock speed 10000 kHz
Info : JTAG tap: riscv.cpu tap/device found: 0x20000913 (mfg: 0x489 (SiFive Inc), part: 0x0000, ver: 0x2)
Info : datacount=1 progbufsize=16
Info : Disabling abstract command reads from CSRs.
Info : Examined RISC-V core; found 1 harts
Info : hart 0: XLEN=32, misa=0x40001105
Info : starting gdb server for riscv.cpu on 3333
Info : Listening on port 3333 for gdb connections
Info : Found flash device 'sp s25fl128s' (ID 0x00182001)
Ready for Remote Connections
Info : Listening on port 6666 for tcl connections
Info : Listening on port 4444 for telnet connections
Info : accepting 'gdb' connection on tcp/3333
metal_shutdown (code=0) at /home/michael/workspace-xilinx/RISC-V/freedom-e-sdk/freedom-metal/src/shutdown.c:19
19 __asm__ volatile("nop");
Info : JTAG tap: riscv.cpu tap/device found: 0x20000913 (mfg: 0x489 (SiFive Inc), part: 0x0000, ver: 0x2)
JTAG tap: riscv.cpu tap/device found: 0x20000913 (mfg: 0x489 (SiFive Inc), part: 0x0000, ver: 0x2)
cleared protection for sectors 64 through 255 on flash bank 0
cleared protection for sectors 64 through 255 on flash bank 0
Info : Disabling abstract command writes to CSRs.
Thread 1 (Remote target):
Info : JTAG tap: riscv.cpu tap/device found: 0x20000913 (mfg: 0x489 (SiFive Inc), part: 0x0000, ver: 0x2)
Loading section .init, size 0x2c2 lma 0x20400000
Loading section .init_array, size 0x4 lma 0x204002c8
Loading section .ctors, size 0x24 lma 0x204002cc
Loading section .rodata, size 0x33c lma 0x204002f0
Loading section .text, size 0x4c80 lma 0x20400680
Loading section .data, size 0x780 lma 0x20405300
Info : Padding image section 0 at 0x204002c2 with 6 bytes
Info : Padding image section 1 at 0x2040062c with 84 bytes
Info : JTAG tap: riscv.cpu tap/device found: 0x20000913 (mfg: 0x489 (SiFive Inc), part: 0x0000, ver: 0x2)
Start address 0x20400000, load size 23078
Transfer rate: 43 KB/sec, 3296 bytes/write.
shutdown command invoked
shutdown command invoked
A debugging session is active.
Inferior 1 [Remote target] will be detached.
Quit anyway? (y or n) [answered Y; input not from terminal]
Remote connection closed如上面所示,烧写应用成功,电脑上会有一个
/dev/ttyUSB2的串口,连接后,每按一次PROG或者RESET键,会打印一次Hello, World!.1
2
3
4
5
6
7
8~$ sudo minicom -o -b 57600 -D /dev/ttyUSB2
OPTIONS: I18n
Port /dev/ttyUSB2, 21:07:42
Press CTRL-A Z for help on special keys
Hello, World!
Hello, World!
使用QEMU模拟运行
我这边系统里已经编译好了qemu最新版,并且支持了
riscv32-softmmu,riscv64-softmmu.1
2
3
4
5
6
7
8
9
10
11
12
13
14
15
16~$ qemu-system-riscv32 -cpu help
any
lowrisc-ibex
rv32
sifive-e31
sifive-e34
sifive-u34
~$ qemu-system-riscv32 -machine help
Supported machines are:
none empty machine
opentitan RISC-V Board compatible with OpenTitan
sifive_e RISC-V Board compatible with SiFive E SDK
sifive_u RISC-V Board compatible with SiFive U SDK
spike RISC-V Spike board (default)
virt RISC-V VirtIO board编译软件
1
2
3
4
5
6
7
8
9
10
11
12
13
14
15
16
17
18
19
20
21
22
23
24
25
26
27
28
29
30
31
32
33
34
35
36
37~$ make PROGRAM=hello TARGET=qemu-sifive-e31 CONFIGURATION=debug software
[...........]
./home/michael/workspace-xilinx/RISC-V/freedom-e-sdk/venv/bin/activate && scripts/ldscript-generator/generate_ldscript.py -d /home/michael/workspace-xilinx/RISC-V/freedom-e-sdk/bsp/qemu-sifive-e31/design.dts -o /home/michael/workspace-xilinx/RISC-V/freedom-e-sdk/bsp/qemu-sifive-e31/metal.default.lds
Generating linker script with default layout
Using layout:
rom: 0x20400000-0x3fffffff (/soc/spi@10014000)
ram: 0x80000000-0x803fffff (/soc/dtim@80000000)
RAM memories:
dtim_0: 0x80000000-0x00400000
Consolidated RAM memories:
dtim_0: 0x80000000-0x00010000
mkdir -p /home/michael/workspace-xilinx/RISC-V/freedom-e-sdk/software/hello/debug/
make -C /home/michael/workspace-xilinx/RISC-V/freedom-e-sdk/software/hello hello \
PORT_DIR= \
PROGRAM=hello \
AR=/home/michael/riscv64-toolchain/bin/riscv64-unknown-elf-ar \
CC=/home/michael/riscv64-toolchain/bin/riscv64-unknown-elf-gcc \
CXX=/home/michael/riscv64-toolchain/bin/riscv64-unknown-elf-g++ \
ASFLAGS="-march=rv32imac -mabi=ilp32 -mcmodel=medlow --specs=nano.specs -O0 -g" \
CCASFLAGS="-march=rv32imac -mabi=ilp32 -mcmodel=medlow -I/home/michael/workspace-xilinx/RISC-V/freedom-e-sdk/bsp/qemu-sifive-e31/install/include --specs=nano.specs" \
CFLAGS="-march=rv32imac -mabi=ilp32 -mcmodel=medlow -ffunction-sections -fdata-sections -I/home/michael/workspace-xilinx/RISC-V/freedom-e-sdk/bsp/qemu-sifive-e31/install/include --specs=nano.specs -DMTIME_RATE_HZ_DEF=10000000 -O0 -g" \
CXXFLAGS="-march=rv32imac -mabi=ilp32 -mcmodel=medlow -ffunction-sections -fdata-sections -I/home/michael/workspace-xilinx/RISC-V/freedom-e-sdk/bsp/qemu-sifive-e31/install/include --specs=nano.specs -DMTIME_RATE_HZ_DEF=10000000 -O0 -g" \
XCFLAGS="-DMETAL_WAIT_CYCLE=0" \
LDFLAGS="-Wl,--gc-sections -Wl,-Map,hello.map -nostartfiles -nostdlib -L/home/michael/workspace-xilinx/RISC-V/freedom-e-sdk/bsp/qemu-sifive-e31/install/lib/debug/ -T/home/michael/workspace-xilinx/RISC-V/freedom-e-sdk/bsp/qemu-sifive-e31/metal.default.lds" \
LDLIBS="-Wl,--start-group -lc -lgcc -lm -lmetal -lmetal-gloss -Wl,--end-group" \
FREERTOS_METAL_VENV_PATH="/home/michael/workspace-xilinx/RISC-V/freedom-e-sdk/venv"
make[1]: Entering directory '/home/michael/workspace-xilinx/RISC-V/freedom-e-sdk/software/hello'
/home/michael/riscv64-toolchain/bin/riscv64-unknown-elf-gcc -march=rv32imac -mabi=ilp32 -mcmodel=medlow -ffunction-sections -fdata-sections -I/home/michael/workspace-xilinx/RISC-V/freedom-e-sdk/bsp/qemu-sifive-e31/install/include --specs=nano.specs -DMTIME_RATE_HZ_DEF=10000000 -O0 -g -Wl,--gc-sections -Wl,-Map,hello.map -nostartfiles -nostdlib -L/home/michael/workspace-xilinx/RISC-V/freedom-e-sdk/bsp/qemu-sifive-e31/install/lib/debug/ -T/home/michael/workspace-xilinx/RISC-V/freedom-e-sdk/bsp/qemu-sifive-e31/metal.default.lds hello.c -Wl,--start-group -lc -lgcc -lm -lmetal -lmetal-gloss -Wl,--end-group -o hello
make[1]: Leaving directory '/home/michael/workspace-xilinx/RISC-V/freedom-e-sdk/software/hello'
mv /home/michael/workspace-xilinx/RISC-V/freedom-e-sdk/software/hello/hello /home/michael/workspace-xilinx/RISC-V/freedom-e-sdk/software/hello/debug/hello.elf
mv /home/michael/workspace-xilinx/RISC-V/freedom-e-sdk/software/hello/hello.map /home/michael/workspace-xilinx/RISC-V/freedom-e-sdk/software/hello/debug/
touch -c /home/michael/workspace-xilinx/RISC-V/freedom-e-sdk/software/hello/debug/hello.elf
/home/michael/riscv64-toolchain/bin/riscv64-unknown-elf-objdump --source --all-headers --demangle --line-numbers --wide /home/michael/workspace-xilinx/RISC-V/freedom-e-sdk/software/hello/debug/hello.elf > /home/michael/workspace-xilinx/RISC-V/freedom-e-sdk/software/hello/debug/hello.lst
/home/michael/riscv64-toolchain/bin/riscv64-unknown-elf-size /home/michael/workspace-xilinx/RISC-V/freedom-e-sdk/software/hello/debug/hello.elf
text data bss dec hex filename
26204 2004 3236 31444 7ad4 /home/michael/workspace-xilinx/RISC-V/freedom-e-sdk/software/hello/debug/hello.elf
/home/michael/riscv64-toolchain/bin/riscv64-unknown-elf-objcopy -O ihex /home/michael/workspace-xilinx/RISC-V/freedom-e-sdk/software/hello/debug/hello.elf /home/michael/workspace-xilinx/RISC-V/freedom-e-sdk/software/hello/debug/hello.hex模拟运行
1
2
3
4
5~$ make PROGRAM=hello TARGET=qemu-sifive-e31 CONFIGURATION=debug simulate
scripts/simulate --elf /home/michael/workspace-xilinx/RISC-V/freedom-e-sdk/software/hello/debug/hello.elf --qemu qemu-system-riscv32 --qemu-config bsp/qemu-sifive-e31/qemu.cfg
Launching QEMU! Press Ctrl-A, X to exit
Hello, World!
Arduino环境测试开发
- sifive/cinco
Arty-A7-35T板子上原本就带有兼容Arduino的接口,这里根据sifive/cinco指导,配置Arduino IDE支持一个名为SiFive Freedom Boards的板子,有两种方式:- 打开
Arduino IDE > File > Perferences > Additional Boards Manaer URLs:,配置添加一行:http://static.dev.sifive.com/bsp/arduino/package_sifive_index.json ,完成. - 第二种手动克隆sifive/cinco到
Arduino IDE的hardware目录.Arduino IDE有两个位置hardware:- 一个是
Arduino IDE安装自带的avr,位于arduin-1.x.xx/hardware,我一般不会把新增的硬件放入到这里. - 另一个就是用户目录下的:
~/.arduino15/packages/*/hardware,如:
- 一个是
- 打开
1 | ls ~/.arduino15/packages/*/hardware |
- 打开
Arduino IDE > Tools > Board: XXXX > Boards Manager ...管理界面,它会自动去更新板子数据库,更新完成.在上面输入:sifive,就会过滤SiFive Freedom Boards,现在最新的版本是1.0.2,安装它. - 安装完成后,本地用户目录下会有如下文件目录结构,
1 | ~$ tree -L 4 ~/.arduino15/packages/sifive/ |
- 它就是从网上下载安装了
SiFive Freedom Boards所要用到的riscv32-unknown-elf-gcc的工具链,以及JTAG调试烧写的OpenOCD.同时打开Arduino IDE > Tools > Board: XXXX列表,会看到Freedom E300 Boards > Freedom E300 Arty DevKit.
Blink测试
- 这里打开
Arduino IDE > File > Examples > 01.Basics > Blink工程.并配置Arduino IDE > Tools下的连接参数如下:- Board: “Freedom E300 Arty DevKit”
- CPU Clock Frequency: “65MHz FPGA Clock”
- Tool Install Localtion: “Default”
- Port: “/dev/ttyUSB2”
- Programmer: “Manual SiFive OpenOCD”
- 上面配置有两个要注意:
Tool Install Localtion: "Default"就是使用~/.arduino15/packages/sifive/tools/riscv32-unknown-elf-gcc下面的工具链进行编译,否则就是从$PATH变量里去要找riscv32-unknown-elf-gcc运行.Programmer指定也是类似,我这里没有选SiFive OpenOCD,而是选择了Manual SiFive OpenOCD,意思就是从$PATH变量里去要找openocd运行.因为这里的openocd版本比较旧,且默认openocd.cfg是仅支持Olimex OpenOCD JTAG ARM-USB-TINY-H调试,这里需要把上面Freedom-E-SDK修改过的openocd.cfg复制到~/.arduino15/packages/sifive/hardware/riscv/1.0.2/freedom-e-sdk/bsp/env/freedom-e300-arty下.- 点击
Arduino IDE工具栏的Upload编译并上传到板子上运行,日志如下:
1 | /home/michael/.arduino15/packages/sifive/tools/riscv32-unknown-elf-gcc/3f7b3696217548bc31aeccf9a0c89bdfa4e16a8f/bin/riscv32-unknown-elf-g++ -T /home/michael/.arduino15/packages/sifive/hardware/riscv/1.0.2/freedom-e-sdk/bsp/env/freedom-e300-hifive1/link.lds -nostartfiles -Wl,-N -Wl,--gc-sections -Wl,--wrap=malloc -Wl,--wrap=free -Wl,--wrap=sbrk /tmp/arduino_build_232653/sketch/Blink.ino.cpp.o -nostdlib -Wl,--start-group /tmp/arduino_cache_428477/core/core_6ccdbc8b93e71222b4d531274eba2283.a -lm -lstdc++ -lc -lgloss -Wl,--end-group -lgcc -o /tmp/arduino_build_232653/Blink.ino.elf |
- 此时,板子上的
LD1会出现一秒周期的闪烁,实踐成功.
Hex Five
- 参考链接:
Hex Five Security(RISC-V International的长期成员)已开发了MultiZone Security IoT Stack,可免费下载RISC-V IoT安全栈.由Hex Five Security公司开发的MultiZone Security IoT Stack,是第一个RISC-V IoT安全栈.可使用由该公司开发的开源软核X300,编程到Digilent Arty A7-35T FPGA开发板上进行框架评估.Hex Five发布了第一个支持FreeRTOS的RISC-V安全IoT协议栈.MultiZone安全物联网堆栈,第一个用于RISC-V的安全IoT堆栈:FreeRTOS的安全实现,在操作系统,TCP/IP堆栈和TLS 1.3/ECC的信任根之间采用硬件强制软件定义的分隔,以实现安全的物联网应用.
编译
下载源码,这里会耗时比较长,因为会从网上同步非常多的
submodule.这里最终找到了hex-five/multizone-fpga来实践,它们的代码结构是一样的.1
2
3~$ git clone https://github.com/hex-five/multizone-fpga
~$ cd multizone-fpga
~$ git submodule update --init --recursive --jobs 8编译
Verilog,这里第一次运行,会要从网上下载很多Scala的插件.1
2
3~$ source ~/Xilinx/Vivado/2021.1/settings64.sh
~$ cd multizone-fpga
~$ make -j 16 -f Makefile.x300arty35devkit verilog编译
mcs,是要用到risc-v toolchain的.因为系统用的是python3.x,所以这里还要打一个patch.1
2
3
4
5
6
7
8
9
10
11
12
13
14
15~$ cat ~/vlsi_rom_gen-fixed.patch
diff --git a/scripts/vlsi_rom_gen b/scripts/vlsi_rom_gen
index 3e97070db..c0185d1d2 100755
--- a/scripts/vlsi_rom_gen
+++ b/scripts/vlsi_rom_gen
@@ -94,7 +94,7 @@ def iterate_by_n(it, n):
'Iterable length not evenly divisible by {}'.format(n)
)
else:
- raise
+ return
yield batch
~$ cd multizone-fpga/rocket-chip
~$ git apply ~/vlsi_rom_gen-fixed.patch设置
RISCV变量,并编译.这里会有一些耗时.
1 | ~$ make -f Makefile.x300arty35devkit mcs |
烧写到QSPI Flash
- Launch Vivado
- Open Hardware Manager, click the auto-connect icon, and open the target board
- Right click on the FPGA device and select ”Add Configuration Memory Device”
- Select Part “s25fl128sxxxxxx0-spi-x1_x2_x4” (“mt25ql128-spi-x1_x2_x4” if you have an old Arty 35T)
- Click OK to ”Do you want to program the configuration memory device now?”
- Add X300ArtyA7-35T.mcs or X300ArtyA7-100T.mcs depending on your board
- Select OK
- Once the programming completes in Vivado, press the “PROG” Button on the Arty board to load the image into the FPGA
OpenOCD
VexRiscv
- Links:
linux-on-litex-vexriscv
安装LiteX/Migen及工具
- 参考链接:
- The LiteX framework provides a convenient and efficient infrastructure to create FPGA Cores/SoCs, to explore various digital design architectures and create full FPGA based systems.
- 首先这里的
LiteX跟一个加密货币链是同名的.Migen是基于FHDL(嵌入Python的eDSL)的EDA工具箱,它还包含了MiSoC/nMigen之类的衍生和扩展来更好的简化硬件设计/开发.而LiteX则是一个基于MiGen的Core/SoC构建器,它包含了SoC设计框架和一组IP库/实用程序来高效地创建SoC和进行全定制FPGA设计.LiteX的生态正日益成熟,已支持各种常见的硬件IP和多种RISC-V软核,并在真正的硬件产品开发中使用. - 安装必要的工具与一些库文件.
1 | ~$ sudo apt-get install verilator libevent-dev libjson-c-dev |
- 在运行
litex_setup.py时,它会网上下载很多的开源工具库下,大部分都是python,scala两种语写的.1
2
3
4
5
6
7
8
9
10
11
12
13
14
15
16
17
18
19
20
21
22
23
24
25
26
27
28
29
30
31
32
33
34
35
36
37$ wget https://raw.githubusercontent.com/enjoy-digital/litex/master/litex_setup.py
$ chmod +x litex_setup.py
$ ./litex_setup.py init install --user (--user to install to user directory)
~$ tree -L 1
.
├── litedram
├── liteeth
├── litehyperbus
├── liteiclink
├── litejesd204b
├── litepcie
├── litesata
├── litescope
├── litesdcard
├── litespi
├── litex
├── litex-boards
├── litex_setup.py
├── migen
├── nmigen
├── pythondata-cpu-blackparrot
├── pythondata-cpu-cv32e40p
├── pythondata-cpu-ibex
├── pythondata-cpu-lm32
├── pythondata-cpu-microwatt
├── pythondata-cpu-minerva
├── pythondata-cpu-mor1kx
├── pythondata-cpu-picorv32
├── pythondata-cpu-rocket
├── pythondata-cpu-serv
├── pythondata-cpu-vexriscv
├── pythondata-cpu-vexriscv-smp
├── pythondata-misc-tapcfg
├── pythondata-misc-usb_ohci
├── pythondata-software-compiler_rt
└── pythondata-software-picolibc - 关于
LiteX更详细的资料,一定要参考它的litex/wiki,及以一些常用的命令
常用命令
- 可以时常升级保持更新
1
~$ ./litex_setup.py --update
- 使用它的脚本,一键编译做工具链
RISC-V toolchain.1
~$ ./litex_setup.py --gcc=riscv
Litex-Buildenv
- litex-buildenv An environment for building LiteX based FPGA designs.Makes it easy to get everything you need!
- 但是测试发现这个库有一点过时了,有很多东西没有维护了.
Litex-VexRiscv
模拟器运行
- 第一次运行它会下载相应的源码并编译.并且需要在
images目录下有如下文件:1
2~$ ls images/
boot.json Image opensbi.bin rootfs.cpio rv32.dtb - 主要三个类型的文件:
Linux Kernel, OpenSBI(uboot), Rootfs.可以先不自己构建,下载对应的的文件做快速测,
1 | ~$ export PATH=~/riscv64-toolchain/bin:$PATH |
- 也可以使用
lxsim运行,它是litex_setup.py安装的工具集,位于~/.local/bin/lxsim.1
2
3
4
5
6
7
8
9
10
11
12
13
14
15
16
17
18
19
20
21
22
23
24
25
26
27
28
29
30
31
32
33
34
35
36
37
38
39
40
41
42
43
44
45
46
47
48
49
50
51
52
53
54
55
56
57
58
59
60
61
62
63
64
65
66
67
68~$ lxsim --cpu-type=vexriscv
INFO:SoC: __ _ __ _ __
INFO:SoC: / / (_) /____ | |/_/
INFO:SoC: / /__/ / __/ -_)> <
INFO:SoC: /____/_/\__/\__/_/|_|
INFO:SoC: Build your hardware, easily!
INFO:SoC:--------------------------------------------------------------------------------
INFO:SoC:Creating SoC...(2021-11-06 22:03:10)
INFO:SoC:--------------------------------------------------------------------------------
INFO:SoC:FPGA device : SIM.
INFO:SoC:System clock: 1.000MHz.
INFO:SoCBusHandler:Creating Bus Handler...
INFO:SoCBusHandler:32-bit wishbone Bus, 4.0GiB Address Space.
INFO:SoCBusHandler:Adding reserved Bus Regions...
INFO:SoCBusHandler:Bus Handler created.
INFO:SoCCSRHandler:Creating CSR Handler...
INFO:SoCCSRHandler:32-bit CSR Bus, 32-bit Aligned, 16.0KiB Address Space, 2048B Paging, big Ordering (Up to 32 Locations).
INFO:SoCCSRHandler:Adding reserved CSRs...
INFO:SoCCSRHandler:CSR Handler created.
INFO:SoCIRQHandler:Creating IRQ Handler...
INFO:SoCIRQHandler:IRQ Handler (up to 32 Locations).
INFO:SoCIRQHandler:Adding reserved IRQs...
INFO:SoCIRQHandler:IRQ Handler created.
[...]
[...]
[xgmii_ethernet] loaded (0x5575a247c090)
[clocker] loaded
[spdeeprom] loaded (addr = 0x0)
[serial2tcp] loaded (0x5575a247c090)
[serial2console] loaded (0x5575a247c090)
[gmii_ethernet] loaded (0x5575a247c090)
[ethernet] loaded (0x5575a247c090)
[clocker] sys_clk: freq_hz=1000000, phase_deg=0
__ _ __ _ __
/ / (_) /____ | |/_/
/ /__/ / __/ -_)> <
/____/_/\__/\__/_/|_|
Build your hardware, easily!
(c) Copyright 2012-2021 Enjoy-Digital
(c) Copyright 2007-2015 M-Labs
BIOS built on Nov 6 2021 22:03:21
BIOS CRC passed (5bc979b3)
Migen git sha1: 7507a2b
LiteX git sha1: af5167c7
--=============== SoC ==================--
CPU: VexRiscv @ 1MHz
BUS: WISHBONE 32-bit @ 4GiB
CSR: 32-bit data
ROM: 128KiB
SRAM: 8KiB
--============== Boot ==================--
Booting from serial...
Press Q or ESC to abort boot completely.
sL5DdSMmkekro
Timeout
No boot medium found
--============= Console ================--
litex>
板上运行
编译FPGA bitstream
1 | linux-on-litex-vexriscv$ ./make.py --board=arty --build |
编译完成后,有如下目录.
1
2
3
4
5
6
7
8
9
10
11
12
13
14
15linux-on-litex-vexriscv$ tree -L 2 build
build
├── arty
│ ├── arty.dtb
│ ├── arty.dts
│ ├── csr.csv
│ ├── csr.json
│ ├── gateware
│ └── software
└── sim
├── csr.json
├── gateware
├── sim.dts
└── software它的内存文件,以及其它文件都可以在
gateware目录可以找到
1 | linux-on-litex-vexriscv$ tree -L 2 build/arty/gateware/ |
使用OpenOCD加载
- 因为
LiteX是完全使用开源工具集合来开发自己的硬件,所以烧写器,可以使用FT2232 + OpenOCD这种组合来支持,OpenOCD这里无需特定分支版本,就用官方的标准版本就可以.也可以使用Vivado烧写它.还有这里可能有一个小的问题,因为linux-on-litex-vexriscv/prog下无openocd的配置文件,需要先把从litex-boards/litex_boards/prog把文件复制或者链到该目录下. - 为了能让普通用户访问到
FT2232的/dev/ttyUSBX,确做了如下的设置.
1 | ~$ cat /etc/udev/rules.d/98-openocd.rules |
- 指定参数编译并加载,目标板
--board=arty.或者使用./make.py --board=arty --flash烧写到flash.
1 | linux-on-litex-vexriscv$ ./make.py --board=arty --load |
- 加载成功后,板上的流水灯就会开始闪烁了.用
lxterm /dev/ttyUSB1 --speed=1e6直接进入litex boot界面,如下:1
2
3
4
5
6
7
8
9
10
11
12
13
14
15
16
17
18
19
20
21
22
23
24
25
26
27
28
29
30
31
32
33
34
35
36
37
38
39
40
41
42
43
44
45
46
47
48
49
50
51
52
53
54
55
56
57
58
59
60
61
62
63
64
65
66
67
68
69
70
71
72
73
74
75
76
77
78~/.local/bin/lxterm /dev/ttyUSB1 --speed=1e6
BIOS CRC passed (cf084352)
Migen git sha1: 7507a2b
LiteX git sha1: 67431f41
--=============== SoC ==================--
CPU: VexRiscv SMP-LINUX @ 100MHz
BUS: WISHBONE 32-bit @ 4GiB
CSR: 32-bit data
ROM: 64KiB
SRAM: 8KiB
L2: 0KiB
FLASH: 16384KiB
SDRAM: 262144KiB 16-bit @ 800MT/s (CL-7 CWL-5)
--========== Initialization ============--
Ethernet init...
Initializing SDRAM @0x40000000...
Switching SDRAM to software control.
Write latency calibration:
m0:0 m1:0
Read leveling:
m0, b00: |00000000000000000000000000000000| delays: -
m0, b01: |00000000000000000000000000000000| delays: -
m0, b02: |11111111110000000000000000000000| delays: 05+-05
m0, b03: |00000000000011111111111110000000| delays: 19+-07
m0, b04: |00000000000000000000000000011111| delays: 30+-02
m0, b05: |00000000000000000000000000000000| delays: -
m0, b06: |00000000000000000000000000000000| delays: -
m0, b07: |00000000000000000000000000000000| delays: -
best: m0, b03 delays: 19+-07
m1, b00: |00000000000000000000000000000000| delays: -
m1, b01: |00000000000000000000000000000000| delays: -
m1, b02: |11111111110000000000000000000000| delays: 05+-05
m1, b03: |00000000000111111111111111000000| delays: 18+-07
m1, b04: |00000000000000000000000000001111| delays: 30+-02
m1, b05: |00000000000000000000000000000000| delays: -
m1, b06: |00000000000000000000000000000000| delays: -
m1, b07: |00000000000000000000000000000000| delays: -
best: m1, b03 delays: 19+-07
Switching SDRAM to hardware control.
Memtest at 0x40000000 (2.0MiB)...
Write: 0x40000000-0x40200000 2.0MiB
Read: 0x40000000-0x40200000 2.0MiB
Memtest OK
Memspeed at 0x40000000 (Sequential, 2.0MiB)...
Write speed: 31.7MiB/s
Read speed: 33.1MiB/s
Initializing S25FL128L SPI Flash @0xd0000000...
SPI Flash clk configured to 25 MHz
Memspeed at 0xd0000000 (Sequential, 4.0KiB)...
Read speed: 2.5MiB/s
Memspeed at 0xd0000000 (Random, 4.0KiB)...
Read speed: 1.1MiB/s
--============== Boot ==================--
Booting from serial...
Press Q or ESC to abort boot completely.
sL5DdSMmkekro
Timeout
Booting from SDCard in SD-Mode...
Booting from boot.json...
Booting from boot.bin...
SDCard boot failed.
Booting from network...
Local IP: 192.168.1.50
Remote IP: 192.168.1.100
Booting from boot.json...
Booting from boot.bin...
Copying boot.bin to 0x40000000...
Network boot failed.
No boot medium found
--============= Console ================--
litex> help
加载运行Linux系统
同样
lxterm也是litex_setup.py安装的工具集之一,位于~/.local/bin/lxterm.如果你用的是Mate Desktop,它也有一个同名的工具,别混用了.运行下面命令时,要按一下板上的PROG键, 让它进入烧写状态.1
2
3
4
5
6
7
8
9
10
11
12
13
14
15
16
17
18
19
20
21
22
23
24
25
26
27
28
29
30
31
32
33
34
35
36
37
38
39
40
41
42
43
44
45
46
47
48
49
50
51
52
53
54
55
56
57
58
59
60
61
62
63
64
65
66
67
68
69
70
71
72
73
74
75
76
77
78
79
80
81
82
83
84
85
86
87
88
89
90
91
92
93
94
95
96
97
98
99
100
101
102
103
104
105
106
107
108
109
110
111
112
113
114
115
116
117
118
119
120
121
122
123
124
125
126
127
128
129
130
131
132
133
134
135
136
137
138
139
140
141
142
143
144
145
146
147
148
149
150
151
152
153
154
155
156
157
158
159
160
161
162
163
164
165
166
167
168
169
170
171
172
173
174
175
176
177
178
179
180
181
182
183
184
185
186
187
188
189
190
191
192
193
194
195
196
197
198
199
200
201
202
203
204
205
206
207
208
209
210
211
212
213
214
215
216
217
218
219
220
221
222
223
224
225
226
227
228
229
230
231
232
233
234
235
236
237
238
239
240
241
242linux-on-litex-vexriscv$ ~/.local/bin/lxterm --images=images/boot.json /dev/ttyUSB1 --speed=1e6
BIOS CRC passed (f7d62022)
Migen git sha1: 7507a2b
LiteX git sha1: af5167c7
--=============== SoC ==================--
CPU: VexRiscv SMP-LINUX @ 100MHz
BUS: WISHBONE 32-bit @ 4GiB
CSR: 32-bit data
ROM: 64KiB
SRAM: 8KiB
L2: 0KiB
FLASH: 16384KiB
SDRAM: 262144KiB 16-bit @ 800MT/s (CL-7 CWL-5)
--========== Initialization ============--
Ethernet init...
Initializing SDRAM @0x40000000...
Switching SDRAM to software control.
Write latency calibration:
m0:0 m1:0
Read leveling:
m0, b00: |00000000000000000000000000000000| delays: -
m0, b01: |00000000000000000000000000000000| delays: -
m0, b02: |11111111110000000000000000000000| delays: 05+-05
m0, b03: |00000000000011111111111110000000| delays: 18+-06
m0, b04: |00000000000000000000000000011111| delays: 29+-02
m0, b05: |00000000000000000000000000000000| delays: -
m0, b06: |00000000000000000000000000000000| delays: -
m0, b07: |00000000000000000000000000000000| delays: -
best: m0, b03 delays: 18+-06
m1, b00: |00000000000000000000000000000000| delays: -
m1, b01: |00000000000000000000000000000000| delays: -
m1, b02: |11111111110000000000000000000000| delays: 05+-05
m1, b03: |00000000000111111111111110000000| delays: 18+-07
m1, b04: |00000000000000000000000000011111| delays: 29+-02
m1, b05: |00000000000000000000000000000000| delays: -
m1, b06: |00000000000000000000000000000000| delays: -
m1, b07: |00000000000000000000000000000000| delays: -
best: m1, b03 delays: 18+-07
Switching SDRAM to hardware control.
Memtest at 0x40000000 (2.0MiB)...
Write: 0x40000000-0x40200000 2.0MiB
Read: 0x40000000-0x40200000 2.0MiB
Memtest OK
Memspeed at 0x40000000 (Sequential, 2.0MiB)...
Write speed: 31.7MiB/s
Read speed: 33.1MiB/s
Initializing S25FL128L SPI Flash @0xd0000000...
SPI Flash clk configured to 25 MHz
Memspeed at 0xd0000000 (Sequential, 4.0KiB)...
Read speed: 2.5MiB/s
Memspeed at 0xd0000000 (Random, 4.0KiB)...
Read speed: 1.1MiB/s
--============== Boot ==================--
Booting from serial...
Press Q or ESC to abort boot completely.
sL5DdSMmkekro
[LXTERM] Received firmware download request from the device.
[LXTERM] Uploading images/Image to 0x40000000 (7420864 bytes)...
[LXTERM] Upload calibration...(inter-frame: 10.00us, length: 64)
[LXTERM] Upload complete (86.2KB/s).
[LXTERM] Uploading images/rv32.dtb to 0x40ef0000 (12130 bytes)...
[LXTERM] Upload calibration...(inter-frame: 10.00us, length: 64)
[LXTERM] Upload complete (78.9KB/s).
[LXTERM] Uploading images/rootfs.cpio to 0x41000000 (4010496 bytes)...
[LXTERM] Upload calibration...(inter-frame: 10.00us, length: 64)
[LXTERM] Upload complete (86.2KB/s).
[LXTERM] Uploading images/opensbi.bin to 0x40f00000 (53640 bytes)...
[LXTERM] Upload calibration...(inter-frame: 10.00us, length: 64)
[LXTERM] Upload complete (85.3KB/s).
[LXTERM] Booting the device.
[LXTERM] Done.
Executing booted program at 0x40f00000
--============= Liftoff! ===============--
OpenSBI v0.8-1-gecf7701
____ _____ ____ _____
/ __ \ / ____| _ \_ _|
| | | |_ __ ___ _ __ | (___ | |_) || |
| | | | '_ \ / _ \ '_ \ \___ \| _ < | |
| |__| | |_) | __/ | | |____) | |_) || |_
\____/| .__/ \___|_| |_|_____/|____/_____|
| |
|_|
Platform Name : LiteX / VexRiscv-SMP
Platform Features : timer,mfdeleg
Platform HART Count : 8
Boot HART ID : 0
Boot HART ISA : rv32imas
BOOT HART Features : time
BOOT HART PMP Count : 0
Firmware Base : 0x40f00000
Firmware Size : 124 KB
Runtime SBI Version : 0.2
MIDELEG : 0x00000222
MEDELEG : 0x0000b101
[ 0.000000] Linux version 5.12.0-rc4 (florent@panda) (riscv32-buildroot-linux-gnu-gcc.br_real (Buildroot 2020.11-281-g69e5046e7b) 10.2.0, GNU ld (GNU Binutils) 2.35.2) #2 SMP Mon Mar 29 10:07:39 CEST 2021
[ 0.000000] Zone ranges:
[ 0.000000] Normal [mem 0x0000000040000000-0x000000004fffffff]
[ 0.000000] Movable zone start for each node
[ 0.000000] Early memory node ranges
[ 0.000000] node 0: [mem 0x0000000040000000-0x000000004fffffff]
[ 0.000000] Initmem setup node 0 [mem 0x0000000040000000-0x000000004fffffff]
[ 0.000000] SBI specification v0.2 detected
[ 0.000000] SBI implementation ID=0x1 Version=0x8
[ 0.000000] SBI v0.2 TIME extension detected
[ 0.000000] SBI v0.2 IPI extension detected
[ 0.000000] SBI v0.2 RFENCE extension detected
[ 0.000000] SBI v0.2 HSM extension detected
[ 0.000000] Invalid cpuid [8] for hartid [8]
[ 0.000000] riscv: ISA extensions aim
[ 0.000000] riscv: ELF capabilities aim
[ 0.000000] percpu: Embedded 10 pages/cpu s19148 r0 d21812 u40960
[ 0.000000] CPU node for /cpus/cpu@8 exist but the possible cpu range is :0-7
[ 0.000000] CPU node for /cpus/cpu@9 exist but the possible cpu range is :0-7
[ 0.000000] CPU node for /cpus/cpu@10 exist but the possible cpu range is :0-7
[ 0.000000] CPU node for /cpus/cpu@11 exist but the possible cpu range is :0-7
[ 0.000000] CPU node for /cpus/cpu@12 exist but the possible cpu range is :0-7
[ 0.000000] CPU node for /cpus/cpu@13 exist but the possible cpu range is :0-7
[ 0.000000] CPU node for /cpus/cpu@14 exist but the possible cpu range is :0-7
[ 0.000000] CPU node for /cpus/cpu@15 exist but the possible cpu range is :0-7
[ 0.000000] Built 1 zonelists, mobility grouping on. Total pages: 65024
[ 0.000000] Kernel command line: console=liteuart earlycon=liteuart,0xf0001000 rootwait root=/dev/ram0
[ 0.000000] Dentry cache hash table entries: 32768 (order: 5, 131072 bytes, linear)
[ 0.000000] Inode-cache hash table entries: 16384 (order: 4, 65536 bytes, linear)
[ 0.000000] Sorting __ex_table...
[ 0.000000] mem auto-init: stack:off, heap alloc:off, heap free:off
[ 0.000000] Memory: 243356K/262144K available (5596K kernel code, 572K rwdata, 860K rodata, 214K init, 221K bss, 18788K reserved, 0K cma-reserved)
[ 0.000000] SLUB: HWalign=64, Order=0-3, MinObjects=0, CPUs=8, Nodes=1
[ 0.000000] rcu: Hierarchical RCU implementation.
[ 0.000000] rcu: RCU calculated value of scheduler-enlistment delay is 25 jiffies.
[ 0.000000] NR_IRQS: 64, nr_irqs: 64, preallocated irqs: 0
[ 0.000000] riscv-intc: 32 local interrupts mapped
[ 0.000000] Couldn't find cpu id for hartid [8]
[ 0.000000] Couldn't find cpu id for hartid [9]
[ 0.000000] Couldn't find cpu id for hartid [10]
[ 0.000000] Couldn't find cpu id for hartid [11]
[ 0.000000] Couldn't find cpu id for hartid [12]
[ 0.000000] Couldn't find cpu id for hartid [13]
[ 0.000000] Couldn't find cpu id for hartid [14]
[ 0.000000] Couldn't find cpu id for hartid [15]
[ 0.000000] Couldn't find cpu id for hartid [8]
[ 0.000000] Couldn't find cpu id for hartid [9]
[ 0.000000] plic: handler already present for context 19.
[ 0.000000] Couldn't find cpu id for hartid [10]
[ 0.000000] plic: handler already present for context 21.
[ 0.000000] Couldn't find cpu id for hartid [11]
[ 0.000000] plic: handler already present for context 23.
[ 0.000000] Couldn't find cpu id for hartid [12]
[ 0.000000] plic: handler already present for context 25.
[ 0.000000] Couldn't find cpu id for hartid [13]
[ 0.000000] plic: handler already present for context 27.
[ 0.000000] Couldn't find cpu id for hartid [14]
[ 0.000000] plic: handler already present for context 29.
[ 0.000000] Couldn't find cpu id for hartid [15]
[ 0.000000] plic: handler already present for context 31.
[ 0.000000] plic: interrupt-controller@f0c00000: mapped 32 interrupts with 16 handlers for 32 contexts.
[ 0.000000] random: get_random_bytes called from start_kernel+0x360/0x4d0 with crng_init=0
[ 0.000000] riscv_timer_init_dt: Registering clocksource cpuid [0] hartid [0]
[ 0.000000] clocksource: riscv_clocksource: mask: 0xffffffffffffffff max_cycles: 0x171024e7e0, max_idle_ns: 440795205315 ns
[ 0.000021] sched_clock: 64 bits at 100MHz, resolution 10ns, wraps every 4398046511100ns
[ 0.002019] Couldn't find cpu id for hartid [8]
[ 0.002715] Couldn't find cpu id for hartid [9]
[ 0.003406] Couldn't find cpu id for hartid [10]
[ 0.004035] Couldn't find cpu id for hartid [11]
[ 0.004647] Couldn't find cpu id for hartid [12]
[ 0.005269] Couldn't find cpu id for hartid [13]
[ 0.005888] Couldn't find cpu id for hartid [14]
[ 0.006510] Couldn't find cpu id for hartid [15]
[ 0.008712] Console: colour dummy device 80x25
[ 0.009694] Calibrating delay loop (skipped), value calculated using timer frequency..200.00 BogoMIPS (lpj=400000)
[ 0.011160] pid_max: default: 32768 minimum: 301
[ 0.015359] Mount-cache hash table entries: 1024 (order: 0, 4096 bytes, linear)
[ 0.016601] Mountpoint-cache hash table entries: 1024 (order: 0, 4096 bytes, linear)
[ 0.039744] ASID allocator using 9 bits (512 entries)
[ 0.042606] rcu: Hierarchical SRCU implementation.
[ 0.052177] smp: Bringing up secondary CPUs ...
[ 1.106334] CPU1: failed to come online
[ 2.174473] CPU2: failed to come online
[ 3.242724] CPU3: failed to come online
[ 4.310959] CPU4: failed to come online
[ 5.379125] CPU5: failed to come online
[ 6.447274] CPU6: failed to come online
[ 7.515486] CPU7: failed to come online
[ 7.516400] smp: Brought up 1 node, 1 CPU
[ 7.522412] devtmpfs: initialized
[ 7.631706] clocksource: jiffies: mask: 0xffffffff max_cycles: 0xffffffff, max_idle_ns: 7645041785100000 ns
[ 7.633017] futex hash table entries: 2048 (order: 5, 131072 bytes, linear)
[ 7.639479] NET: Registered protocol family 16
[ 7.880381] FPGA manager framework
[ 7.895223] clocksource: Switched to clocksource riscv_clocksource
[ 8.064355] NET: Registered protocol family 2
[ 8.073113] tcp_listen_portaddr_hash hash table entries: 512 (order: 0, 6144 bytes, linear)
[ 8.074433] TCP established hash table entries: 2048 (order: 1, 8192 bytes, linear)
[ 8.076232] TCP bind hash table entries: 2048 (order: 2, 16384 bytes, linear)
[ 8.077425] TCP: Hash tables configured (established 2048 bind 2048)
[ 8.079928] UDP hash table entries: 256 (order: 1, 8192 bytes, linear)
[ 8.081038] UDP-Lite hash table entries: 256 (order: 1, 8192 bytes, linear)
[ 8.092717] Unpacking initramfs...
[ 8.858450] Initramfs unpacking failed: invalid magic at start of compressed archive
[ 8.916140] Freeing initrd memory: 8192K
[ 8.932899] workingset: timestamp_bits=30 max_order=16 bucket_order=0
[ 9.193838] Block layer SCSI generic (bsg) driver version 0.4 loaded (major 253)
[ 9.194565] io scheduler mq-deadline registered
[ 9.195468] io scheduler kyber registered
[ 9.223323] No litex,nclkout entry in the dts file
[ 9.225515] LiteX SoC Controller driver initialized: subreg:4, align:4
[ 10.286467] f0001000.serial: ttyLXU0 at MMIO 0x0 (irq = 0, base_baud = 0) is a liteuart
[ 10.388082] printk: console [liteuart0] enabled
[ 10.443080] libphy: Fixed MDIO Bus: probed
[ 10.445897] liteeth f0002000.mac: unable to get rx-fifo-depth
[ 10.447597] liteeth: probe of f0002000.mac failed with error -22
[ 10.451740] i2c /dev entries driver
[ 10.459084] i2c i2c-0: Not I2C compliant: can\'t read SCL
[ 10.460008] i2c i2c-0: Bus may be unreliable
[ 10.491212] litex-mmc f0009000.mmc: Requested clk_freq=12500000: set to 12500000 via div=8
[ 10.523707] fpga_manager fpga0: LiteX ICAPBitstream FPGA Manager registered
[ 10.549391] NET: Registered protocol family 10
[ 10.558414] litex-mmc f0009000.mmc: Requested clk_freq=0: set to 390625 via div=256
[ 10.565072] Segment Routing with IPv6
[ 10.567088] sit: IPv6, IPv4 and MPLS over IPv4 tunneling driver
[ 10.582063] NET: Registered protocol family 17
[ 10.594660] Freeing unused kernel memory: 208K
[ 10.596083] Kernel memory protection not selected by kernel config.
[ 10.597491] Run /init as init process
Starting syslogd: OK
Starting klogd: OK
Running sysctl: OK
Saving random seed: [ 12.456910] random: dd: uninitialized urandom read (512 bytes read)
OK
Starting network: OK
Welcome to Buildroot
buildroot login:通过串口加载是稍慢的,加载成功后,会有一个
shell console登录提示.lxterm是通过板上J10 USB接口使用JTAGUART协议来通信的,脚本是位于litex/litex/tools/litex_term.py.也可以使用sudo minicom -D /dev/ttyUSB1 -b 1000000来连接,注意它的速率是1000000.有一些USB to UART不支持这种速率,通常表现为乱码,无法输入等.
1 | buildroot login: root |
images/boot.json就是内存地址的映射表.
1 | linux-on-litex-vexriscv$ cat images/boot.json |
- 也可以直接使用
OpenOCD来加载,如下:1
2
3
4
5
6
7
8
9
10
11
12
13
14
15
16linux-on-litex-vexriscv$ openocd -f prog/openocd_xc7_ft2232.cfg -c "transport select jtag; init; pld load 0 build/arty/gateware/arty.bit; exit"
Open On-Chip Debugger 0.11.0+dev-00433-g97db87c22 (2021-11-01-22:36)
Licensed under GNU GPL v2
For bug reports, read
http://openocd.org/doc/doxygen/bugs.html
DEPRECATED! use 'adapter driver' not 'interface'
DEPRECATED! use 'ftdi vid_pid' not 'ftdi_vid_pid'
DEPRECATED! use 'ftdi channel' not 'ftdi_channel'
DEPRECATED! use 'ftdi layout_init' not 'ftdi_layout_init'
Info : auto-selecting first available session transport "jtag".To override use 'transport select <transport>'.
DEPRECATED! use 'adapter speed' not 'adapter_khz'
fpga_program
Warn : Transport "jtag" was already selected
Info : ftdi: if you experience problems at higher adapter clocks, try the command "ftdi tdo_sample_edge falling"
Info : clock speed 25000 kHz
Info : JTAG tap: xc7.tap tap/device found: 0x0362d093 (mfg: 0x049 (Xilinx), part: 0x362d, ver: 0x0)
通过SDCard Boot加载linux系统
- 通过
TF/SD启动,需要一张空白卡,格式成W95 FAT32,现在我只测试了W95 FAT32与exFAT两种格式,只有W95 FAT32可以成功加载,还发现对TF/SD卡有兼容问题,我手上有一块较老的512MB的SD卡就是无法识别加载,最终还是买了一张新的SD格式化,才成功加载。具体格式化如下:
1 | ~$ fdisk /dev/sdb |
再把
linux-on-litex-vexriscv/images下的所有文件复制到SD卡根目录下。1
2
3litex/linux-on-litex-vexriscv$ ls images/
boot.json Image opensbi.bin rootfs.cpio rv32.dtb因为
Digilent Arty-A7-35T板上没集成SD卡插槽,只能通过其它外接的方式来实现,linux-on-litex-vexriscv项目默认是通过定义配置PMOD-D来支持SDCard,关于Pmod MicroSD又有两种接口,一种是digilent,另一种是numato.当时在某宝上对比发现,digilent接口是在5x-1xx元左右,后来就选择了一个numato的。numato相较于digilent少了一个插卡检测(CD)信号脚,同时管脚功能定义也不一样,linux-on-litex-vexriscv项目默认是配置digilent类型,且没参数可以选择,如果是像我这里使用了numato的类型的PMOD,需要修改linux-on-litex-vexriscv/make.py源码.而在litex-hub/litex-boards的项目里是可以通过--sdcard-adapter=numato来配置选择的。numato的补丁如下:
1 | litex-hub/linux-on-litex-vexriscv$ git diff make.py |
- 上面补丁相当于是
--sdcard-adapter=numato转给了litex-boards. 执行./make.py --board=arty --build --flash,如果编译正常,从SDCard boot的显示如下:
1 | [....] |
直接使用Litex-Boards脚本编译
- 前面运行
litex_setup.py --install --user时,它就会在当前目录下,同步https://github.com/litex-hub/litex-boards的源码1
2
3
4
5
6
7
8
9
10
11
12
13
14
15
16
17
18
19
20
21
22~$ cd litex-boards/litex-boards
~$ ./targets/digilent_arty.py --cpu-type vexriscv --with-spi-flash --with-sdcard --with-ethernet --with-pmod-gpio --sdcard-adapter=numato --build --flash
[....]
===================================
Configuration Memory information
===================================
File Format BIN
Interface SPIX4
Size 16M
Start Address 0x00000000
End Address 0x00FFFFFF
Addr1 Addr2 Date File(s)
0x00000000 0x0021728B Nov 21 23:17:41 2021 digilent_arty.bit
0 Infos, 0 Warnings, 0 Critical Warnings and 0 Errors encountered.
write_cfgmem completed successfully
# quit
INFO: [Common 17-206] Exiting Vivado at Sun Nov 21 23:17:42 2021...
~$ ./targets/digilent_arty.py --cpu-type vexriscv --sys-clk-freq 100e6 --with-ethernet --with-sdcard --load
烧写到Flash
- 下面是以
openFPGALoader烧写Arty A7-100T为例。
1 | ./make.py --board=arty --variant=a7-100 --cpu-count=1 --build |
1 | ~$ openFPGALoader -b arty --fpga-part xc7a100tcsg324 build/arty/gateware/arty.bit -f --verify |
编译错误
- 下面提示:
FPGA的逻辑容量不够大,因为这里使用了--cpu-count=16命令参数,使用默认或者--cpu-count=1就会无错.1
2
3
4
5
6
7
8
9
10
11[....]
WARNING: [DRC RPBF-3] IO port buffering is incomplete: Device port i2c0_scl expects both input and output buffering but the buffers are incomplete.
INFO: [Vivado_Tcl 4-198] DRC finished with 7 Errors, 1 Warnings
ERROR: [Vivado_Tcl 4-23] Error(s) found during DRC.Placer not run.
INFO: [Vivado_Tcl 4-199] Please refer to the DRC report (report_drc) for more information.
INFO: [Common 17-83] Releasing license: Implementation
9 Infos, 1 Warnings, 0 Critical Warnings and 8 Errors encountered.
place_design failed
place_design: Time (s): cpu = 00:01:00 ; elapsed = 00:00:17 .Memory (MB): peak = 4696.504 ; gain = 0.000 ; free physical = 17632 ; free virtual = 88828
ERROR: [Common 17-39] 'place_design' failed due to earlier errors.
[...]
定制编译buildroot
- 这里其实只下载
buildroot的官方源码,指定linux-on-litex-vexriscv/buildroot内的配置文件,就可以一键编译完成,因为这里当时编译时有一个小错误,这里改了使用了git://github.com/litex-hub/linux.git另一个commit(版本): a2a2a69d144d66e0c36697da062b3949e3c2c870,它是Linux 5.15的版本.这里几乎不需要修改,使用默认的配置就能编译出一个可用的kernel与rootfs.
1 | ~$ git clone http://github.com/buildroot/buildroot |
BuildRoot里的Linux几个关键配置如下:1
2
3
4
5
6~$ cat .config
[...]
BR2_LINUX_KERNEL_CUSTOM_REPO_VERSION="a2a2a69d144d66e0c36697da062b3949e3c2c870"
BR2_LINUX_KERNEL_VERSION="a2a2a69d144d66e0c36697da062b3949e3c2c870"
BR2_LINUX_KERNEL_CUSTOM_CONFIG_FILE="$(BR2_EXTERNAL_LITEX_VEXRISCV_PATH)/board/litex_vexriscv/linux.config"
[...]上面的选项是
Kernel -> Linux kernel -> Custom Git repository里的设置,也可以指定Custom version,比如直接使用5.16.15这样的linux kernel主线版本号,默认在kernel主分支是支持risc-v架构的。单独配置编译内核
1
2
3buildroot$ cd dl/linux/git/
~$ ARCH=riscv CROSS_COMPILE=riscv64-unknown-elf- make menuconfig
~$ ARCH=riscv CROSS_COMPILE=riscv64-unknown-elf- make -j10把
buildroot/output/images里的Image,rootfs.cpio复制到linux-on-litex-vexriscv/images替换同名的文件.再加载到板上运行如下:
1 | Starting network: OK |
- 开启网络
1
2
3
4
5
6
7
8
9
10
11
12root@buildroot:~# ifconfig eth0 up
root@buildroot:~# udhcpd eth0
udhcpc eth0
udhcpc: started, v1.35.0
udhcpc: broadcasting discover
udhcpc: broadcasting discover
udhcpc: broadcasting select for 192.168.1.238, server 192.168.1.1
udhcpc: lease of 192.168.1.238 obtained from 192.168.1.1, lease time 43200
deleting routers
adding dns 8.8.8.8
adding dns 8.8.4.4
运行64位Linux
- RISC-V-Linux
- litex-hub/linux-on-litex-rocket
Rocket Core是一款处理器的核,它最大的特点是:使用Chisel(Constructing Hardware in an ScalaEmbedded Language)语言进行开发的.而Rocket-Chip是SoC生成器.
BOOM Core
- RISC-V BOOM
- riscv-boom/riscv-boom
BOOM Core的全称是Berkeley Out-of-Order Machine,与Rocket Core不同的是,BOOM Core面向更高性能的目标,是一款超标量乱序发射,乱序执行的处理器核.
LowRISC SOC
编译
1 | ~$ litex-boards/litex_boards/targets/digilent_arty.py --build --cpu-type rocket --cpu-variant linux4 --sys-clk-freq 50e6 --with-ethernet --with-sdcard --uart_name=usb_acm |
开源工具链开发
简介
Xilinx 7-series是支持开源的产品,它的开发工具链的组合:
Chisel/FIRRTL硬件编译框架
- sbt
sbt是一个代码编译工具,是scala界的mvn,可以编译scala,java等,需要java1.6以上.作为Scala的标准构建工具,使用风格与Maven类似,由Scala语言写的,参考官方网站,目前的版本是1.54,虽然说Scala的项目可以通过Maven来构建和管理,但是依然推荐sbt,更适合一些.
- Chisel/FIRRTL Hardware Compiler Framework
- chipsalliance/rocket-chip
Rocket-chip是一个SoC生成器,在很多场景下我们常用Rocket指代Rocket处理器,而实际上Rocket-chip是一个SoC生成器(Generator),它用来根据不同的配置参数产生不同处理器的RTL代码,而后者才是一个真正的处理器.
- chipsalliance/chisel3
Chisel(Constructing Hardware In a Scala Embedded Language)是UC Berkeley开发的一种开源硬件构造语言.它是建构在Scala语言之上的领域专用语言(DSL),支持高度参数化的硬件生成器.
- chipsalliance/firrtl
- Firrtl is an intermediate representation (IR) for digital circuits designed as a platform for writing circuit-level transformations.This repository consists of a collection of transformations (written in Scala) which simplify, verify, transform, or emit their input circuit.
SymbiFlow
- Installation instructions for Symbiflow with Xilinx Artix7 100T Board
- SymbiFlow is a fully open source toolchain for the development of FPGAs of multiple vendors.Currently, it targets the Xilinx 7-Series, Lattice iCE40, Lattice ECP5 FPGAs, QuickLogic EOS S3 and is gradually being expanded to provide a comprehensive end-to-end FPGA synthesis flow.
Microblaze
创建工程
- 打开
Vivado点击Create New Project:Project Name:设置名称与工程位置,下一步.Project Type:选择RTL Project,并勾上Do not secify sources at this time,下一步.Default Part:选择Boards,下拉Name选择对应的板子型号,如果列表内没有找到,先按Refresh从网上更新,再去列表内选择.这里是选择择了Arty-A7 35T的板子.New Project Summary:显示工程的摘要信息,按Finish,完成工程创建,显示如下的界面.
Create Block Design
- 从左边导航栏里
IP INTEGRATOR > Create Block Design,改名为system, 如图: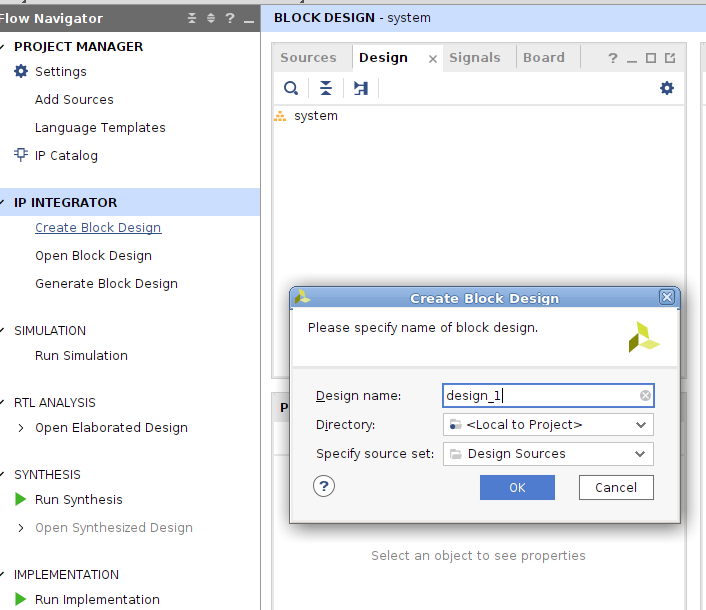
- 切换到
Board的tab 页,会显示Arty A7-35的所支持硬件资源列表,这个列表的所有项,都是由该板子的board file定义的.右边Diagram,按提示:This design is empty, Press the + button to add IP,来添加一些必要的IP核.也可以从左边的树型栏,拖入控件.
配置System Clock.
- 从
Arty A7-35 > Clocks,拖入System Clock到Diagram的画布内. - 双击控件下方的
Clocking Wizard,打开时钟配置界面.右边表格,切换到Output Clocks页面,修改如:clk_out1:勾选上,Requested,Actual栏改成166.667.clk_out2:勾选上,Requested,Actual栏改成200.00.Reset Type:选择Active Low.完成.
配置DDR3 SDRAM.
- 从
Arty A7-35 > External Memery,拖入DDR3 SDRAM到Diagram的画布内.Vivado会把两个控件,自动连接. - 这里先要删除
clk_ref_i,sys_clk_i两个默认自动连接,再用鼠标拖线连接端口,如下:
1 | sys_clock mig_7series |
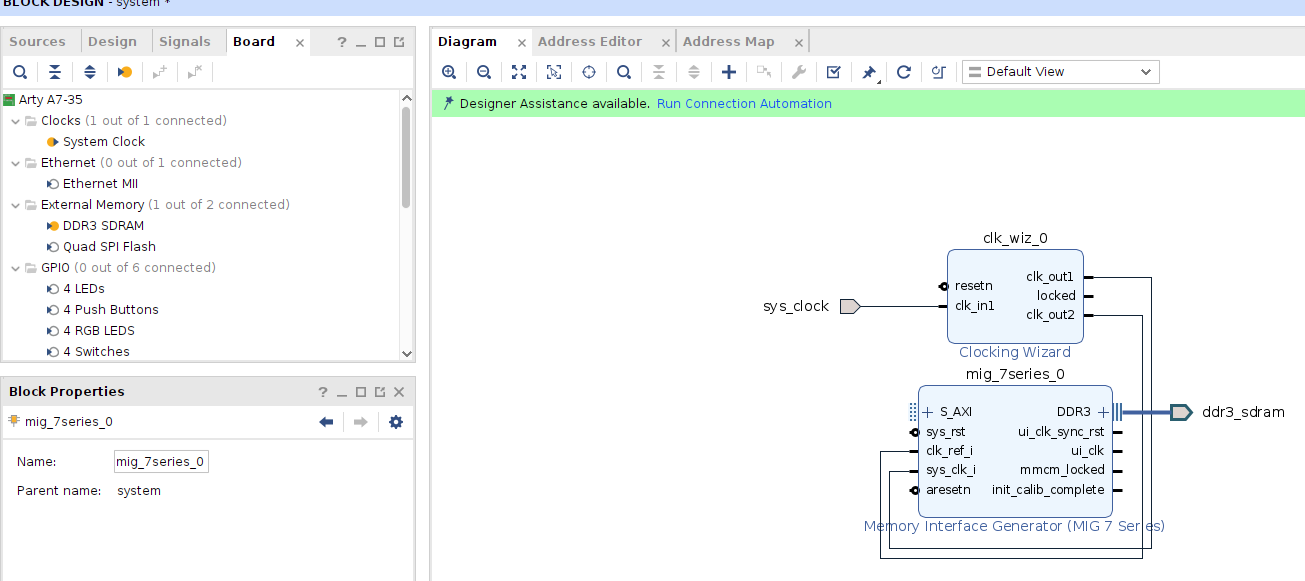
- 点击
Diagram里的高亮提示链接:Run Connection Automation.勾选上顶层All Automation,OK完成.
添加Microblaze处理器与配置
- 点击左边栏上方
IP Catalog,会在右边Diagram在边上添加一个IP Catalog的新TAB页.在页内的Search:输入Microblaze.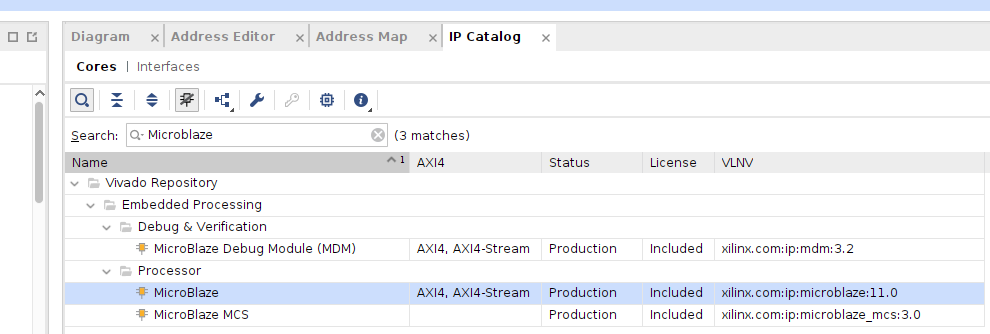
- 再双击
Microblaze去Add IP,点击Add IP to Block Design, 它就加入到设计页面里.再点击Run Block Automaction,就弹出一个配置界面,如下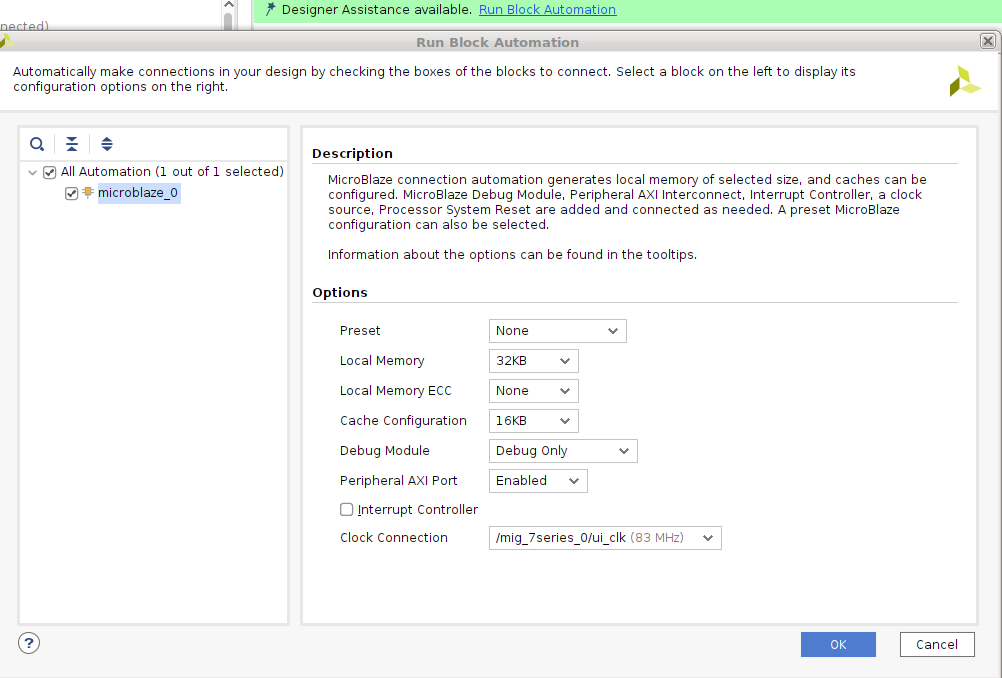
- 确保配置参数如上图所示,尤其是
Clock Connection必须连接到/mig_7series_0/ui_clk上.OK完成后,先不进行Run Connection Automation.
添加外设(Peripheral)
- 从
Arty A7-35 > UART,拖入USB UART到Diagram的画布内. - 点击
Run Connection Automation,勾选顶层All Automation,OK完成. Diagram上,点击右键菜单Regenerate Layout.最终布局如下: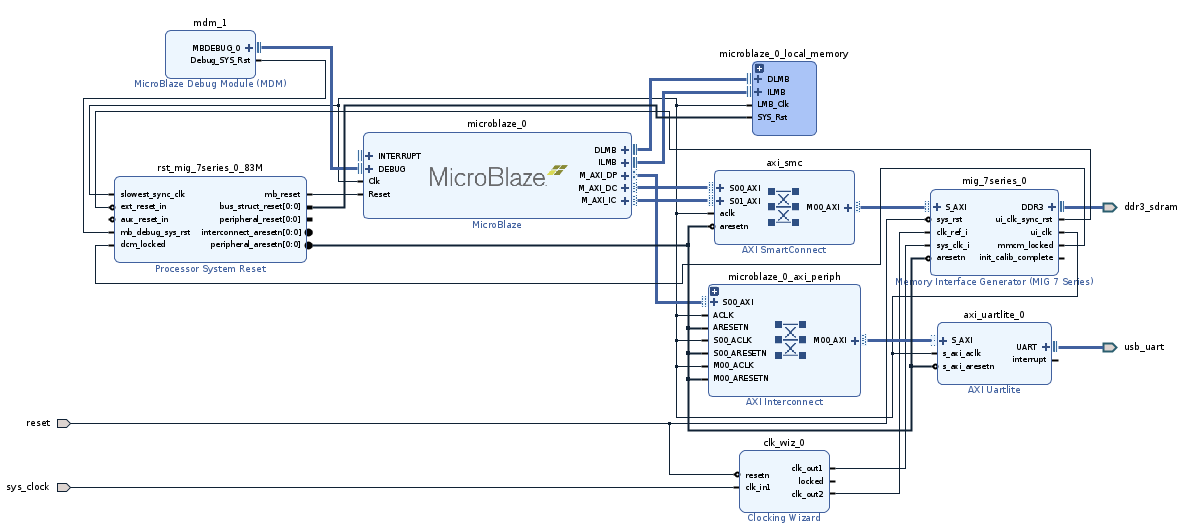
校验设计,添加HDL Wrapper
- 点击
Tools > Validate Design (F6),它检验出设计或连接错误. - 检验完成后无报错,打开
Sources页,Design Sources > system(systemd.bd_)右键菜单,选择Create HDL Wrapper...,再选Let Vivado manage wrapper and auto-update,OK完成.
生成Bitstream文件
- 点击左边导航栏,
PROGRAM AND DEBUG > Generate Bitstream, 会出现Launch Runs对话框,配置编译项的,这里直接OK完成.这个过程的时间,会根据电脑系统的性能,以及工程设计文件的大小所决定的.在Vivado最左上角会有Running xxxxxxxxx Cancel进程条与Cancel链接.完成后,如下: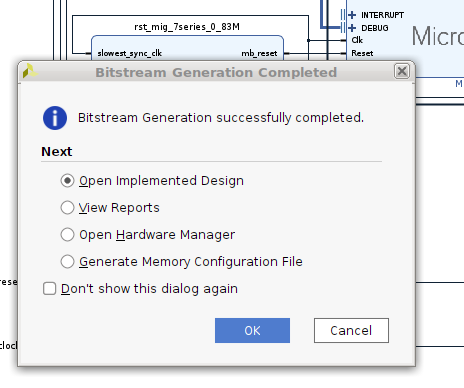
- 因为这里不需要做任何修改,就直接
Cancel完成.
导出HDL到SDK
File > Export > Export Hardware,Output选项,选择Include bitstream,下一步,可以修改XSA文件名,以及Export to的具体路径目录.完成后,会在导出的目录下,看到一个类似system_wrapper.xsa的文件.
创建应用工程(Vitis IDE)
创建平台工程
- 这里可以从
Vivado> Tools> Launch Vitis IDE运行它,Vitis IDE看它的界面,与大多数的厂商IDE差不多,都是基于Java Eclipse开发的. - 打开
Vitis IDE> File> New> Platform Project.Platform Project Name:在Platform project name:输入hello_microblaze_platform.Platform:这里默认选择Create a new platform hardware (XSA),通过Browse选择前面导出的硬件文件:system_wrapper.xsa.完成.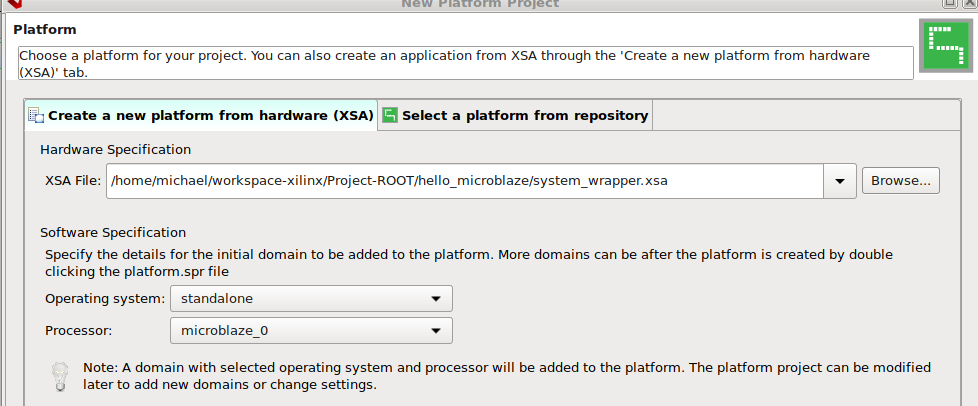
创建应用工程
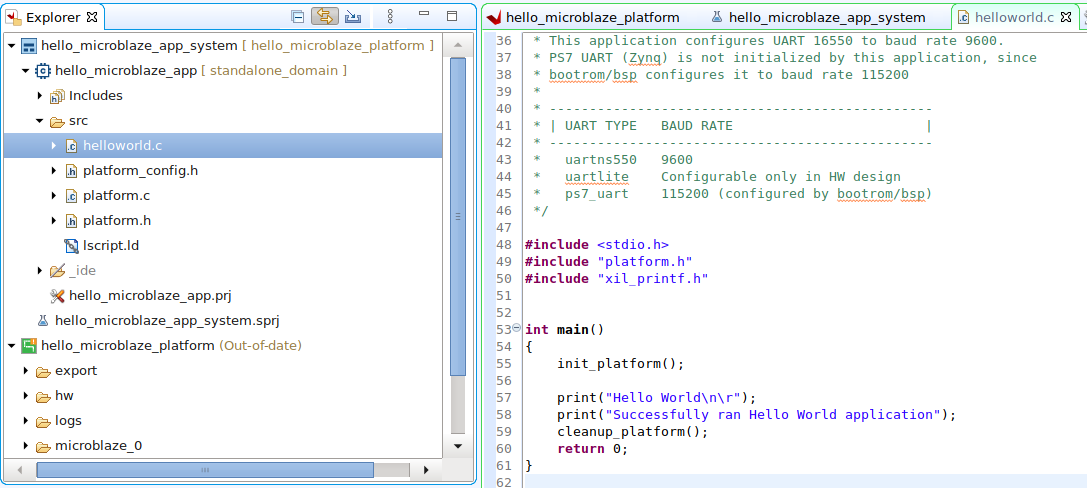
- 上面已经创建好平台工程(platform),再创建一个应用工程
File > New > Application Project:Welcome:第一页,直接点下一步.Platform:默认已经选择Select a platform from repository页,并且选择高亮了hello_microblaze_platform,下一步.Application Project Details:输入项目名称:hello_microblaze_app.Domain:默认就是standalone_domain,下一步.Templates:这里会有一个模版的列表,这里就选择Hello World的模版,完成.
- 最终工程文件结构如下图
烧写设备
- 打开
Xilinx> Program Device对话框, 这里都是默认配置,连接Arty A7-35到电脑,直接点Program.下方的Console会有如下日志:1
2
3
4
5
6
7
8
9
10
11
12
13
14
15
16
17
18
19
20
21
22
23
24updatemem -force -meminfo \
/home/michael/workspace-xilinx/Project-ROOT/hello_microblaze_app/_ide/bitstream/system_wrapper.mmi \
-bit \
/home/michael/workspace-xilinx/Project-ROOT/hello_microblaze_app/_ide/bitstream/system_wrapper.bit \
-data \
/Xilinx-Installed-ROOT/Xilinx/Vitis/2021.1/data/embeddedsw/lib/microblaze/mb_bootloop_le.elf \
-proc system_i/microblaze_0 -out \
/home/michael/workspace-xilinx/Project-ROOT/hello_microblaze_app/_ide/bitstream/download.bit
****** updatemem v2021.1 (64-bit)
**** SW Build 3247384 on Thu Jun 10 19:36:07 MDT 2021
** Copyright 1986-2021 Xilinx, Inc.All Rights Reserved.
source /Xilinx-Installed-ROOT/Xilinx/Vitis/2021.1/scripts/updatemem/main.tcl -notrace
Command: update_mem -meminfo /home/michael/workspace-xilinx/Project-ROOT/hello_microblaze_app/_ide/bitstream/system_wrapper.mmi -data /Xilinx-Installed-ROOT/Xilinx/Vitis/2021.1/data/embeddedsw/lib/microblaze/mb_bootloop_le.elf -proc system_i/microblaze_0 -bit /home/michael/workspace-xilinx/Project-ROOT/hello_microblaze_app/_ide/bitstream/system_wrapper.bit -out /home/michael/workspace-xilinx/Project-ROOT/hello_microblaze_app/_ide/bitstream/download.bit -force
Loading bitfile /home/michael/workspace-xilinx/Project-ROOT/hello_microblaze_app/_ide/bitstream/system_wrapper.bit
Loading data files...
Updating memory content...
Creating bitstream...
Writing bitstream /home/michael/workspace-xilinx/Project-ROOT/hello_microblaze_app/_ide/bitstream/download.bit...
0 Infos, 0 Warnings, 0 Critical Warnings and 0 Errors encountered.
update_mem completed successfully
update_mem: Time (s): cpu = 00:00:07 ; elapsed = 00:00:06 .Memory (MB): peak = 2143.617 ; gain = 873.242 ; free physical = 17872 ; free virtual = 88610
INFO: [Common 17-206] Exiting updatemem at Sun Oct 17 00:19:15 2021...
编译及运行工程
- 先点
Explorer > hello_microblaze_app,右键Build Project,编译工程. - 再点
Explorer > hello_microblaze_app,右键Run As > Launch Hardware (Single Application Debug). - 现在可以连接到本机的
UART串口去观看,板子的输出.可以在IDE下方Vitis Serial Terminal页里,按**+**图标,添加一个串端配置.配置如:/dev/ttyUSB1, 9600, 0, 8.
谢谢支持
- 微信二维码: