数据卷(Volumes)
Kubernetes对于数据卷重新定义,提供了丰富的强大的功能.按照功能可分为三类:本地数据卷,网络数据卷,信息数据卷.Kubernetes提供支持的数据卷类型,最新版本会有增减:- 本地数据卷:
- EmptyDir
- HostPath
- 网络数据卷:
- NFS
- iSCSI
- GlusterFS
- RBD
- Flocker
- GCE Perisistent Disk
- Aws Elastic Block Store
- azureDisk
- CephFS
- fc (fibre Channel)
- Persistent Volume Claim
- 信息数据卷:
- Git Repo(deprecated)
- Secret
- Downward API
- 本地数据卷:
本地数据卷
HostPath
- 大多数的
Pod应该忽略它们主机节点,因此它们不应该访问节点里文件系统上的任何文件.但是某些系统级别的Pod(通常是由DaemonSet管理)确实需要读取节点里的文件,还有在测试环境中可以HostPath来代替一些PV.HostPath卷指向节点里文件系统是的特定文件或目录.在同一个节点上运行并在其HostPath卷中使用相同路径的Pod可以看到相同的文件.如果要在集群里使用HostPath,需要把--enable-hostpath-provisioner参数标志加到kube-controller-manager里启动.
Ceph集群
- Ceph 中文官档,Ceph 英文官档,这里有详尽权威的文档,最新文档及版本,参看Github Ceph.
概要
Ceph是一个开源项目,它提供软件定义的(SDS),统一的存储解决方案.具有高度可伸缩性,容量可扩展到EB级别.Ceph的技术特性,总体表现在集群的可靠性,集群扩展性,数据安全性,接口统一性4个方面.
数据卷
后端存储可以分为
filestore与bluestore:FileStore:
- FileStore is the legacy approach to storing objects in Ceph. It relies on a standard file system (normally XFS) in combination with a key/value database (traditionally LevelDB, now RocksDB) for some metadata.
- FileStore is well-tested and widely used in production. However, it suffers from many performance deficiencies due to its overall design and its reliance on a traditional file system for object data storage.
- Although FileStore is capable of functioning on most POSIX-compatible file systems (including btrfs and ext4), we recommend that only the XFS file system be used with Ceph. Both btrfs and ext4 have known bugs and deficiencies and their use may lead to data loss. By default, all Ceph provisioning tools use XFS.
BlueStore:
- Key BlueStore features include:
- Direct management of storage devices. BlueStore consumes raw block devices or partitions. This avoids intervening layers of abstraction (such as local file systems like XFS) that can limit performance or add complexity.
- Metadata management with RocksDB. RocksDB’s key/value database is embedded in order to manage internal metadata, including the mapping of object names to block locations on disk.
- Full data and metadata checksumming. By default, all data and metadata written to BlueStore is protected by one or more checksums. No data or metadata is read from disk or returned to the user without being verified.
- Inline compression. Data can be optionally compressed before being written to disk.
- Multi-device metadata tiering. BlueStore allows its internal journal (write-ahead log) to be written to a separate, high-speed device (like an SSD, NVMe, or NVDIMM) for increased performance. If a significant amount of faster storage is available, internal metadata can be stored on the faster device.
- Efficient copy-on-write. RBD and CephFS snapshots rely on a copy-on-write clone mechanism that is implemented efficiently in BlueStore. This results in efficient I/O both for regular snapshots and for erasure-coded pools (which rely on cloning to implement efficient two-phase commits).
- 支持下面的配置:
- A block device, a block.wal, and a block.db device
- A block device and a block.wal device
- A block device and a block.db device
- A single block device
- block device 也有三种选项:
- 整个磁盘
- 磁盘分区
- 逻辑卷 (a logical volumen of LVM)
- Key BlueStore features include:
注意:
- 不可以使用磁盘作为
block.db或者block.wal,否则会报错:blkid could not detect a PARTUUID for device; - 若使用磁盘或者分区作
block,则ceph-volume会在其上创建LV来使用.若使用分区作block.db或block.wal,则直接使用分区而不创建LV.
- 不可以使用磁盘作为
BlueFs将整个BlueStore的存储空间分为三个层次:- 慢速(Slow)空间:主要用于存储对象数据,可由普通大容量机械盘提供,由
BlueStore自行管理 - 高速(DB)空间:存储
BlueStore内部产生的元数据,可由普通SSD提供,需求小于(慢速空间). - 超高速(WAL)空间:主要存储
RocksDB内部产生的.log 文件,可由SSD或者NVRAM等时延相较普通SSD更小的设备充当.容量需求和(高速空间)相当,同样由Bluefs直接管理.
- 慢速(Slow)空间:主要用于存储对象数据,可由普通大容量机械盘提供,由
Ceph的功能组件
Ceph OSD:(Object Storage Device),主要功能包括存储数据,处理数据的复制,恢复,回补平衡数据分布,并将一些相关数据提供给Ceph Monitor,例如Ceph OSD心跳等.一个Ceph的存储集群,至少需要1个Ceph OSD来实现active+clean健康状态和有效的保存数据的副本(默认情况下是双副本,可以调整).注意:每一个Disk,分区都可以成为一个OSD.Ceph Monitor:Ceph的监视器,主要功能是维护整个集群健康状态,提供一致性的决策,包含了Monitor map,OSD map,PG(Placement Group) map和CRUSH map.Ceph MDS:(Ceph Metadata Server),主要保存的是Ceph文件系统的元数据(metadata).注意:Ceph的块存储与Ceph的对象存储都不需要Ceph MDS.Ceph MDS为基于POSIX文件系统的用户提供了一些基础命令,如:ls,find等.如果需要创建CephFS才需要用到MDS,但是CephFS离生产使用还有一段距离.
Ceph 功能特性
RADOS
RADOS具备自我修复等特性,提供了一个可靠,自动,智能的分布式存储.它的灵魂CRUSH(Controlled Replication Under Scalable Hashing,可扩展哈希算法的可控复制)算法.
Ceph文件系统
CephFS功能特性是基于RADOS来现实分布式的文件系统,引入了MDS(Metadata Server),主要为兼容POSIX文件系统提供元数据.一般都是当体系文件系统来挂载.Ceph文件系统
Ceph块设备
RBD(Rados Block Device)功能特性是基于Librados之上,通过Librbd创建一个块设备,通过QEMU/KVM附加到VM上,作为传统的块设备来使用.目前OpenStack,CloudStack等都是采用这种方式来为VM提供块设备,同时也支持快照同COW(Copy On Write)等功能.Ceph块设备
Ceph对象网关
RADWOGW的功能特性是基于LibRADOS之上,提供当前流行的RESTful协议的网关,并且兼容AWS S3和Swift接口,作为对象存储,可以对接网盘类应用以及HLS的流媒体应用等.
体系结构

通过Ceph/ceph-ansiable安装
- 关于
Releases版本的特别说明:stable-3.0支持ceph jewel 和 luminous 版本.该branch需要Ansible 2.4`版本.stable-3.1支持ceph luminous 和 mimic 版本.该branch需要Ansible 2.4`版本.stable-3.2支持ceph luminous 和 mimic 版本.该branch需要Ansible 2.6`版本.stable-4.0支持ceph nautilus 版本.该branch需要Ansible 2.8`版本.master支持Ceph@master版本.该branch需要Ansible 2.8版本.
1 | ~$ git clone https://github.com/ceph/ceph-ansible |
通过Ceph/ceph-deploy安装
系统环境:
- ceph: version 10.2.11 (e4b061b47f07f583c92a050d9e84b1813a35671e)
- Debian GNU/Linux 9.9 (stretch)
- ceph-deploy : 2.0.1
链接:
快速安装(apt)
Ceph-deploy是比较旧的部署方式,过程稍复杂.经测试使用apt的方式安装不到ceph-deploy,这里通过pip install ceph-deploy安装成功.- 下面使用
VirtualBox创建虚拟机来做实验.创建一个Linux虚拟机,安装debian9,设置两个网卡,一个是NAT(10.0.2.0/24)用于外网下载软件使用,一个是Vboxnet1(192.168.99.0/24)集群通信使用.安装一些常的工具软件,并克隆4个新的虚拟机,更改它的主机名与IP地址.下面会用到Ansible来批量操作这些虚拟机.安装虚假机结构如下:

- 在上述的节点虚拟器机里安装
apt get ntp ntpdate ntp-doc时间服务器相关包,并配置好SSH公钥免农密登录.这里可以使用Ansible变量操作. - 注意,各个节点里的
/etc/hosts要与ceph-deploy操作的主机是一致的.否则会出现ceph-deploy mon create-initial无法进行的错误.
清理旧节点
1 | ~$ ceph-deploy purge {ceph-node} [{ceph-node}] |
安装节点
1 | ~$ ceph-deploy new --help |
1 | # --> ceph.conf |
初始化
Monitors1
2~$ ceph-deploy mon create node1 node2 node3
~$ ceph-deploy gatherkeys node1 node2 node3注意:如果出现下面的错误,可能是系统的空间小于
5%.具体错误细节可以查看/var/log/ceph/ceph-mon.DB001.log1
2[DB001][INFO ] Running command: sudo ceph --cluster=ceph --admin-daemon /var/run/ceph/ceph-mon.DB001.asok mon_status
[DB001][ERROR ] b'admin_socket: exception getting command descriptions: [Errno 2] No such file or directory'会在当前目录下,创建如下文件
- {cluster-name}.client.admin.keyring
- {cluster-name}.mon.keyring
- {cluster-name}.bootstrap-osd.keyring
- {cluster-name}.bootstrap-mds.keyring
- {cluster-name}.bootstrap-rgw.keyring
- {cluster-name}.bootstrap-mgr.keyring
分发 ceph 配置和 keys 到集群的节点中去:
1
2
3
4
5
6
7
8
9
10
11
12
13
14
15
16
17
18
19
20
21
22
23$ ceph-deploy admin node1 node2 node3
[ceph_deploy.conf][DEBUG ] found configuration file at: /home/lcy/.cephdeploy.conf
[ceph_deploy.cli][INFO ] Invoked (2.0.1): /home/lcy/.pyenv/versions/py3dev/bin/ceph-deploy admin node1 node2 node3
[ceph_deploy.cli][INFO ] ceph-deploy options:
[ceph_deploy.cli][INFO ] verbose : False
[ceph_deploy.cli][INFO ] quiet : False
[ceph_deploy.cli][INFO ] username : None
[ceph_deploy.cli][INFO ] overwrite_conf : False
[ceph_deploy.cli][INFO ] ceph_conf : None
[ceph_deploy.cli][INFO ] cluster : ceph
[ceph_deploy.cli][INFO ] client : ['node1', 'node2', 'node3']
[ceph_deploy.cli][INFO ] cd_conf : <ceph_deploy.conf.cephdeploy.Conf object at 0x7fef98f77390>
[ceph_deploy.cli][INFO ] default_release : False
[ceph_deploy.cli][INFO ] func : <function admin at 0x7fef99bdd6a8>
[ceph_deploy.admin][DEBUG ] Pushing admin keys and conf to node1
[node1][DEBUG ] connection detected need for sudo
[node1][DEBUG ] connected to host: node1
[ceph_deploy.admin][DEBUG ] Pushing admin keys and conf to node2
[node2][DEBUG ] connection detected need for sudo
[node2][DEBUG ] connected to host: node2
[ceph_deploy.admin][DEBUG ] Pushing admin keys and conf to node3
[node3][DEBUG ] connection detected need for sudo
[node3][DEBUG ] connected to host: node3查看集群的状态,可直接登录用
root权限运行,或者Ansible命令运行:1
2
3
4
5
6
7
8
9
10
11
12
13
14
15
16~$ ansible -i ../hosts node1 -b -m command -a "ceph -s"
192.168.99.101 | CHANGED | rc=0 >>
cluster:
id: 0bf150da-b691-4382-bf3d-600e90c19fba
health: HEALTH_OK
services:
mon: 3 daemons, quorum node1,node2,node3
mgr: no daemons active
osd: 0 osds: 0 up, 0 in
data:
pools: 0 pools, 0 pgs
objects: 0 objects, 0B
usage: 0B used, 0B / 0B avail
pgs:
Ceph Manager部署
- 参考文档
1
2
3
4
5
6
7
8
9
10
11
12
13
14
15
16
17
18~$ ceph-deploy mgr create node1 node2 node3
[...]
~$ ansible -i ../hosts node1 -b -m command -a "ceph -s"
192.168.99.101 | CHANGED | rc=0 >>
cluster:
id: 0bf150da-b691-4382-bf3d-600e90c19fba
health: HEALTH_OK
services:
mon: 3 daemons, quorum node1,node2,node3
mgr: node1(active), standbys: node3, node2
osd: 0 osds: 0 up, 0 in
data:
pools: 0 pools, 0 pgs
objects: 0 objects, 0B
usage: 0B used, 0B / 0B avail
pgs:
Ceph OSD部署
- ceph-volume
- 从
Ceph Luminous 12.2.2开始,ceph-disk被弃用,使用ceph-volume代替.
1 | ~$ ceph-deploy osd -h |
- 在
node1添加了一个磁盘作OSD盘,下面把它整个盘创建成一个块设备.
1 | ~$ ceph-deploy osd create node1 --data /dev/vdb |
- 出错消息,如果原盘里面有
LVM的信息,要先手动清除原LVM信息,不然会出现下面错误.先用lvdisplay查看,再用lvremove --force,vgdisplay,vgremove --force,清除原有的 LVM 信息.
1 | [DB001][ERROR ] RuntimeError: command returned non-zero exit status: 1 |
清除原
LVM信息1
~$ ansible -i hosts all -b -m shell -a "lvdisplay | awk 'NR==2 {print $3}'| xargs lvremove --force ; vgdisplay | awk 'NR==2 {print $3}' | xargs vgremove"
查看
osd状态1
2
3
4
5
6
7
8
9
10
11
12~$ ansible -i ../hosts node1 -b -m command -a "ceph osd stat"
3 osds: 3 up, 3 in
~$ ansible -i ../hosts node1 -b -m command -a "ceph df"
GLOBAL:
SIZE AVAIL RAW USED %RAW USED
180GiB 177GiB 3.02GiB 1.68
POOLS:
NAME ID USED %USED MAX AVAIL OBJECTS
hdd 1 375B 0 84.0GiB 8
cephfs_data 2 0B 0 84.0GiB 0
cephfs_metadata 3 2.19KiB 0 84.0GiB 21查看
osd树1
2
3
4
5
6
7
8
9
10
11$ ansible -i hosts node1 -b -m command -a "ceph osd tree"
node1 | CHANGED | rc=0 >>
ID CLASS WEIGHT TYPE NAME STATUS REWEIGHT PRI-AFF
-1 0.17578 root default
-3 0.05859 host node1
0 hdd 0.05859 osd.0 up 1.00000 1.00000
-7 0.05859 host node2
2 hdd 0.05859 osd.2 up 1.00000 1.00000
-5 0.05859 host node3
1 hdd 0.05859 osd.1 up 1.00000 1.00000查看系统状态
1
2
3
4
5
6
7
8
9
10
11
12
13
14
15
16
17
18
19
20
21
22
23
24
25
26
27
28
29
30
31
32
33
34
35
36
37
38
39
40
41
42
43
44
45
46
47
48
49
50
51$ ansible -i ../hosts node1 -b -m command -a "ceph -s"
192.168.99.101 | CHANGED | rc=0 >>
cluster:
id: 0bf150da-b691-4382-bf3d-600e90c19fba
health: HEALTH_OK
services:
mon: 3 daemons, quorum node1,node2,node3
mgr: node1(active), standbys: node3, node2
osd: 1 osds: 1 up, 1 in
data:
pools: 0 pools, 0 pgs
objects: 0 objects, 0B
usage: 1.00GiB used, 9.00GiB / 10.0GiB avail # 这里是node1:/dev/sdb刚创建的.
pgs:
# 如果要使用管道操作,必须使用shell模块,command模块会出错.
~$ ansible -i ../hosts node1 -b -m shell -a "mount | grep ceph"
tmpfs on /var/lib/ceph/osd/ceph-0 type tmpfs (rw,relatime)
~$ ansible -i ../hosts node1 -b -m command -a "ls -l /var/lib/ceph/"
192.168.99.101 | CHANGED | rc=0 >>
total 44
drwxr-xr-x 2 ceph ceph 4096 Apr 11 08:44 bootstrap-mds
drwxr-xr-x 2 ceph ceph 4096 May 9 21:33 bootstrap-mgr
drwxr-xr-x 2 ceph ceph 4096 May 9 22:27 bootstrap-osd
drwxr-xr-x 2 ceph ceph 4096 Apr 11 08:44 bootstrap-rbd
drwxr-xr-x 2 ceph ceph 4096 Apr 11 08:44 bootstrap-rgw
drwxr-xr-x 2 ceph ceph 4096 Apr 11 08:44 mds
drwxr-xr-x 3 ceph ceph 4096 May 9 21:33 mgr
drwxr-xr-x 3 ceph ceph 4096 May 9 21:22 mon
drwxr-xr-x 3 ceph ceph 4096 May 9 22:27 osd
drwxr-xr-x 2 ceph ceph 4096 Apr 11 08:44 radosgw
drwxr-xr-x 2 ceph ceph 4096 May 9 21:22 tmp
~$ ansible -i ../hosts node1 -b -m command -a "ls -l /var/lib/ceph/osd/ceph-0"
192.168.99.101 | CHANGED | rc=0 >>
total 48
-rw-r--r-- 1 ceph ceph 393 May 9 22:27 activate.monmap
lrwxrwxrwx 1 ceph ceph 93 May 9 22:27 block -> /dev/ceph-195012d6-0c8a-45bf-964c-3ac15f2cd024/osd-block-261c9455-fbc4-4eba-9783-5fba4290048d
-rw-r--r-- 1 ceph ceph 2 May 9 22:27 bluefs
-rw-r--r-- 1 ceph ceph 37 May 9 22:27 ceph_fsid
-rw-r--r-- 1 ceph ceph 37 May 9 22:27 fsid
-rw------- 1 ceph ceph 55 May 9 22:27 keyring
-rw-r--r-- 1 ceph ceph 8 May 9 22:27 kv_backend
-rw-r--r-- 1 ceph ceph 21 May 9 22:27 magic
-rw-r--r-- 1 ceph ceph 4 May 9 22:27 mkfs_done
-rw-r--r-- 1 ceph ceph 41 May 9 22:27 osd_key
-rw-r--r-- 1 ceph ceph 6 May 9 22:27 ready
-rw-r--r-- 1 ceph ceph 10 May 9 22:27 type
-rw-r--r-- 1 ceph ceph 2 May 9 22:27 whoami查看
Ceph的参数配置项1
2
3
4
5
6~$ ansible -i ../hosts node1 -b -m command -a "ceph --show-config"
name = client.admin
cluster = ceph
debug_none = 0/5
debug_lockdep = 0/1
[....]查看
LVM相关信息1
2
3
4
5
6
7
8
9
10
11
12
13
14
15
16
17
18
19
20
21
22
23
24
25
26
27
28
29
30
31
32
33
34
35
36
37
38
39
40
41
42
43
44
45
46
47
48
49
50
51
52
53
54~$ ansible -i ../hosts node1 -b -m command -a "pvdisplay"
192.168.99.101 | CHANGED | rc=0 >>
--- Physical volume ---
PV Name /dev/sdb
VG Name ceph-195012d6-0c8a-45bf-964c-3ac15f2cd024
PV Size 10.00 GiB / not usable 4.00 MiB
Allocatable yes (but full)
PE Size 4.00 MiB
Total PE 2559
Free PE 0
Allocated PE 2559
PV UUID Qd6kSs-Ivbp-3APy-21Tv-XQgx-EhBn-XfioVa
~$ ansible -i ../hosts node1 -b -m command -a "vgdisplay"
192.168.99.101 | CHANGED | rc=0 >>
--- Volume group ---
VG Name ceph-195012d6-0c8a-45bf-964c-3ac15f2cd024
System ID
Format lvm2
Metadata Areas 1
Metadata Sequence No 17
VG Access read/write
VG Status resizable
MAX LV 0
Cur LV 1
Open LV 1
Max PV 0
Cur PV 1
Act PV 1
VG Size 10.00 GiB
PE Size 4.00 MiB
Total PE 2559
Alloc PE / Size 2559 / 10.00 GiB
Free PE / Size 0 / 0
VG UUID XiVkQ6-aUPv-3BRw-Gj1N-jdG4-HRxf-hCS3Mg
~$ ansible -i ../hosts node1 -b -m command -a "lvdisplay"
192.168.99.101 | CHANGED | rc=0 >>
--- Logical volume ---
LV Path /dev/ceph-195012d6-0c8a-45bf-964c-3ac15f2cd024/osd-block-261c9455-fbc4-4eba-9783-5fba4290048d
LV Name osd-block-261c9455-fbc4-4eba-9783-5fba4290048d
VG Name ceph-195012d6-0c8a-45bf-964c-3ac15f2cd024
LV UUID F9dF0S-qwb7-LJC0-vld2-TF6g-nP8q-9ncsdI
LV Write Access read/write
LV Creation host, time node1, 2019-05-09 22:27:44 -0400
LV Status available
# open 4
LV Size 10.00 GiB
Current LE 2559
Segments 1
Allocation inherit
Read ahead sectors auto
- currently set to 256
Block device 253:0关于
LVM的关系.简单描述一下:LV是建立在VG上,VG建立在PV上面.下面关闭
node2,为添加一块20G的盘,测试其它BlueStore类型.1
2
3
4
5
6
7
8
9
10
11
12
13
14
15
16
17~$ ansible -i ../hosts node1 -b -m command -a "ceph -s"
192.168.99.101 | CHANGED | rc=0 >>
cluster:
id: 0bf150da-b691-4382-bf3d-600e90c19fba
health: HEALTH_WARN
1/3 mons down, quorum node1,node3 # 警告有一个节点shutdown.
services:
mon: 3 daemons, quorum node1,node3, out of quorum: node2
mgr: node1(active), standbys: node3
osd: 1 osds: 1 up, 1 in
data:
pools: 0 pools, 0 pgs
objects: 0 objects, 0B
usage: 1.00GiB used, 9.00GiB / 10.0GiB avail
pgs:
Parted(GPT 分区)
如果使用
fdisk(MBR)分区会报错,下面使用parted(GPT)分区.1
2
3
4
5
6
7
8
9
10
11
12
13
14
15
16
17
18
19
20
21
22
23
24
25
26
27
28
29
30
31
32
33
34
35
36
37
38
39
40
41
42
43
44
45
46
47
48
49
50
51root@node2:~# parted /dev/sdb
GNU Parted 3.2
Using /dev/sdb
Welcome to GNU Parted! Type 'help' to view a list of commands.
(parted) mklabel gpt
(parted) print
Model: ATA VBOX HARDDISK (scsi)
Disk /dev/sdb: 21.5GB
Sector size (logical/physical): 512B/512B
Partition Table: gpt
Disk Flags:
Number Start End Size File system Name Flags
(parted) mkpart parimary 0 10G
Warning: The resulting partition is not properly aligned for best performance.
Ignore/Cancel?
Ignore/Cancel? Ignore
(parted) print
Model: ATA VBOX HARDDISK (scsi)
Disk /dev/sdb: 21.5GB
Sector size (logical/physical): 512B/512B
Partition Table: gpt
Disk Flags:
Number Start End Size File system Name Flags
1 17.4kB 10.0GB 10000MB parimary
(parted) mkpart parimary 10G 21.5G
(parted) p
Model: ATA VBOX HARDDISK (scsi)
Disk /dev/sdb: 21.5GB
Sector size (logical/physical): 512B/512B
Partition Table: gpt
Disk Flags:
Number Start End Size File system Name Flags
1 17.4kB 10.0GB 10000MB parimary
2 10.0GB 21.5GB 11.5GB parimary
(parted) q
root@node2:~# partx /dev/sdb
NR START END SECTORS SIZE NAME UUID
1 34 19531250 19531217 9.3G parimary a8c625b7-ebf2-4ceb-a9fd-5371dde59b35
2 19531776 41940991 22409216 10.7G parimary 6463703f-c1f3-4ad7-8870-ed634db64131
root@node2:~# lsblk /dev/sdb
NAME MAJ:MIN RM SIZE RO TYPE MOUNTPOINT
sdb 8:16 0 20G 0 disk
├─sdb1 8:17 0 9.3G 0 part
└─sdb2 8:18 0 10.7G 0 part添加
osd.1(block,block.db)
1 | ~$ ceph-deploy osd create node2 --data /dev/sdb2 --block-db /dev/sdb1 |
创建MDS服务器
1 | ~$ ceph-deploy mds create FE001 DIG001 |
挂载到文件系统,挂载文件系统,可以使用
/etc/ceph/ceph.client.admin.keyring里的 key,也可以按照下面,新建一个用户与 key.1
2
3
4
5
6
7
8
9
10~$ sudo ceph auth get-or-create client.cephfs mon 'allow r' mds 'allow rw' osd 'allow rw pool=cephfs-data, allow rw pool=cephfs-metadata'
~$ sudo ceph auth get client.cephfs
exported keyring for client.cephfs
[client.cephfs]
key = AQDAwhldGXL3GhAAGsHu3XYUIwzS6z0SOcLMFA==
caps mds = "allow rw"
caps mon = "allow r"
caps osd = "allow rw pool=cephfs-data, allow rw pool=cephfs-metadata"
~$ sudo mount.ceph node1:6789:/ /data -o name=cephfs,secret=AQDAwhldGXL3GhAAGsHu3XYUIwzS6z0SOcLMFA==上述的挂载的方式,会在
Shell里看到key,不安全.可以把AQDAwhldGXL3GhAAGsHu3XYUIwzS6z0SOcLMFA==这个Base64的密钥字段保存成一个文件,加上chmod 400的权限.1
2
3
4~$ sudo mount.ceph node1:6789:/ /data -o name=cephfs,secretfile=/etc/ceph/cephfs.secret
# 加入自动挂载
~$ echo "mon1:6789,mon2:6789,mon3:6789:/ /cephfs ceph name=cephfs,secretfile=/etc/ceph/cephfs.secret,_netdev,noatime 0 0" | sudo tee -a /etc/fstab
1 | [2019-07-01 14:20:45,567][ceph_volume.process][INFO ] stdout ceph.block_device=/dev/ceph-bd417a6a-cef6-4ff5-828a-5b68ec8843f0/osd-block-dcde5f54-c555-41ee-8c20-586f1069bcb7,ceph.block_uuid=wHZD0b-lU7P-vYFg-XOBI-zknV-Q181-0xKtt3,ceph.cephx_lockbox_secret=,ceph.cluster_fsid=d7f63adc-33d1-4ae9-9ba7-ae401950d965,ceph.cluster_name=ceph,ceph.crush_device_class=None,ceph.encrypted=0,ceph.osd_fsid=dcde5f54-c555-41ee-8c20-586f1069bcb7,ceph.osd_id=1,ceph.type=block,ceph.vdo=0";"/dev/ceph-bd417a6a-cef6-4ff5-828a-5b68ec8843f0/osd-block-dcde5f54-c555-41ee-8c20-586f1069bcb7";"osd-block-dcde5f54-c555-41ee-8c20-586f1069bcb7";"ceph-bd417a6a-cef6-4ff5-828a-5b68ec8843f0";"wHZD0b-lU7P-vYFg-XOBI-zknV-Q181-0xKtt3";"60.00g |
1 | ~$ sudo lvs -o lv_tags |
可以在
Ceph集群之外的服务器来安装RGW,需要安装ceph-radosgw包,如:ceph-deploy install --rgw <rgw-node> [<rgw-node>...].下面为了方便起见,我直接在node3,node4上面安装RGW.添加一个
mon节点1
~$ ceph-deploy mon add node4
1 | # node3在前面被管理过了. |
- 修改 RGW 的默认端口.在 ceph.conf 加入下面两行
1 | [client.rgw.node4] |
- 上传当前目录下的配置文件到指定的在节点上去.
1
2~$ ceph-deploy --overwrite-conf config push node4
~$ ansible -i hosts node4 -b -m systemd -a "name=radosgw state=restarted daemon_reload=yes"
civetweb配置
如果不是通过
ceph-deploy部署的集群需要通过下面的流程,手动配置添加RGW1
2
3
4
5
6
7
8
9
10
11
12
13
14
15
16# 创建keyring
~$ sudo ceph-authtool --create-keyring /etc/ceph/ceph.client.radosgw.keyring
# 生成密钥匙
~$ sudo ceph-authtool /etc/ceph/ceph.client.radosgw.keyring -n client.rgw.node3 --gen-key
# 设置权限
~$ sudo ceph-authtool -n client.rgw.node3 --cap osd 'allow rwx' --cap mon 'allow rwx' /etc/ceph/ceph.client.radosgw.keyring
# 导入keyring到集群中
~$ sudo ceph -k /etc/ceph/ceph.client.admin.keyring auth add client.rgw.node3 -i /etc/ceph/ceph.client.radosgw.keyring
~$ cat /etc/ceph/ceph.conf
[...]
[client.rgw.node3]
rgw_frontends = civetweb port=80
host=node3
rgw_s3_auth_use_keystone=false
keyring=/etc/ceph/ceph.client.radosgw.keyring
log file=/var/log/ceph/client.radosgw.gateway.log这里是通过
ceph-deploy部署的,只需导出相应到/etc/ceph/ceph.client.radosgw.keyring1
2
3
4
5
6
7~$ sudo ceph auth get client.rgw.node3
exported keyring for client.rgw.node3
# 把下面这行复制,并创建到 /etc/ceph/ceph.client.radosgw.keyring
[client.rgw.node3]
key = AQC8FNVcl07ALRAAfhr+APpuKW/VvknEzD7hpg==
caps mon = "allow rw"
caps osd = "allow rwx"测试访问
1
~$ sudo radosgw --cluster ceph --name client.rgw.node3 --setuser ceph --setgroup ceph -d --debug_ms 1 --keyring /etc/ceph/ceph.client.radosgw.keyring
如果一切正常开启,就使用
systemctl restart ceph-radosgw@rgw.node3重启它的服务,如果服务有错,使用journalctl -u ceph-radosgw@rgw.node3查看.
客户端访问
创建S3用户
1 | $ ansible -i ../hosts node4 -b -m command -a "radosgw-admin user create --uid=\"lcy\" --display-name=\"admin user test\"" |
创建Swift用户
Swift用户是作为子用户被创建,因此要先创建用户,如下:lcy1
2
3
4
5
6
7
8
9
10
11
12
13
14
15
16
17
18
19
20
21
22
23
24
25
26
27
28
29
30
31
32
33
34
35
36
37
38
39
40
41
42
43
44
45
46
47
48
49~$ ansible -i ../hosts node4 -b -m command -a "radosgw-admin subuser create --uid=lcy --subuser=lcy:swift --access=full"
192.168.99.104 | CHANGED | rc=0 >>
{
"user_id": "lcy",
"display_name": "admin user test",
"email": "",
"suspended": 0,
"max_buckets": 1000,
"auid": 0,
"subusers": [
{
"id": "lcy:swift",
"permissions": "full-control"
}
],
"keys": [
{
"user": "lcy",
"access_key": "74I2DQ89N5EL1OGCCSCV",
"secret_key": "ePz9ONOrZS4BB8RN44KBYxCzRA0UNz8Kyu5kXzvE"
}
],
"swift_keys": [
{
"user": "lcy:swift",
"secret_key": "bw2zByEnhZMzpSvrb9tYi5rjOT8mK69SkuuWFN8j"
}
],
"caps": [],
"op_mask": "read, write, delete",
"default_placement": "",
"placement_tags": [],
"bucket_quota": {
"enabled": false,
"check_on_raw": false,
"max_size": -1,
"max_size_kb": 0,
"max_objects": -1
},
"user_quota": {
"enabled": false,
"check_on_raw": false,
"max_size": -1,
"max_size_kb": 0,
"max_objects": -1
},
"temp_url_keys": [],
"type": "rgw"
}
使用Python客户端库测试
1 | ~$ pip install boto python-swiftclient |
使用s3cmd测试
使用
s3cmd之前,需要先使用s3cmd --configure交互设置好相应的参数.这里跳过直接写入一些必要的连接参数.这里可以配置任一rgw(node3,node4)节点测试.1
2
3
4
5
6
7
8
9
10
11
12
13
14
15
16
17
18
19
20
21
22
23
24
25
26
27
28~$ sudo apt instal s3cmd
~$ cat <<EOF > ~/.s3cfg
[default]
access_key = 74I2DQ89N5EL1OGCCSCV
host_base = node3:7480
host_bucket = node3:7480/%(bucket)
secret_key = ePz9ONOrZS4BB8RN44KBYxCzRA0UNz8Kyu5kXzvE
cloudfront_host = node3:7480
use_https = False
bucket_location = US
EOF
# 列出所有桶
~$ s3cmd ls
2019-05-10 07:08 s3://ooo-bucket
# 创建桶
~$ s3cmd mb s3://sql
# 上传文件进桶
~$ s3cmd put ~/wxdb-20190422-1638.sql s3://sql
upload: '/home/lcy/wxdb-20190422-1638.sql' -> 's3://sql/wxdb-20190422-1638.sql' [1 of 1]
197980 of 197980 100% in 1s 104.33 kB/s done
# 列出桶里的文件
~$ s3cmd ls s3://sql
2019-05-10 08:12 197980 s3://sql/wxdb-20190422-1638.sql
# 下载桶里的文件到本地.
~$ s3cmd get s3://sql/wxdb-20190422-1638.sql
download: 's3://sql/wxdb-20190422-1638.sql' -> './wxdb-20190422-1638.sql' [1 of 1]
197980 of 197980 100% in 0s 57.23 MB/s done查看集群利用率统计
1
2
3
4
5
6
7
8
9
10
11
12
13~$ ansible -i ../hosts node2 -b -m command -a "ceph df"
192.168.99.102 | CHANGED | rc=0 >>
GLOBAL:
SIZE AVAIL RAW USED %RAW USED
20.7GiB 18.7GiB 2.01GiB 9.72
POOLS:
NAME ID USED %USED MAX AVAIL OBJECTS
.rgw.root 1 2.08KiB 0 5.83GiB 6
default.rgw.control 2 0B 0 5.83GiB 8
default.rgw.meta 3 2.13KiB 0 5.83GiB 12
default.rgw.log 4 0B 0 5.83GiB 207
default.rgw.buckets.index 5 0B 0 5.83GiB 3
default.rgw.buckets.data 6 193KiB 0 5.83GiB 1
s3fs-fuse挂载文件系统
- s3fs-fuse
- Django 使用 AWS S3 存储文件参考
- 原本想直接把
ceph s3 bucket做为一个卷挂到 docker 上面,暂时没试验成功.下是如在的宿主机里挂载,再通过-v挂到 docker 上.1
2
3
4
5
6
7
8
9
10
11
12
13
14
15
16
17
18
19
20
21
22
23
24
25~$ sudo apt install s3fs fuse
# 也可把它放在/etc/passwd-s3fs
~$ echo ACCESS_KEY_ID:SECRET_ACCESS_KEY > ${HOME}/.passwd-s3fs && chmod 600 ${HOME}/.passwd-s3fs
~$ s3cmd ls
2019-05-10 08:10 s3://iso
2019-05-16 03:50 s3://media # 下面将把它挂载成一个文件目录.
2019-05-10 07:08 s3://ooo-bucket
2019-05-16 06:44 s3://public
2019-05-10 08:10 s3://sql
# 这里需注,ceph s3 必需使用use_path_request_style参数,因为它不是AWS原生的.
~$ s3fs media /data/s3fs -o allow_other,umask=022,use_path_request_style,url=http://node3
~$ df -h | grep s3fs
s3fs 256T 0 256T 0% /data/s3fs
~$ grep s3fs /etc/mtab
s3fs /data/s3fs fuse.s3fs rw,nosuid,nodev,relatime,user_id=1000,group_id=120,allow_other 0 0
# 如是挂载不加umask,默认是0000,无访问权限.
~$ ls -l /data/s3fs/
total 9397
drwxr-xr-x 1 root root 0 Jan 1 1970 hls
-rwxr-xr-x 1 root root 3100721 May 16 14:24 video.mp4 - 如果需要调试问题,可加入
-o dbglevel=info -f -o curldbg启动,具体还有其它功能,可以详查看它的github以及它的帮助命令.
警告错误类
-
1
2
3
4
5
6
7
8
9
10
11
12
13
14
15
16
17
18
19
20$ ansible -i ../hosts node1 -b -m command -a "ceph -s"
192.168.99.101 | CHANGED | rc=0 >>
cluster:
id: 0bf150da-b691-4382-bf3d-600e90c19fba
health: HEALTH_WARN
Degraded data redundancy: 237/711 objects degraded (33.333%), 27 pgs degraded, 48 pgs undersized
services:
mon: 4 daemons, quorum node1,node2,node3,node4
mgr: node1(active), standbys: node2, node3
osd: 2 osds: 2 up, 2 in
rgw: 2 daemons active
data:
pools: 6 pools, 48 pgs
objects: 237 objects, 198KiB
usage: 2.01GiB used, 18.7GiB / 20.7GiB avail
pgs: 237/711 objects degraded (33.333%)
27 active+undersized+degraded
21 active+undersized 根据上面的警告,数据中的
pg降级,重启OSD的节点服务systemctl restart ceph-osd.target之后再看.后来仔细查看发现,是因为
osd的备份数量是3,而我这里只创建了两个osd,所以才会出现上述降级警告.可以修改备份数量为2,也可以再增加一个osd节点.下面也参照
node2一样添加一个 20G 的盘,分成两个区,使用(block,block.wal)方式创建.
1 | ~$ ceph-deploy osd create node3 --data /dev/sdb2 --block-wal /dev/sdb1 |
- Ceph: HEALTH_WARN clock skew detected
1 | # 把所有节点的ntp默认开机启动. |
- application not enabled on 1 pool(s) 警告处理
1 | ~$ sudo ceph health detail |
- 安装完成后各节点的服务列表如下:
1
2
3
4
5
6
7
8
9
10
11
12
13
14
15
16
17
18
19
20
21
22
23
24
25
26
27
28
29
30
31
32
33
34
35
36
37
38
39
40
41
42
43$ ansible -i hosts node -b -m command -a "netstat -tnlp"
192.168.99.102 | CHANGED | rc=0 >>
Active Internet connections (only servers)
Proto Recv-Q Send-Q Local Address Foreign Address State PID/Program name
tcp 0 0 192.168.99.102:6789 0.0.0.0:* LISTEN 476/ceph-mon
tcp 0 0 192.168.99.102:6800 0.0.0.0:* LISTEN 875/ceph-osd
tcp 0 0 192.168.99.102:6801 0.0.0.0:* LISTEN 875/ceph-osd
tcp 0 0 192.168.99.102:6802 0.0.0.0:* LISTEN 875/ceph-osd
tcp 0 0 192.168.99.102:6803 0.0.0.0:* LISTEN 875/ceph-osd
tcp 0 0 0.0.0.0:22 0.0.0.0:* LISTEN 529/sshd
tcp6 0 0 :::22 :::* LISTEN 529/sshd
192.168.99.101 | CHANGED | rc=0 >>
Active Internet connections (only servers)
Proto Recv-Q Send-Q Local Address Foreign Address State PID/Program name
tcp 0 0 192.168.99.101:6789 0.0.0.0:* LISTEN 480/ceph-mon
tcp 0 0 192.168.99.101:6800 0.0.0.0:* LISTEN 1015/ceph-osd
tcp 0 0 192.168.99.101:6801 0.0.0.0:* LISTEN 1015/ceph-osd
tcp 0 0 192.168.99.101:6802 0.0.0.0:* LISTEN 1015/ceph-osd
tcp 0 0 192.168.99.101:6803 0.0.0.0:* LISTEN 1015/ceph-osd
tcp 0 0 192.168.99.101:6804 0.0.0.0:* LISTEN 476/ceph-mgr
tcp 0 0 0.0.0.0:22 0.0.0.0:* LISTEN 537/sshd
tcp6 0 0 :::22 :::* LISTEN 537/sshd
192.168.99.103 | CHANGED | rc=0 >>
Active Internet connections (only servers)
Proto Recv-Q Send-Q Local Address Foreign Address State PID/Program name
tcp 0 0 192.168.99.103:6789 0.0.0.0:* LISTEN 479/ceph-mon
tcp 0 0 192.168.99.103:6800 0.0.0.0:* LISTEN 965/ceph-osd
tcp 0 0 192.168.99.103:6801 0.0.0.0:* LISTEN 965/ceph-osd
tcp 0 0 192.168.99.103:6802 0.0.0.0:* LISTEN 965/ceph-osd
tcp 0 0 192.168.99.103:6803 0.0.0.0:* LISTEN 965/ceph-osd
tcp 0 0 0.0.0.0:22 0.0.0.0:* LISTEN 527/sshd
tcp 0 0 0.0.0.0:7480 0.0.0.0:* LISTEN 480/radosgw
tcp6 0 0 :::22 :::* LISTEN 527/sshd
192.168.99.104 | CHANGED | rc=0 >>
Active Internet connections (only servers)
Proto Recv-Q Send-Q Local Address Foreign Address State PID/Program name
tcp 0 0 192.168.99.104:6789 0.0.0.0:* LISTEN 445/ceph-mon
tcp 0 0 0.0.0.0:80 0.0.0.0:* LISTEN 447/radosgw
tcp 0 0 0.0.0.0:22 0.0.0.0:* LISTEN 515/sshd
tcp6 0 0 :::22 :::* LISTEN 515/sshd
与Kubernetes集成
创建RBD
操作
RBD必须直接登录到服务器里操作,ceph-deploy没有提供相关的接口.可以使用Ansible进行远程指操作.1
2
3
4
5
6
7
8
9
10
11
12
13
14
15
16
17
18
19
20
21
22
23
24
25
26
27
28
29
30
31# 关于如何计算池的pg数,可以参考 https://ceph.com/pgcalc/
~$ sudo ceph osd pool create kube 64 64
pool 'kube' created
# 设置存储池的副本数
~$ sudo ceph osd pool set kube size 2
~$ sudo ceph osd lspools
1 .rgw.root,2 default.rgw.control,3 default.rgw.meta,4 default.rgw.log,5 default.rgw.buckets.index,6 default.rgw.buckets.data,7 volumes,8 kube,
~$ sudo rbd create kube/cephimage2 --size 40960
~$ sudo rbd list kube
cephimage2
~$ sudo rbd info kube/cephimage2
rbd image 'cephimage2':
size 40GiB in 10240 objects
order 22 (4MiB objects)
block_name_prefix: rbd_data.519a06b8b4567
format: 2
#
features: layering, exclusive-lock, object-map, fast-diff, deep-flatten
flags:
create_timestamp: Mon May 13 01:44:35 2019
~$ sudo rbd create kube/cephimage1 --size 10240
# 把 cepimage1原来10G大小,扩展至20G
~$ sudo rbd resize kube/cephimage1 --size 20480
-$ sudo rbd create kube/cephimage3 --size 4096 --image-feature layering默认创建
RBD的会开启(layering, exclusive-lock, object-map, fast-diff, deep-flatten)特性,低版本的linux kernel会不支持,一般低版本仅支持layering特性.如果内核版本过低,创建Pod时会出现下面的要错误.
1 | MountVolume.WaitForAttach failed for volume "ceph-rbd-pv" : rbd: map failed exit status 6, rbd output: rbd: sysfs write failed RBD image feature set mismatch. Try disabling features unsupported by the kernel with "rbd feature disable". In some cases useful info is found in syslog - try "dmesg | tail". rbd: map failed: (6) No such device or address |
创建集群
Pod1
2
3
4
5
6
7
8
9~$ git clone https://github.com/kubernetes/examples.git
~$ cd examples/staging/volumes/rbd/
~$ tree
.
├── rbd-with-secret.yaml
├── rbd.yaml
├── README.md
└── secret
└── ceph-secret.yaml修改
rbd-with-secret.yaml的内容如下:1
2
3
4
5
6
7
8
9
10
11
12
13
14
15
16
17
18
19
20
21
22
23
24
25
26
27apiVersion: v1
kind: Pod
metadata:
name: rbd2
spec:
containers:
- image: busybox
command: ["sleep", "60000"]
name: rbd-rw
volumeMounts:
- name: rbdpd
mountPath: /mnt/rbd
volumes:
- name: rbdpd
rbd:
monitors:
- '192.168.99.101:6789'
- '192.168.99.102:6789'
- '192.168.99.103:6789'
- '192.168.99.104:6789'
pool: kube
image: cephimage3
fsType: ext4
readOnly: false
user: admin
secretRef:
name: ceph-secret修改
ceph-secret,注意替换文件里的key字段.1
2
3
4
5
6
7
8
9
10~$ ansible -i hosts node1 -b -m command -a "cat /etc/ceph/ceph.client.admin.keyring" | grep key | awk '{printf "%s",$NF}' | base64
QVFESDB0UmNFSStwR3hBQUJ4aW1ZT1VXRWVTckdzSStpZklCOWc9PQ==
~$ cat secret/ceph-secret.yaml
apiVersion: v1
kind: Secret
metadata:
name: ceph-secret
type: "kubernetes.io/rbd"
data:
key: QVFESDB0UmNFSStwR3hBQUJ4aW1ZT1VXRWVTckdzSStpZklCOWc9PQ== # 来源于上面的命令输出.创建
Pod与Secret1
2
3
4
5
6
7
8
9
10
11
12
13
14~$ kubectl create -f secret/ceph-secret.yaml
~$ kubectl create -f rbd-with-secret
~$ kubectl get pods -o wide
NAME READY STATUS RESTARTS AGE IP NODE NOMINATED NODE READINESS GATES
rbd2 1/1 Running 0 60m 10.244.1.2 node2 <none> <none>
~$ kubectl get secret
NAME TYPE DATA AGE
ceph-secret kubernetes.io/rbd 1 17h
# 这样就像使用本的盘一样了.
~$ kubectl exec -it rbd2 -- df -h | grep -e "rbd0" -e "secret"
/dev/rbd0 3.9G 16.0M 3.8G 0% /mnt/rbd
tmpfs 498.2M 12.0K 498.2M 0% /var/run/secrets/kubernetes.io/serviceaccount创建基于
RBD的PV以及PVC测试
1 | ~$ cat rbd-pv.yaml |
Ceph-Ansible安装方式
关于新以太网名命方式
- 新的
Linux会以enp0s10这样的方式来替换旧式的ethX命名方式.具体可参照这里 PredictableNetworkInterfaceNames,Understanding systemd’s predictable network device names
1 | enp0s10: |
如果不习惯新式的命名可以通过下面三方法改成旧式的命名方式
You basically have three options:
- You disable the assignment of fixed names, so that the unpredictable kernel names are used again. For this, simply mask udev’s .link file for the default policy: ln -s /dev/null /etc/systemd/network/99-default.link
- You create your own manual naming scheme, for example by naming your interfaces “internet0”, “dmz0” or “lan0”. For that create your own .link files in /etc/systemd/network/, that choose an explicit name or a better naming scheme for one, some, or all of your interfaces. See systemd.link(5) for more information.
- You pass the net.ifnames=0 on the kernel command line
查看虚拟机
1
2
3
4
5
6
7
8
9~$ VBoxManage list vms
"k8s-master" {7bfb1ca4-3ccc-4a1a-8548-7759424df181}
"k8s-node1" {4c29c029-4f93-4463-b83d-4ae9e728e9df}
"k8s-node2" {87a2196c-cf3c-472a-9ffa-f5b8c3e09009}
"k8s-node3" {af9e34cf-a7c9-45d8-ad15-f37d409bcdac}
"k8s-node4" {1f46e865-01c1-4a81-a947-cc267c744756}
# 使用 VBoxHeadles启动上述虚拟机,它不会出现窗口.
~$ VBoxHeadless --startvm k8s-master下面是参照官网来安装
ceph-deploy.但是使用apt找不到ceph-deploy包名.1
2
3
4~$ wget -q -O- 'https://download.ceph.com/keys/release.asc' | sudo apt-key add -
# 用Ceph稳定版(如 cuttlefish 、 dumpling 、 emperor 、 firefly,nautilus 等等)替换掉 {ceph-stable-release}
~$ echo deb http://download.ceph.com/debian-{ceph-stable-release}/ $(lsb_release -sc) main | sudo tee /etc/apt/sources.list.d/ceph.list
~$ sudo apt-get update && sudo apt-get install ceph-deploy下面把它转换成
Ansible playbook的方式来安装.在Github上的Ceph有一个ceph-ansible,没有用过,它的 Star 将近 1k 了.
1 |
|
安装KubernetesMaster
1 | ~$ sudo kubeadm init --image-repository registry.cn-hangzhou.aliyuncs.com/google_containers --kubernetes-version v1.14.1 --pod-network-cidr=10.244.0.0/16 --ignore-preflight-errors=NumCPU --apiserver-advertise-address=192.168.99.100 |
- 默认安装集群是使用
kube-proxy+iptables模式,需要手动修改为ipvs模式.使用kubectl -n kube-system edit cm kube-proxy打开 ConfigMap 文件,把mode=""替换成mode="ipvs,再把旧的 pod 删掉,kubectl -n kube-system delete pod kube-proxy-xxx,它会再生成一个新的 pod.
1 | ~$ kubectl -n kube-system logs kube-proxy-t27xd |
使用
Ansible批量加入 k8s 集群.1
2
3
4
5
6
7
8
9
10
11
12
13
14
15
16
17
18~$ cat hosts
[master]
192.168.99.100
[node1]
192.168.99.101
[node2]
192.168.99.102
[node3]
192.168.99.103
[node4]
192.168.99.104
[node]
192.168.99.101
192.168.99.102
192.168.99.103
192.168.99.104
~$ansible -i hosts node -b -m command -a "kubeadm join 192.168.99.100:6443 --token ejtj7f.oth6on2k6y0qcj2k --discovery-token-ca-cert-hash sha256:d162721230250668a4296aca699867126314a9ecd2418f9c70110b6b02bd01de"查看主节点的状态
1
2
3
4
5
6
7
8
9
10
11
12
13
14
15
16
17
18
19
20
21
22
23
24
25
26
27
28
29
30
31
32
33
34
35
36~$ kubectl get nodes
NAME STATUS ROLES AGE VERSION
k8s-master NotReady master 15h v1.14.1
node1 NotReady <none> 15h v1.14.1
node2 NotReady <none> 15h v1.14.1
node3 NotReady <none> 15h v1.14.1
node4 NotReady <none> 15h v1.14.1
# 查看所有节点为什么是NotReady状态?
~$ kubectl get pods -n kube-system
NAME READY STATUS RESTARTS AGE
coredns-d5947d4b-kfhlp 0/1 Pending 0 15h
coredns-d5947d4b-sq95j 0/1 Pending 0 15h
etcd-k8s-master 1/1 Running 2 15h
kube-apiserver-k8s-master 1/1 Running 2 15h
kube-controller-manager-k8s-master 1/1 Running 2 15h
kube-proxy-25vgp 1/1 Running 2 15h
kube-proxy-75xjc 1/1 Running 1 15h
kube-proxy-bvdh6 1/1 Running 1 15h
kube-proxy-lzp8m 1/1 Running 1 15h
kube-proxy-wnmwk 1/1 Running 1 15h
kube-scheduler-k8s-master 1/1 Running 2 15h
# 查看coredns为什么Pending?
~$ kubectl describe pod coredns -n kube-system
[...]
Events:
Type Reason Age From Message
---- ------ ---- ---- -------
Warning FailedScheduling 10m (x49 over 81m) default-scheduler 0/5 nodes are available: 5 node(s) had taints that the pod didn\'t tolerate.
Warning FailedScheduling 75s (x4 over 5m21s) default-scheduler 0/5 nodes are available: 5 node(s) had taints that the pod didn\'t tolerate.
# 查看系统 journalctl
~$ sudo journalctl -u kubelet
# 发现是因为没有安装网络插件的原因.
~$ kubectl apply -f https://raw.githubusercontent.com/coreos/flannel/a70459be0084506e4ec919aa1c114638878db11b/Documentation/kube-flannel.yml
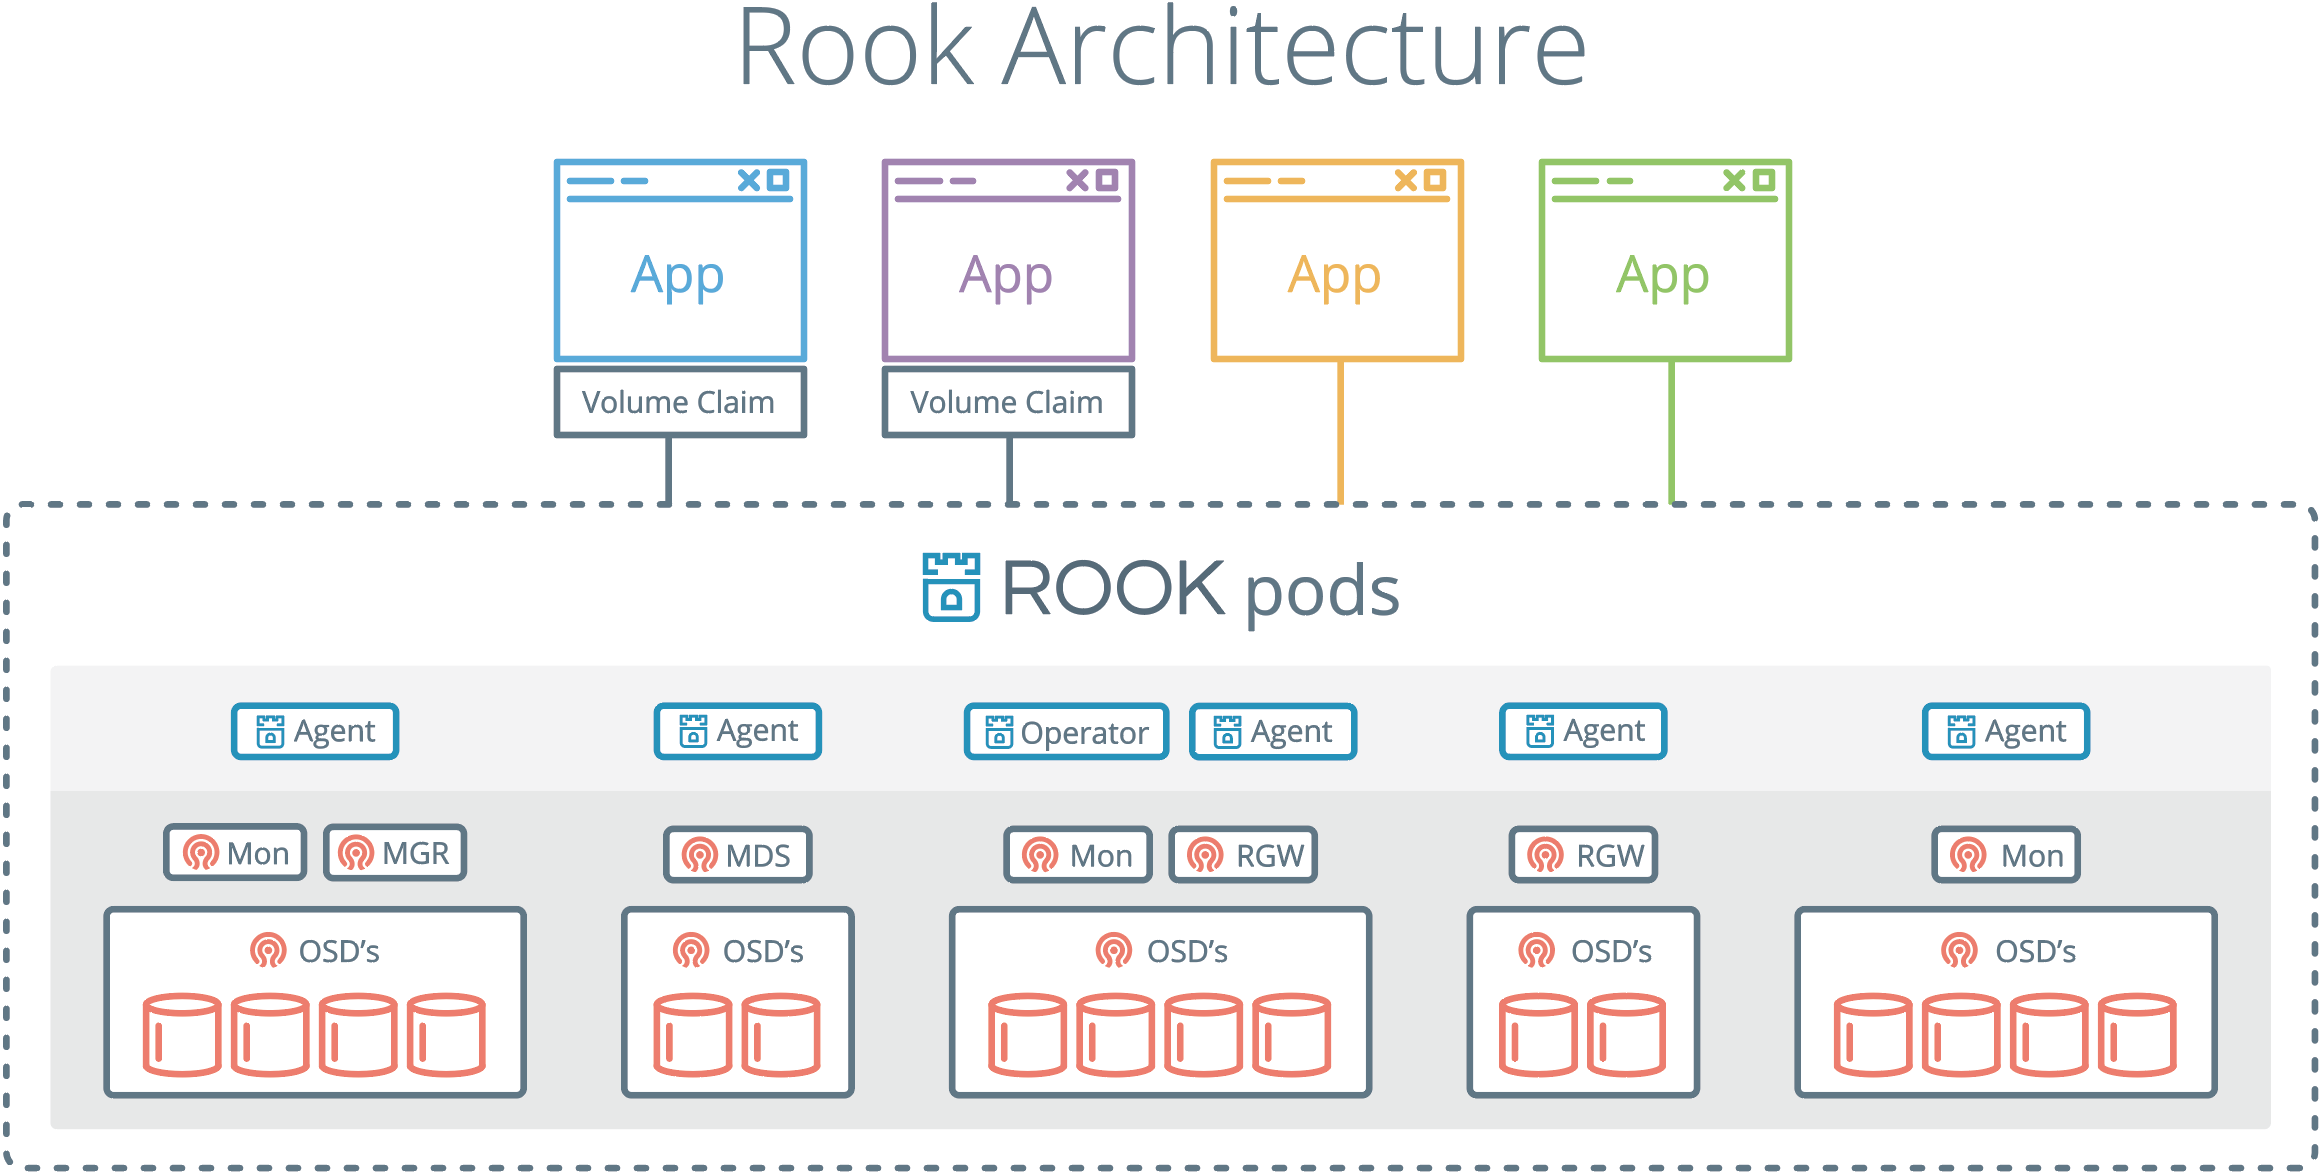
使用Rook构建
Ceph Rook集成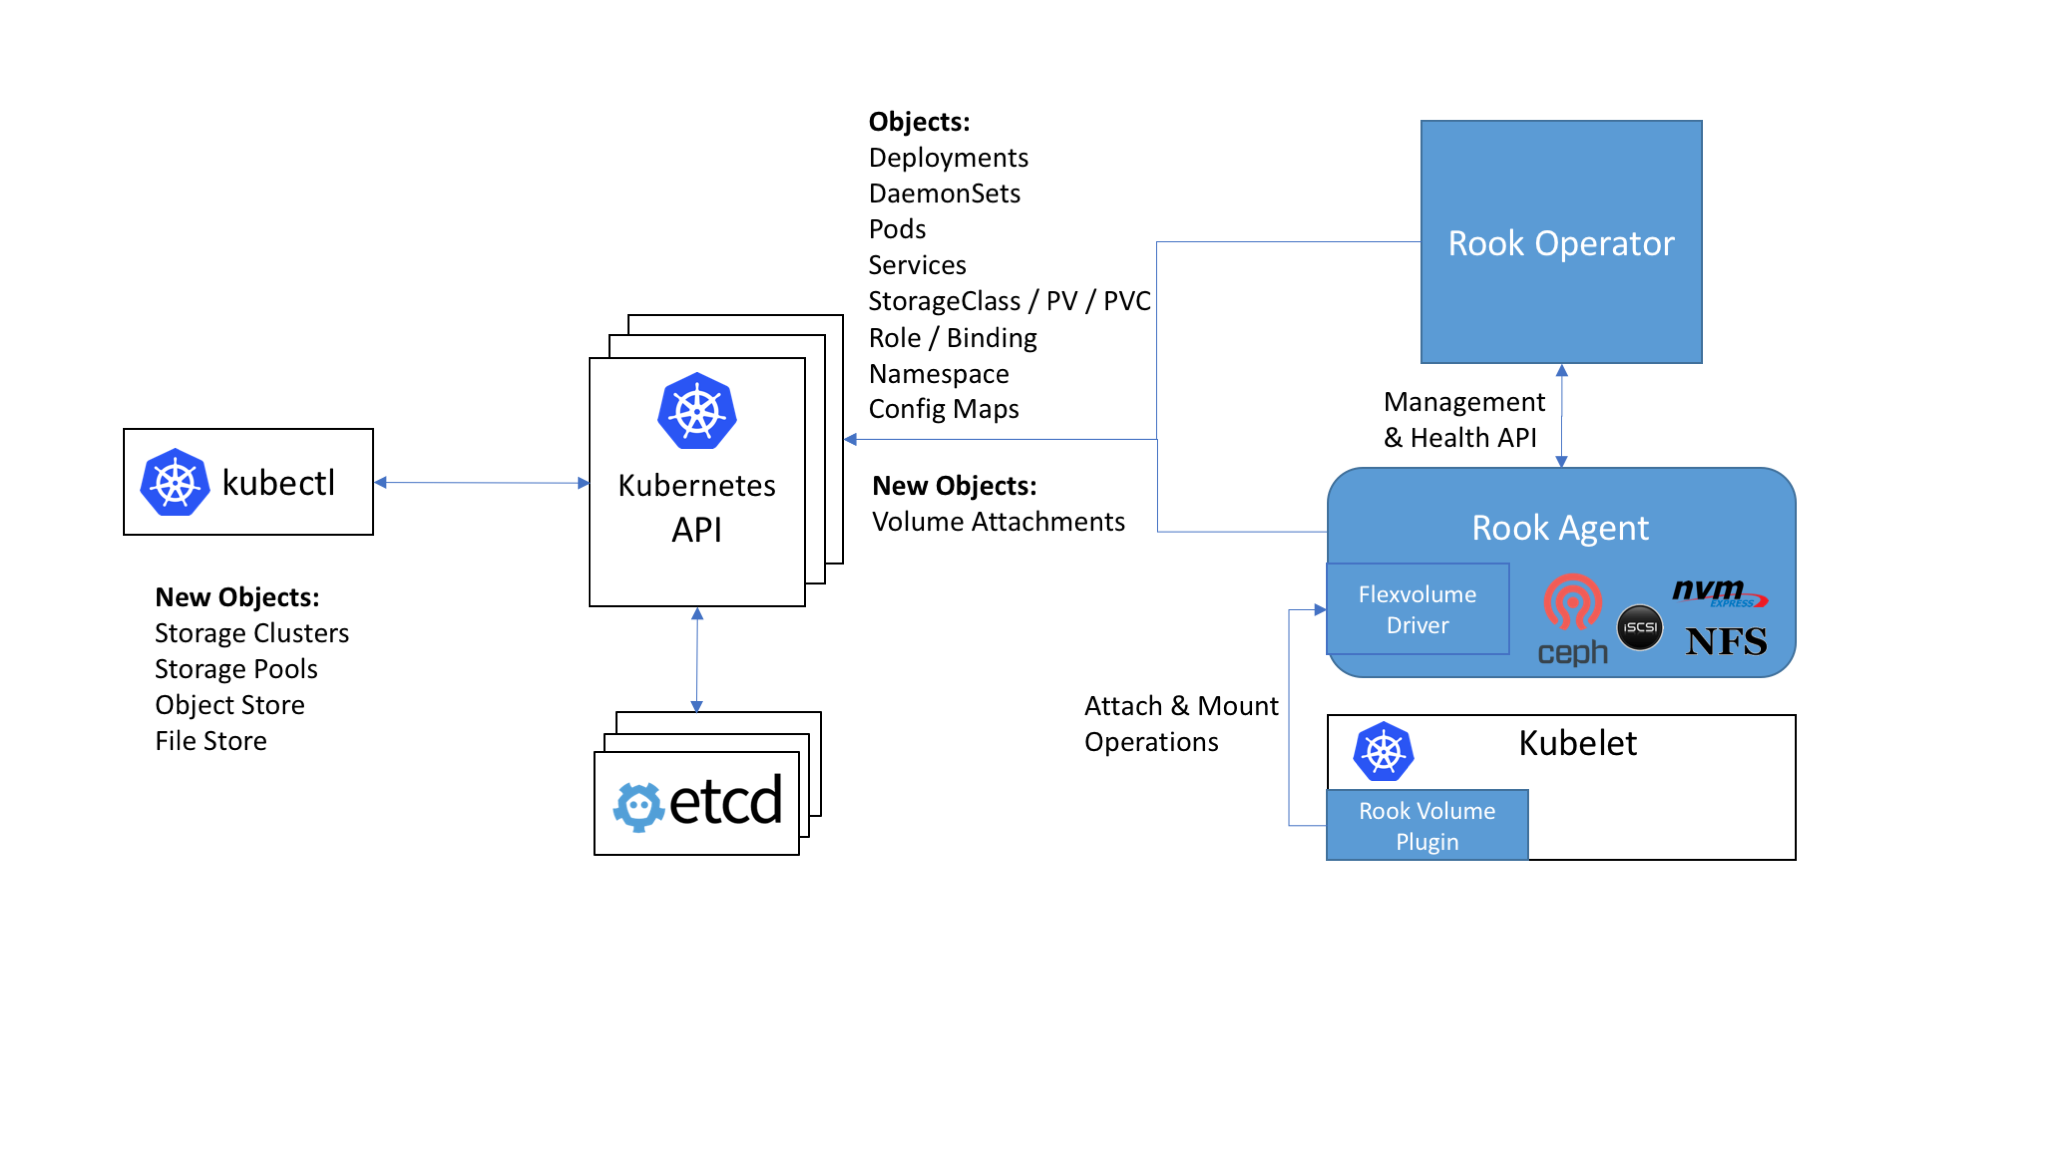
- Rook 的架构
安装Ceph
1 | ~$ git clone https://github.com/rook/rook |
拆除ROOK
1 | ~$ cat remove-nodes-rooks-containers.sh |
错误
1 | ~$ kubectl -n rook-ceph get pod |
谢谢支持
- 微信二维码: