0%

为iMX28-EVK移植Linux内核与U-Boot

U-Boot 2017.11

  • 这里参照开发板原版的u-boot-2009修改部分源码与配置文件才可以正常启动,配置文件,补丁文件
1
2
3
~$ make ARCH=arm CROSS_COMPILE=arm-none-eabi- O=../imx28evk mx28evk_defconfig
~$ cd ../imx28evk
~$ make ARCH=arm CROSS_COMPILE=arm-none-eabi- u-boot.sb

tftpd-hpa 安装

1
2
3
4
5
6
7
8
~$ sudo apt-get install tftpd-hpa
~$ cat /etc/default/tftpd-hpa
# /etc/default/tftpd-hpa
TFTP_USERNAME="tftp"
TFTP_DIRECTORY="/srv/tftp"
TFTP_ADDRESS="0.0.0.0:69"
TFTP_OPTIONS="-l -c -s"

NFS Server 配置

  • 确保 CS 两端的 NFS 协议版本要兼容,exports的路径一致.
1
2
3
4
5
6
7
8
9
10
~$ cat /proc/fs/nfsd/versions
+2 +3 +4 +4.1 +4.2

$ cat /etc/exports
# /etc/exports: the access control list for filesystems which may be exported
# to NFS clients. See exports(5).
#
# Example for NFSv2 and NFSv3:
# /srv/homes hostname1(rw,sync,no_subtree_check) hostname2(ro,sync,no_subtree_check)
/fullpath/nfs-imx28evk 192.168.1.0/24(rw,no_root_squash,subtree_check)

U-boot 使用

公共变量

1
2
3
4
5
6
7
8
9
10
11
12
13
14
15
=> setenv console_mainline ttyAMA0
=> setenv buadrate 115200
=> setenv tftpboot "tftp ${zImage} ; bootz"
=> setenv mmcfatboot "mmc rescan ; fatload mmc 0 ${loadaddr} ${zImage} ; bootz"
=> setenv mmcextboot "mmc rescan ; ext4load mmc 0:1 ${loadaddr} ${zImage} ; bootz"
=> setenv nandboot "mtdparts default ; nand read.jffs2 ${loadaddr} ${kerneladdr} ${kernelsize} ; bootz"
=> setenv zImage zImage_dtb
=> setenv ipaddr 192.168.1.10
=> setenv serverip 192.168.1.100
=> setenv netmask 255.255.255.0
=> setenv gatewayip 192.168.1.1
=> setenv eth eth0
=> setenv hostname imx283-lcy
=> setenv kernelsize 0x00400000
=> setenv kerneladdr 0x00200000

NFS ROOTFS

1
2
3
4
5
6
=> setenv nfsrootpath  /opt/nfs-imx28evk
=> setenv ipstatic "ip=${ipaddr}:${serverip}:${gatewayip}:${netmask}:${hostname}:${eth}:off"
=> setenv nfsargs "setenv bootargs consoel=${console_mainline},${buadrate} root=/dev/nfs rw nfsroot=${serverip}:{$nfsrootpath},v3,tcp,nolock ${ipstatic} init=/linuxrc"
=> setenv bootcmd_nfs "run nfsargs ; run ${tftpboot}"
=> savee
=> run nfs_root

MMC ROOTFS

1
2
3
4
=> setenv mmcargs "mmc rescan ; setenv bootargs consoel=${console_mainline},${buadrate} rootfstype=ext3  root=/dev/mmcblk0p3 rw rootwait"
=> setenv bootcmd_mmc "run mmcargs ; run ${mmcfatboot}"
=> savee
=> run bootcmd_mmc

USB Stack ROOTFS

  • U盘的方法与MMC的方式是一样的.

UBIFS ROOTFS

1
2
3
4
5
6
7
8
9
10
11
12
13
14
15
16
17
18
19
20
21
22
23
24
25
26
27
28
29
30
31
32
33
34
35
36
37
38
39
40
41
42
43
44
45
46
47
48
49
50
51
52
53
54
55
56
57
58
59
60
=> mtdparts

device nand0 <gpmi-nand>, # parts = 7
#: name size offset mask_flags
0: boot 0x00c00000 0x00000000 0
1: env 0x00080000 0x00c00000 0
2: reserve 0x00080000 0x00c80000 0
3: bmp 0x00200000 0x00d00000 0
4: reserve 0x00080000 0x00f00000 0
5: rootfs 0x04000000 0x00f80000 0
6: opt 0x03080000 0x04f80000 0

active partition: nand0,0 - (boot) 0x00c00000 @ 0x00000000

defaults:
mtdids : nand0=gpmi-nand
mtdparts: mtdparts=gpmi-nand:12m(boot),512k(env),512k(reserve),2m(bmp),512k(reserve),64m(rootfs),-(opt)
=> ubi part rootfs
ubi0: attaching mtd1
ubi0: scanning is finished
ubi0 warning: print_rsvd_warning: cannot reserve enough PEBs for bad PEB handling, reserved 5, need 20
ubi0: attached mtd1 (name "mtd=5", size 64 MiB)
ubi0: PEB size: 131072 bytes (128 KiB), LEB size: 126976 bytes
ubi0: min./max. I/O unit sizes: 2048/2048, sub-page size 2048
ubi0: VID header offset: 2048 (aligned 2048), data offset: 4096
ubi0: good PEBs: 512, bad PEBs: 0, corrupted PEBs: 0
ubi0: user volume: 1, internal volumes: 1, max. volumes count: 128
ubi0: max/mean erase counter: 2/1, WL threshold: 4096, image sequence number: 0
ubi0: available PEBs: 0, total reserved PEBs: 512, PEBs reserved for bad PEB handling: 5

// 这里显示boot分区有坏块了吗?这个分区反复擦写的次数比较多.
=>ubi part boot
ubi0: detaching mtd1
ubi0: mtd1 is detached
ubi0: attaching mtd1
ubi0 warning: ubi_io_read: error -74 (ECC error) while reading 64 bytes from PEB 0:0, read only 64 bytes, retry
ubi0 error: ubi_io_read: error -74 (ECC error) while reading 64 bytes from PEB 0:0, read 64 bytes
ubi0 warning: ubi_io_read: error -74 (ECC error) while reading 64 bytes from PEB 1:0, read only 64 bytes, retry
ubi0 error: ubi_io_read: error -74 (ECC error) while reading 64 bytes from PEB 1:0, read 64 bytes
ubi0 warning: ubi_io_read: error -74 (ECC error) while reading 64 bytes from PEB 2:0, read only 64 bytes, retry
ubi0 error: ubi_io_read: error -74 (ECC error) while reading 64 bytes from PEB 2:0, read 64 bytes
ubi0 warning: ubi_io_read: error -74 (ECC error) while reading 64 bytes from PEB 3:0, read only 64 bytes, retry
ubi0 error: ubi_io_read: error -74 (ECC error) while reading 64 bytes from PEB 3:0, read 64 bytes
ubi0: scanning is finished
ubi0 error: ubi_read_volume_table: the layout volume was not found
ubi0 error: ubi_attach_mtd_dev: failed to attach mtd1, error -22
UBI error: cannot attach mtd1UBI error: cannot initialize UBI, error -22UBI init error 22

=> setenv nandargs "setenv bootargs console=${console_mainline},${baudrate} rootfstype=ubifs ubi.mtd=5 root=ubi0:rootfs mtdparts=gpmi-nand:12m(boot),512k(env),512k(reserve),2m(bmp),512k(reserve),64m(rootfs),-(opt) ${ipstatic}"
=> setenv bootcmd_nand "run nandargs ; run nandboot "
=> savee
=> run bootcmd_nand

通过网络更新 kernel

1
=> setenv upkernel "tftp zImage_dtb ; nand erase clean ${kerneladdr} ${kernelsize} ; nand write.jffs2 ${loadaddr} ${kerneladdr} ${kernelsize}"

通过网络更新nand文件系统

1
=> setenv uprootfs "mtdparts default ; nand erase.part rootfs ; ubi part rootfs ; ubi create rootfs ; tftp ${rootfs} ; ubi write ${loadaddr} rootfs ${filesize}"

imx-bootlets

  • imx-bootlets可以使用开发板自带的源码,也可以从这里imx-bootlets下载.它只能使用arm-none-eabi-工具链编译,我换成Linaro Toolchain工具链编译之后无法启动.编译中的脚本会要用到elftosb,要先把elftosb编译出来.
1
2
3
4
5
6
7
8
9
~$ cd imx-bootlets
~$ ln -svf ../linux-4.13/build_output/zImage_dtb zImage // 链接内核到这里
~$ ln -svf ../u-boot-2017-9/imx28evk/uboot uboot      // 链接uboot到这里
~$ make BOARD=iMX28_EVK ARCH=mx28 CROSS_COMPILE=arm-none-eabi- clean
~$ make BOARD=iMX28_EVK ARCH=mx28 CROSS_COMPILE=arm-none-eabi-
~$ ls *.bd
linux.bd linux_ivt.bd uboot.bd uboot_ivt.bd updater.bd updater_ivt.bd
~$ ls *.sb
imx28_ivt_linux.sb imx28_ivt_uboot.sb imx28_linux.sb imx28_uboot.sb

烧写系统

IMX280A USB 烧写模式

  • 短接JP4->WDG,JP6->USB,接上USB_DEV接口,当然POWER接口也是要接上的,系统就会出现下列硬件.这里要使用MfgTool工具烧入,相对较麻烦一些.
1
Bus 008 Device 005: ID 15a2:004f Freescale Semiconductor, Inc. i.MX28 SystemOnChip in RecoveryMode

IMX280 TF 烧写模式

  • EasyARM iMX280A这块板子可以支持TF卡烧写模式,通过串口发现,它里面有一个小系统经过上电之后从TF卡中读取名为imx28_ivt_uboot.sb,rootfs.tar.bz2,uImage,updater_ivt.sb,当然用来烧写 TF 卡是要用官方提供的cfimager.exe格式化,并烧入updater_ivt.sb才可以.
  • 短接JP4->WDG,JP3->USB, 接上串口打印,就会看相应的烧写日志输出了.

BuildRoot 文件系统

  • 使用BusyBox的制作rootfs的方式比较老了,使用BuildRoot可以一站式解决嵌入式的系统移植,这里我只使用它来做rootfs的编译,kernel,u-boot这里我是单独立维护的.
1
2
3
4
~$ export TOPDIR=.
~$ export BASE_DIR=.
~$ make ARCH=arm CROSS_COMPILE=arm-none-eabi- O=../build-imx28evk freescale_imx28evk_defconfig
~$ cd ../build-imx28evk && make ARCH=arm CROSS_COMPILE=arm-none-eabi- menuconfig
  • ToolChain 设置
1
2
3
4
5
6
7
8
9
10
11
12
13
14
15
16
17
18
19
20
21
22
23
24
25
26
27
28
29
30
31
32
33
34
35
36
37
38
39
40
41
  Toolchain type (External toolchain)  --->
*** Toolchain External Options ***
Toolchain (Custom toolchain) --->
Toolchain origin (Pre-installed toolchain) --->
(/linaro-toolchain/gcc-linaro-5.5.0-2017.10-x86_64_arm-linux-gnueabi) Toolchain path
($(ARCH)-linux-gnueabi) Toolchain prefix
External toolchain gcc version (5.x) --->
External toolchain kernel headers series (4.0.x) --->
External toolchain C library (glibc/eglibc) --->
[*] Toolchain has SSP support?
[*] Toolchain has RPC support?
[*] Toolchain has C++ support?
[...]
System configuration -> Run a getty (login prompt ) after boot

│ │ --- Run a getty (login prompt) after boot │ │
│ │ (ttyAMA0) TTY port │ │
│ │ Baudrate (115200) ---> │ │
│ │ (vt100) TERM environment variable │ │
│ │ () other options to pass to getty │ │

[...]

Target packages -> Networking applications
│ │ [*] dropbear │ │
│ │ [*] client programs │ │
│ │ [*] disable reverse DNS lookups │ │
│ │ [*] optimize for size │ │
│ │ [ ] log dropbear access to wtmp │ │
│ │ [ ] log dropbear access to lastlog │ │

Target packages -> Hardware handling
[*] evtest
[*] spi-tools
[*] lm-sensors
[*] i2c-tools


# 如果下载文件需代理的通下面命令修改.
BR2_WGET="wget --passive-ftp -nd -t 3 -e use_proxy=yes -e http_proxy=192.168.1.235:4444 -e https_proxy=192.168.1.235:4444"
  • 如果外部交叉编译工具链出现,少库的错误,还是选择使用BuildRoot编译的工具链吧.整个编译完成之后build-imx28evk目录如下:
1
2
3
4
5
6
7
8
9
10
$ tree -L 1
.
├── build
├── dl  # 软件源码下载的位置.
├── host # 如查使用``BuildRoot``编译的工具链,这里就是工具链的位置.
├── images #最终生成的各种镜像文件.
├── Makefile
├── staging -> host/arm-buildroot-linux-gnueabi/sysroot
└── target

  • 参照EasyArm imx280的文档对UBIFS文件系统修改如下:
1
2
3
4
5
6
7
8
9
 [*] tar the root filesystem
│ │ Compression method (no compression) --->

[*] ubifs root filesystem
│ │ (0x1f000) logical eraseblock size
│ │ (0x800) minimum I/O unit size
│ │ (512) maximum logical eraseblock count
│ │ ubifs runtime compression (lzo) --->
│ │ Compression method (no compression) --->

BusyBox 配置静态编译

  • 看了很多教材,都建议把BusyBox编译成静态连接,就不用复制一堆的库了.
1
2
3
~$ make ARCH=arm CROSS_COMPILE=arm-none-eabi- busybox-menuconfig

Busybox Settings -> [*] Build BusyBox as a static binary (no shared libs)

Linux Kernel 配置

  • 如果要对Buildroot中的Kernel做细致栽剪设置,需要使用到下面命令,但是我这里是把 U-boot,Linux Kernel分开维护的.
1
~$ make ARCH=arm CROSS_COMPILE=arm-linux-gnueabi- linux-menuconfig

编译

  • 解压rootfs.tarNFS Root或者U盘,SD卡的分区都可以,同时为Dropbear添加公钥登录认证.方便使用SSH来能登录进行交互操作.
1
2
3
4
5
6
7
8
9
~$ tree images
images
├── rootfs.cpio
├── rootfs.ext2
└── rootfs.tar

~$ sudo tar xvf rootfs.tar -C /nfsroot/rootfs
~# cd /nfsroot/rootfs/root && mkdir .ssh && chmod 700 .ssh
~# cd .ssh && echo "public key" > authorized_keys && chmod 600 authorized_keys

UBIFS 文件系统制作

1
2
~$ cd  /nfsroot/
~$ sudo mkfs.ubifs -d rootfs -e 0x1f000 -c 512 -m 0x800 -x lzo -o rootfs.ubifs

UBIFS 文件烧写

  • 下面建一条组合命令来通过Uboot从 SD 中读取rootfs.ubifs文件并烧写到 NAND 的 rootfs 分区中.从 USB 设备中也是类似.UBoot 命令中,ext4load是从ext3/ext4的文件系统加载文件,fatload是从FAT32/FAText文件系统中加载文件.如果从 USB 设备读取,先运行usb reset.
1
2
3
4
5
6
7
8
9
10
11
12
13
14
15
16
17
18
19
20
21
22
# MMC 卡单分区
=> ls mmc 0
2616657 zImage_dtb
7618560 rootfs.ubifs
635808 imx28_ivt_uboot.sb
.Trash-1000/
2488348 zImage
4718592 rootfs.ubi

# 这里是列出一张多分区的MMC卡的文件系统列表,这是第一分区的内容.
=> ls mmc 0:1
<DIR> 1024 .
<DIR> 1024 ..
<DIR> 12288 lost+found
225 uEnv.txt
<DIR> 1024 boot
<DIR> 1024 .Trash-1000
2643950 zImage_dtb
4317184 rootfs.ubifs

=>setenv burnsd_rootfs "mtdparts default;nand erase.part rootfs;ubi part rootfs 2048;ubi create rootfs;dcache on; mmc rescan; ext4load mmc 0:3 0x82000000 rootfs.ubifs; ubi write 0x82000000 rootfs ${filesize}; "
=> saveenv

Linux 内核编译

Linux 下载及配置选项

  • 我这边针对EasyARM 280A的开发板修改的配置文件在这里,把它复制到编译目录里,改成.config就可以了.Linux 的源码部份只是改了设备树的部份,这是补丁文件
1
2
3
4
5
6
7
8
9
10
11
12
13
14
15
16
17
18
19
20
21
~$ wget -c https://cdn.kernel.org/pub/linux/kernel/v4.x/linux-4.14.51.tar.xz
~$ tar xvf linux-4.14.51.tar.xz && cd linux-4.14.51
~$ make ARCH=arm CROSS_COMPILE=arm-none-eabi- O=../imx28evk-kernel mxs_defconfig

GEN ./Makefile
HOSTCC scripts/kconfig/mconf.o
HOSTCC scripts/kconfig/lxdialog/checklist.o
[...]

~$ make ARCH=arm CROSS_COMPILE=arm-none-eabi- menuconfig

Boot options -> [*] Use appended device tree blob to zImage (EXPERIMENTAL)
[*] Supplement the appended DTB with traditional ATAG information
Kernel command line type (Use bootloader kernel arguments if available) --->
(console=ttyAMA0,115200n8 rootfstype=ubifs ubi.mtd=5 root=ubi0_0 rootwait=1 rw earlyprintk) Default kernel command string
Kernel command line type (Use bootloader kernel arguments if available) --->
Kernel hacking → printk and dmesg options -> [*] Enable dynamic printk() support
[*] Kernel low-level debugging functions (read help!)
Kernel low-level debugging port (i.MX28 Debug UART) --->
[*] Early printk
Device Drivers → Network device support → Ethernet driver support -> Freescale devices -> FEC ethernet controller

编译内核用设备树

  • Linux 内核3.x以后都要使用设备树才能正常启动,可以把DTB附加到zImage后面,也可以在U-Boot中指定dtb文件路径.
  • 设备树的patch如下.经过测试iMX280A必须改成pinctrl-0 = <&duart_pins_b>不然串口ttyAMA0无法输入,同时修改时要注意 IO 定义的冲突处理.这里是我修改的iMX280A的设备树补丁文件
1
~$ diff -Naur ../../linux-4.14.51/arch/arm/boot/dts/imx28-evk.dts ../linux-4.14.51/arch/arm/boot/dts/imx28-evk.dts > ../linux-4.14.51-imx28evk.patch

设备树相关

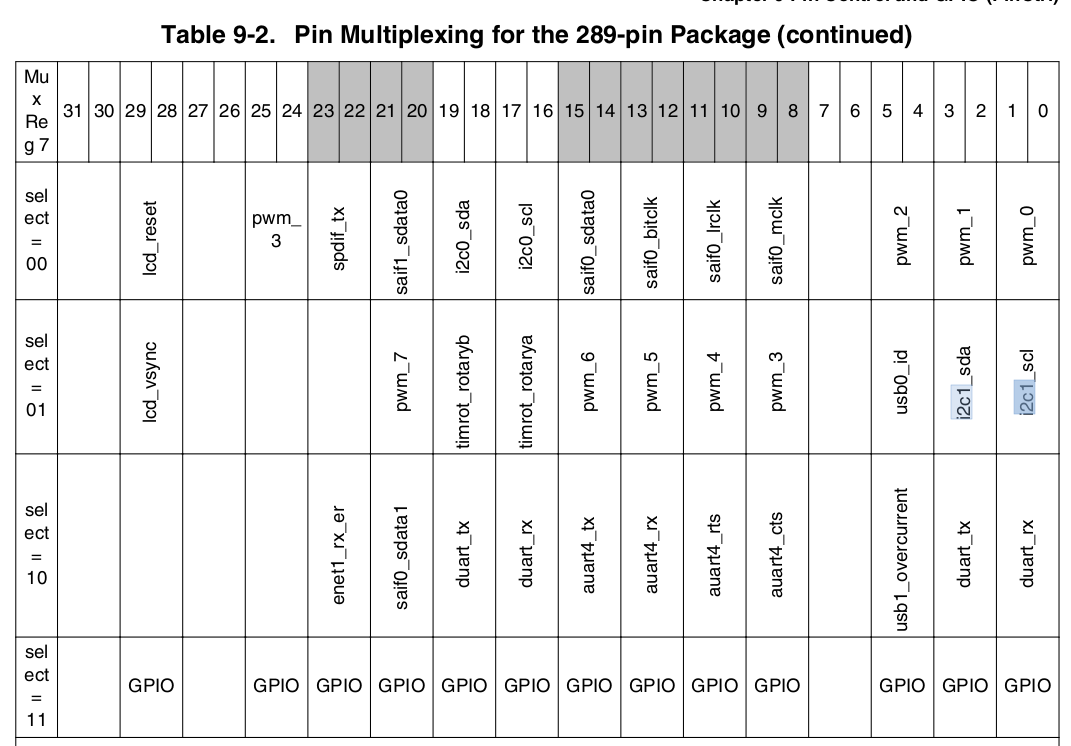
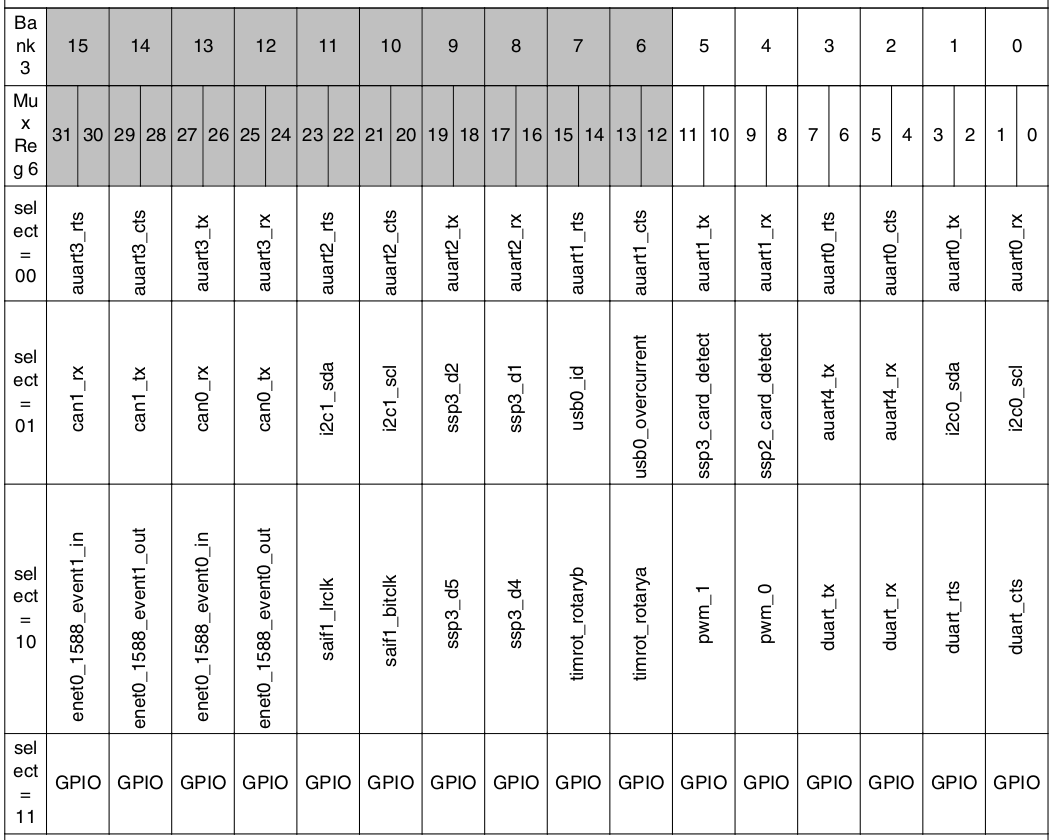
  • 这里设备树配置要参照芯片的数据手册,还有内核的文档Documentation/devicetree/bindings/pinctrl/fsl,mxs-pinctrl.txt,下一面给出芯片管脚与内核对应定义示例.

imx28evk

1
2
3
4
5
6
7
8
9
$ grep -e "PWM0" -e "PWM1" ./arch/arm/boot/dts/imx28-pinfunc.h
#define MX28_PAD_PWM0__PWM_0 0x3100
#define MX28_PAD_PWM1__PWM_1 0x3110
#define MX28_PAD_PWM0__I2C1_SCL 0x3101
#define MX28_PAD_PWM1__I2C1_SDA 0x3111
#define MX28_PAD_PWM0__DUART_RX 0x3102
#define MX28_PAD_PWM1__DUART_TX 0x3112
#define MX28_PAD_PWM0__GPIO_3_16 0x3103
#define MX28_PAD_PWM1__GPIO_3_17 0x3113

imx28evk-pin-324

1
2
3
4
5
6
7
8
9
10
11
$ grep -e "I2C0"  ./arch/arm/boot/dts/imx28-pinfunc.h
#define MX28_PAD_I2C0_SCL__I2C0_SCL 0x3180
#define MX28_PAD_I2C0_SDA__I2C0_SDA 0x3190
#define MX28_PAD_AUART0_RX__I2C0_SCL 0x3001
#define MX28_PAD_AUART0_TX__I2C0_SDA 0x3011
#define MX28_PAD_I2C0_SCL__TIMROT_ROTARYA 0x3181
#define MX28_PAD_I2C0_SDA__TIMROT_ROTARYB 0x3191
#define MX28_PAD_I2C0_SCL__DUART_RX 0x3182
#define MX28_PAD_I2C0_SDA__DUART_TX 0x3192
#define MX28_PAD_I2C0_SCL__GPIO_3_24 0x3183
#define MX28_PAD_I2C0_SDA__GPIO_3_25 0x3193

imx28evk-dma_apbx

1
2
3
4
5
6
7
8
9
10
11
12
13
14
15
16
17
18
19
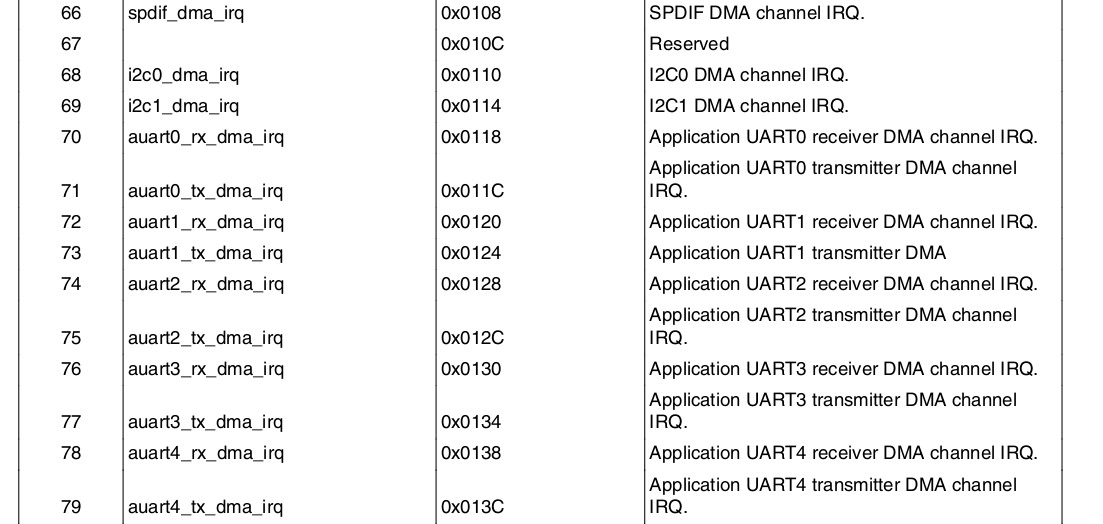
$ cat arch/arm/boot/dts/imx28.dtsi
[...]
dma_apbx: dma-apbx@80024000 {
compatible = "fsl,imx28-dma-apbx";
reg = <0x80024000 0x2000>;
interrupts = <78 79 66 0
80 81 68 69
70 71 72 73
74 75 76 77>;
interrupt-names = "auart4-rx", "auart4-tx", "spdif-tx", "empty",
"saif0", "saif1", "i2c0", "i2c1",
"auart0-rx", "auart0-tx", "auart1-rx", "auart1-tx",
"auart2-rx", "auart2-tx", "auart3-rx", "auart3-tx";
#dma-cells = <1>;
dma-channels = <16>;
clocks = <&clks 26>;
};

[...]
1
2
3
4
5
6
7
8
9
10
11
12
13
14
15
16
17
18
19
20
21
22
23
24
25
26
27
28
29
30
31
32
33
34
35
36
37
38
39
40
41
42
43
~$ cd ../imx28evk-kernel &&  make ARCH=arm CROSS_COMPILE=arm-none-eabi- zImage modules
GEN ./Makefile
scripts/kconfig/conf --silentoldconfig Kconfig
SYSHDR arch/arm/include/generated/uapi/asm/unistd-common.h
SYSHDR arch/arm/include/generated/uapi/asm/unistd-oabi.h
SYSHDR arch/arm/include/generated/uapi/asm/unistd-eabi.h
CHK include/config/kernel.release
[...]

~$ make ARCH=arm CROSS_COMPILE=arm-none-eabi- imx28-evk.dtb
~$ cat arch/arm/boot/zImage arch/arm/boot/dts/imx28-evk.dtb > zImage_dtb
// 如果内核中有模块编译就使用下面这命令把它安装到根文件系统目录下, make INSTALL_HDR_PATH=/nfsroot/rootfs headers_install 安装内核头文件在这里不需要,只是做一个记录.
# make INSTALL_MOD_PATH=/nfsroot/rootfs/ modules_install
INSTALL crypto/echainiv.ko
INSTALL drivers/crypto/mxs-dcp.ko
INSTALL drivers/media/usb/gspca/gspca_main.ko
DEPMOD 4.14.51_lcybuild-20180706-1017
# cd /nfsroot/rootfs/lib/modules && tree
.
└── 4.14.51_lcybuild-20180706-1017
├── build -> /fullpath/kernel-imx28evk-buildroot-toolchain
├── kernel
│   ├── crypto
│   │   └── echainiv.ko
│   └── drivers
│   ├── crypto
│   │   └── mxs-dcp.ko
│   └── media
│   └── usb
│   └── gspca
│   └── gspca_main.ko
├── modules.alias
├── modules.alias.bin
├── modules.builtin
├── modules.builtin.bin
├── modules.dep
├── modules.dep.bin
├── modules.devname
├── modules.order
├── modules.softdep
├── modules.symbols
├── modules.symbols.bin
└── source -> /fullpath/linux-4.14.51

mkimage 生成 uImage

  • 如果要用到uImage文件,用下面这条命令转换出来.注意LOADADDR是变量,不同开发板定义是不一样的.
1
2
3
4
5
6
7
mkimage -A arm -O linux -T kernel -C none -a 0x40008000 -e 0x40008000 -n "Linux-4.13.11" -d arch/arm/boot/zImage uImage
Image Name: Linux-4.13.11
Created: Fri Jun 22 12:03:38 2018
Image Type: ARM Linux Kernel Image (uncompressed)
Data Size: 4280112 Bytes = 4179.80 kB = 4.08 MB
Load Address: 40008000
Entry Point: 40008000

测试 I2C 功能

  • 霍尼韦尔HMC5883L接线
1
2
3
4
5
6
iMX280A				HMC5883L

SCL1 <---> SCL
SDA1 <---> SDA
GND <---> GND
3.3v <---> 3V3
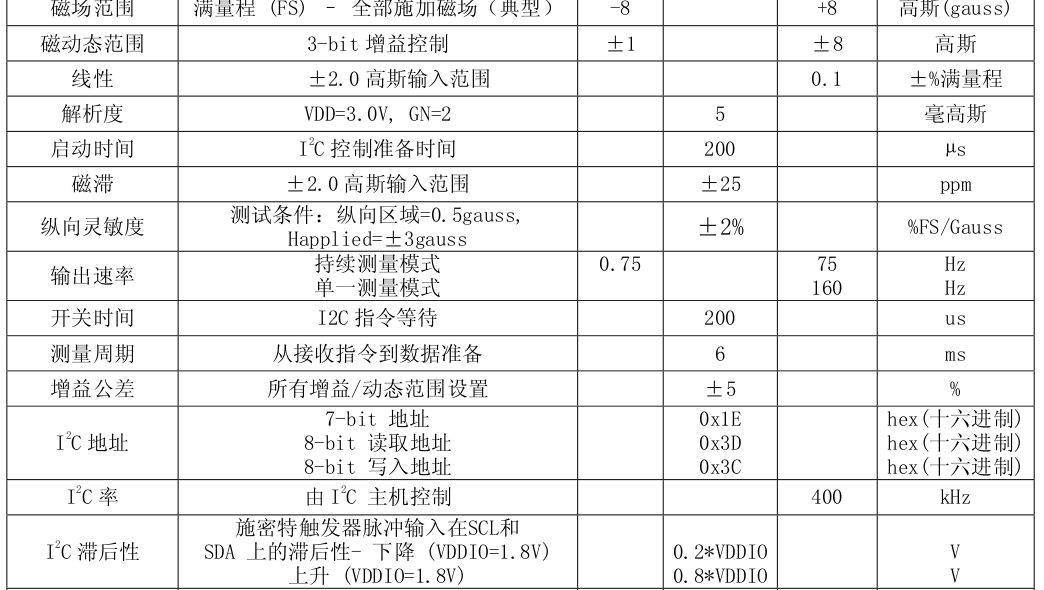
  • HMC5883L 规格书

hmc5883l

  • 进入 iMX280A 输入下面命令检测设备.并 dump 传感器数值
1
2
3
4
5
6
7
8
9
10
11
12
13
14
15
16
17
18
19
20
21
22
23
24
25
26
27
28
29
# i2cdetect -r -y 1
0 1 2 3 4 5 6 7 8 9 a b c d e f
00: -- -- -- -- -- -- -- -- -- -- -- -- --
10: -- -- -- -- -- -- -- -- -- -- -- -- -- -- 1e --
20: -- -- -- -- -- -- -- -- -- -- -- -- -- -- -- --
30: -- -- -- -- -- -- -- -- -- -- -- -- -- -- -- --
40: -- -- -- -- -- -- -- -- -- -- -- -- -- -- -- --
50: -- -- -- -- -- -- -- -- -- -- -- -- -- -- -- --
60: -- -- -- -- -- -- -- -- -- -- -- -- -- -- -- --
70: -- -- -- -- -- -- -- --
# i2cdump -y 1 0x1e w
0,8 1,9 2,a 3,b 4,c 5,d 6,e 7,f
00: 2010 0320 0003 1900 0119 e101 ffe1 10ff
08: 0010 4803 3448 3334 1033 0000 3c00 003c
10: 0000 0000 0000 0000 0000 0000 0000 0000
18: 0000 0000 a500 10a5 0710 e807 10e8 0010
20: 0000 0000 0000 0000 0000 0000 0000 1000
28: 0010 0000 0000 0000 0000 0000 0000 0000
30: 0000 0000 1400 8314 6683 5466 0054 a000
[....]
80: 2010 0320 0003 1900 0119 e101 ffe1 10ff
88: 0010 4803 3448 3334 1033 0000 3c00 003c
90: 0000 0000 0000 0000 0000 0000 0000 0000
98: 0000 0000 a500 10a5 0710 e807 10e8 0010
a0: 0000 0000 0000 0000 0000 0000 0000 1000
a8: 0010 0000 0000 0000 0000 0000 0000 0000
b0: 0000 0000 1400 8314 6683 5466 0054 a000
b8: 00a0 0700 0007 0000 0000 0000 0000 0000
[.....]

SPI 测试

  • SPI用户空间编程,需要在内核中要开启CONFIG_SPI_SPIDEV=y.
  • 还需要在内核的源码中添加一项{ .compatible = "spidev" },不然会出现**spidev spi1.0: buggy DT: spidev listed directly in DT**的错误.
1
2
3
4
5
6
7
8
9
10
11
12
$cat ../linux-4.14.51/drivers/spi/spidev.c
[....]
#ifdef CONFIG_OF
static const struct of_device_id spidev_dt_ids[] = {
{ .compatible = "rohm,dh2228fv" },
{ .compatible = "lineartechnology,ltc2488" },
{ .compatible = "ge,achc" },
{ .compatible = "semtech,sx1301" },
{ .compatible = "spidev" },
{},
};
[...]

下载测试代码

1
2
3
4
5
6
7
8
9
$ git clone https://github.com/rm-hull/spidev-test
$ cd spidev-test
$ gcc spidev_test.c -o spidev_test
#./spidev_test
spi mode: 0
bits per word: 8
max speed: 500000 Hz (500 KHz)
can't send spi message: Invalid argument
Aborted (core dumped)
  • MMC/SD 卡的分区类型说明
1
2
3
4
* for a card connected via a PCI card reader
DISK=/dev/mmcblk0
* for a card connected via a USB card reader,
DISK=/dev/sdX

错误处理

Root 挂载错误

  • 下面这个错误的可能性会很多,我这边使用Linaro Toolchain工具链生成的rootfs.tar解压到 NFS 服务器里,就会出现下面错误,后来换成BuildRoot编译的工具就没有问题.
  • 如果是 UBIFS 文件系统挂载一定要指定mtdparts给 u-boot 的bootargs变量里面,不然找不到分区信息,就无法挂载.
1
2
3
4
5
6
7
8
9
10
11
12
13
14
15

[ 5.625458] Kernel panic - not syncing: Attempted to kill init! exitcode=0x00000004
[ 5.625458]
[ 5.634639] CPU: 0 PID: 1 Comm: init Not tainted 4.14.51_lcybuild-20180702-0852 #3
[ 5.642215] Hardware name: Freescale MXS (Device Tree)
[ 5.647434] [<c00157bc>] (unwind_backtrace) from [<c0013644>] (show_stack+0x10/0x14)
[ 5.655216] [<c0013644>] (show_stack) from [<c001d580>] (panic+0xb8/0x234)
[ 5.662120] [<c001d580>] (panic) from [<c001eecc>] (do_exit+0x9c8/0x9fc)
[ 5.668843] [<c001eecc>] (do_exit) from [<c001fa28>] (do_group_exit+0x3c/0xb4)
[ 5.676102] [<c001fa28>] (do_group_exit) from [<c002846c>] (get_signal+0x264/0x58c)
[ 5.683792] [<c002846c>] (get_signal) from [<c0012aa8>] (do_signal+0xb8/0x42c)
[ 5.691043] [<c0012aa8>] (do_signal) from [<c0012fdc>] (do_work_pending+0xb0/0xc0)
[ 5.698640] [<c0012fdc>] (do_work_pending) from [<c0010148>] (slow_work_pending+0xc/0x20)
[ 5.706839] ---[ end Kernel panic - not syncing: Attempted to kill init! exitcode=0x00000004
[ 5.706839]

u-boot 编译错误

1
2
3
4
5
6
7
8
9
10
11
12
13
14
15
16
17
gcc -Wall -Wstrict-prototypes -O2 -fomit-frame-pointer -include /home/michael/3TB-DISK/imx28-test/u-boot-2014.01/include/libfdt_env.h -idirafter /home/michael/3TB-DISK/imx28-test/u-boot-2014.01/include -idirafter /home/michael/3TB-DISK/imx28-test/u-boot-2014.01/arch/arm/include -idirafter /home/michael/3TB-DISK/imx28-test/u-boot-2014.01/include -I /home/michael/3TB-DISK/imx28-test/u-boot-2014.01/lib/libfdt -I /home/michael/3TB-DISK/imx28-test/u-boot-2014.01/tools -DCONFIG_SYS_TEXT_BASE=0x40000100 -DUSE_HOSTCC -D__KERNEL_STRICT_NAMES -D_GNU_SOURCE -DCONFIG_MXS   -o mxsimage.o mxsimage.c -c
mxsimage.c:146:19: error: field ‘cipher_ctx’ has incomplete type
EVP_CIPHER_CTX cipher_ctx;
^~~~~~~~~~
mxsimage.c:147:15: error: field ‘md_ctx’ has incomplete type
EVP_MD_CTX md_ctx;
^~~~~~
mxsimage.c: In function ‘sb_postfill_image_header’:
mxsimage.c:1345:13: error: storage size of ‘md_ctx’ isn’t known
EVP_MD_CTX md_ctx;
^~~~~~
mxsimage.c:1345:13: warning: unused variable ‘md_ctx’ [-Wunused-variable]
mxsimage.c: In function ‘sb_verify_image_header’:
mxsimage.c:1638:13: error: storage size of ‘md_ctx’ isn’t known
EVP_MD_CTX md_ctx;
^~~~~~
mxsimage.c:1638:13: warning: unused variable ‘md_ctx’ [-Wunused-variable]
  • 一些旧的版本编译时会出现上述错误,需修改的是把它改成指针声明.可以用这个patch文件解决.

U-boot 加载内核错误

1
2
3
4
5
6
7
8
 Booting kernel from Legacy Image at 42000000 ...
Image Name: Linux-4.13.11
Image Type: ARM Linux Kernel Image (uncompressed)
Data Size: 4280112 Bytes = 4.1 MB
Load Address: 40008000
Entry Point: 40008000
Verifying Checksum ... Bad Data CRC
ERROR: can't get kernel image!
  • 上面是因为启动的 uImage 在的体积大于 uboot 中的变里kernelsize所设定的值,设置如下:
1
2
3
U-Boot >setenv kernelsize 0x415000
U-Boot >save
U-Boot >reset

编译环境错误

1
2
3
4
5
6
7
8
You have PERL_MM_OPT defined because Perl local::lib
is installed on your system. Please unset this variable
before starting Buildroot, otherwise the compilation of
Perl related packages will fail
support/dependencies/dependencies.mk:25: recipe for target 'core-dependencies' failed
make[1]: *** [core-dependencies] Error 1
Makefile:16: recipe for target '_all' failed
make: *** [_all] Error 2
  • 如果编译时出现上述错误,要运行下面的脚本.
1
~$ eval $(perl -Mlocal::lib=--deactivate-all)

BusyBox 编译错误

1
2
3
4
5
6
7
/home/michael/3TB-DISK/imx28-test/MX283Linux/busybox-1.27.2/miscutils/nandwrite.c: In function 'nandwrite_main':
/home/michael/3TB-DISK/imx28-test/MX283Linux/busybox-1.27.2/miscutils/nandwrite.c:152: error: 'MTD_FILE_MODE_RAW' undeclared (first use in this function)
/home/michael/3TB-DISK/imx28-test/MX283Linux/busybox-1.27.2/miscutils/nandwrite.c:152: error: (Each undeclared identifier is reported only once
/home/michael/3TB-DISK/imx28-test/MX283Linux/busybox-1.27.2/miscutils/nandwrite.c:152: error: for each function it appears in.)
/home/michael/3TB-DISK/imx28-test/MX283Linux/busybox-1.27.2/scripts/Makefile.build:197: recipe for target 'miscutils/nandwrite.o' failed
make[3]: *** [miscutils/nandwrite.o] Error 1
/home/michael/3TB-DISK/imx28-test/MX283Linux/busybox-1.27.2/Makefile:742: recipe for target 'miscutils' failed
  • 复制/usr/include/mtd/mtd-abi.h 到 busybox/include 下面,再要 nandwrite.c 里加上#include "mtd-abi.h"
1
2
3
4
5
6
7
/home/michael/3TB-DISK/imx28-test/MX283Linux/busybox-1.27.2/util-linux/blkdiscard.c: In function 'blkdiscard_main':
/home/michael/3TB-DISK/imx28-test/MX283Linux/busybox-1.27.2/util-linux/blkdiscard.c:71: error: 'BLKSECDISCARD' undeclared (first use in this function)
/home/michael/3TB-DISK/imx28-test/MX283Linux/busybox-1.27.2/util-linux/blkdiscard.c:71: error: (Each undeclared identifier is reported only once
/home/michael/3TB-DISK/imx28-test/MX283Linux/busybox-1.27.2/util-linux/blkdiscard.c:71: error: for each function it appears in.)
/home/michael/3TB-DISK/imx28-test/MX283Linux/busybox-1.27.2/scripts/Makefile.build:197: recipe for target 'util-linux/blkdiscard.o' failed
make[3]: *** [util-linux/blkdiscard.o] Error 1
/home/michael/3TB-DISK/imx28-test/MX283Linux/busybox-1.27.2/Makefile:742: recipe for target 'util-linux' failed
  • 可以按照上述方法添加头文件解决,它位于/usr/include/linux/fs.h 中,也可以不编译这个模块 Linux System Utilities ->blkidiscard就不会报错了.
1
2
3
4
5
6
7
8
9
10
11
12
13
14
15
coreutils/lib.a(mktemp.o): In function `mktemp_main':
mktemp.c:(.text.mktemp_main+0x98): warning: the use of `mktemp\' is dangerous, better use `mkstemp\'
util-linux/lib.a(nsenter.o): In function `nsenter_main\':
nsenter.c:(.text.nsenter_main+0x1b0): undefined reference to `setns\'
coreutils/lib.a(sync.o): In function `sync_main\':
sync.c:(.text.sync_main+0x80): undefined reference to `syncfs\'
collect2: ld returned 1 exit status
Note: if build needs additional libraries, put them in CONFIG_EXTRA_LDLIBS.
Example: CONFIG_EXTRA_LDLIBS="pthread dl tirpc audit pam"
/home/michael/3TB-DISK/imx28-test/MX283Linux/busybox-1.27.2/Makefile:717: recipe for target 'busybox_unstripped' failed
make[2]: *** [busybox_unstripped] Error 1
Makefile:112: recipe for target '_all' failed
make[1]: *** [_all] Error 2
Makefile:14: recipe for target 'all' failed
make: *** [all] Error 2
  • 不要选择下面这两个模块
1
2
Coreutils->sync
Linux System Utilities->nsenter

谢谢支持