0%

Visual Studio Code使用笔记

安装 VSCode

  • 因为 vscode 是支持跨平台,多语言,易配置的免费 IDE 工具,所以安装是很简的.我这里以Linux Debian系统为例.

插件与扩展

  • 安装插件也是很简单,当然要确保电脑是可以上网的,选中 VSCode 主窗口按下组合快捷键Ctrl+Shift+P,就会出现下图的界面:
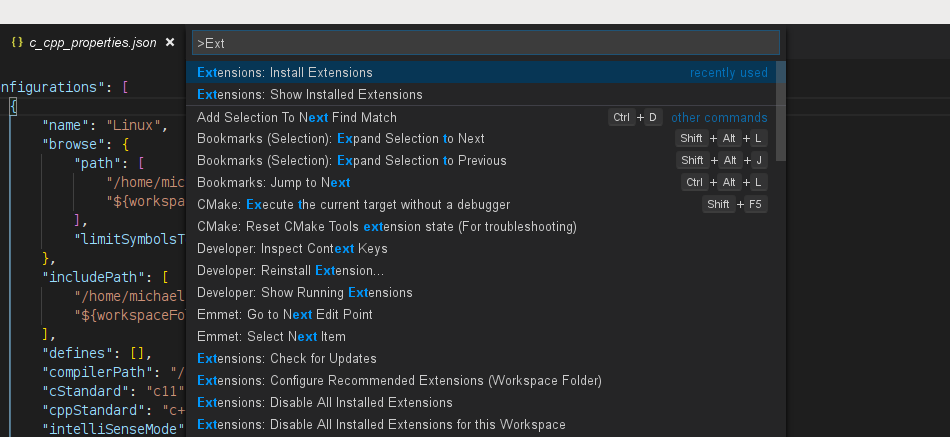
extinstall 输入:Ext就会有自动补全的选项,选择的项如图所示,确认之后就会在左边 Docker 出现一个查询列表,在这里输入一些关键字进行查询,没有安装的插件,会在右下端有绿色高亮显示install安装按钮.如下图所示:
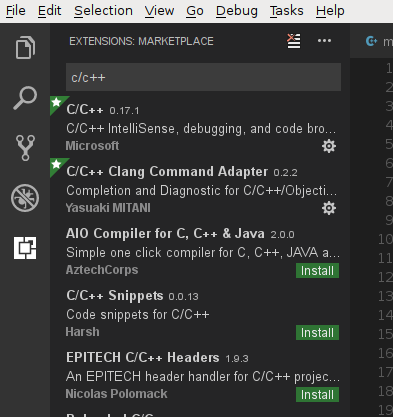
extsearch

C/C++ 工程开发(CMake)

  • 安装了的插件有:
    • ms-vscode.cpptools
    • mitaki28.vscode-clang
    • twxs.cmake -
    • vector-of-bool.cmake-tools -
    • webfreak.debug -
    • ionutvmi.path-autocomplete //路径补全 -
    • christian-kohler.path-intellisense  //路径补全
    • vscode-fileheader // 自动创建文件头部注释信息,如:作者,版权.

创建 CMakeLists.txt

  • 首先新建一个空目录,使用 VSCode 打开这个目录,同时我个人喜欢把编译目录也建在这个目录下,名为build.用 VSCode 新建一个名为CMakeLists.txt的文件加入如下基本行:
1
2
3
4
5
6
7
8
9
10
11
project(chapter3)
cmake_minimum_required(VERSION 3.0)
aux_source_directory(. DIR_ROOT_SRCS)

#下面这三行不是必须,这三行只是为了使用非标准路径的OpenCV库.
include_directories(/fullpath/opencv-build-3.x-qt5/include)
link_directories(/fullpath/opencv-build-3.x-qt5/lib)
find_package(OpenCV 3.4.1 HINTS /fullpath/opencv-build-3.x-qt5)
add_executable(${PROJECT_NAME} ${DIR_ROOT_SRCS})
target_link_libraries(${PROJECT_NAME} ${OpenCV_LIBS})

创建 c_cpp_properties.json 文件

  • 组合快捷键Ctrl+Shift+P输入C/Cpp: Edit Configurations ...确定,就会进入一个新的名为c_cpp_properties.json的文件编辑状态,输入如下内容:
1
2
3
4
5
6
7
8
9
10
11
12
13
14
15
16
17
18
19
20
21
22
23
24
25
26
{
"configurations": [
{
"name": "Linux",

"browse": {
// 这个path是为在开发中自动补齐头文件名
"path": [
"/fullpath/opencv-build-3.x-qt5/include",
"${workspaceFolder}"
],
"limitSymbolsToIncludedHeaders": true
},
"includePath": [
"/fullpath/opencv-build-3.x-qt5/include",
"${workspaceFolder}/**"
],
"defines": [],
"compilerPath": "/usr/bin/clang",
"cStandard": "c11",
"cppStandard": "c++17",
"intelliSenseMode": "clang-x64"
}
],
"version": 4
}

创建tasks.json文件

  • 组合快捷键Ctrl+Shift+P输入Tasks: Configure Default Build Tasks,或者从工具栏的Tasks->Configure Default Build Task ...,就会出现一个下拉列表,选择Other,就会进入一个新的名为tasks.json的文件编辑状态,填入如下内容.
1
2
3
4
5
6
7
8
9
10
11
12
13
14
15
16
17
18
19
20
21
22
23
24
25
26
27
28
29
30
31
32
33
34
35
36
37
38
39
40
{
// See https://go.microsoft.com/fwlink/?LinkId=733558
// for the documentation about the tasks.json format
"version": "2.0.0",
"tasks": [
{
"label": "cmake",
"type": "shell",
"command": "cd build && cmake ../",
"group": {
"kind": "build",
"isDefault": true
},
"presentation": {
"echo": true,
"reveal": "always",
"focus": false,
"panel": "shared"
},
"problemMatcher": []
},
{
"label": "make",
"type": "shell",
"command": "cd build && make",
"group": {
"kind": "build",
"isDefault": true
},
"presentation": {
"echo": true,
"reveal": "always",
"focus": false,
"panel": "shared"
},
"problemMatcher": []
}
]
}

创建程序主文件

  • 新建一个名为main.cpp的文件如下:
1
2
3
4
5
6
7
8
9
10
11
12
13
14
15
16
#include <iostream>
#include <opencv2/core.hpp>
#include <opencv2/highgui.hpp>
#include <opencv2/imgproc.hpp>

using namespace std;
using namespace cv;

int main(int argc,char *argv[])
{
cv::Mat srcImage = cv::imread("../../images/hand1.jpg");
cv::imshow("bitwise_add",bitImage);
cv::waitKey(0);
return 0;
}

创建Debug launch.json

  • 组合快捷键Ctrl+Shift+D 下拉选择Add Configurations...->选择C++(GDB/LLDB),就会进入一个新的名为launch.json的文件编辑状态,文件如下:
1
2
3
4
5
6
7
8
9
10
11
12
13
14
15
16
17
18
19
20
21
22
23
24
25
26
27
28
29
30
31
32
33
34
35
36
37
38
39
40
41
42
43
44
45
{
// Use IntelliSense to learn about possible attributes.
// Hover to view descriptions of existing attributes.
// For more information,visit: https://go.microsoft.com/fwlink/?linkid=830387
"version": "0.2.0",
"configurations": [

{
"name": "(gdb) Launch",
"type": "cppdbg",
"request": "launch",
"program": "${workspaceFolder}/build/chapter3",
"args": [],
"stopAtEntry": false,
"cwd": "${workspaceFolder}",
"environment": [],
"externalConsole": true,
"MIMode": "gdb",
//这一行是为了在调试前编译一次工程.
"preLaunchTask": "make",
"setupCommands": [
{
"description": "Enable pretty-printing for gdb",
"text": "-enable-pretty-printing",
"ignoreFailures": true
}
]
},
{
"name": "(gdb) Attach",
"type": "cppdbg",
"request": "attach",
"program": "${workspaceFolder}/build/chapter1",
"processId": "${command:pickProcess}",
"MIMode": "gdb",
"setupCommands": [
{
"description": "Enable pretty-printing for gdb",
"text": "-enable-pretty-printing",
"ignoreFailures": true
}
]
}
]
}

测试运行

  • 现在就可以用组合快捷键Ctrl+Shift+B先运行cmake再运行make就能生成出目标文件了.
  • F9在源文件里下断点,F5运行 GDB 调试.
  • 工程的目录结构如下:
1
2
3
4
5
6
7
8
9
10
~/opencv_chapter3$ ls -a
. .. build CMakeLists.txt main.cpp .vscode
~/opencv_chapter3$ tree .vscode/
.vscode/
├── c_cpp_properties.json
├── launch.json
└── tasks.json

0 directories,3 files

  • 显而易见的,在根目录下有一个.vscode的隐藏目录,里面有我刚创建的三个文件.

Qt工程开发(qmake)

1
2
3
4
5
6
7
8
9
10
11
12
13
14
15
16
{
"configurations": [
{
"name": "Linux",
"includePath": [
"${workspaceFolder}/**"
],
"defines": [],
"compilerPath": "/usr/bin/clang-3.5",
"cStandard": "c11",
"cppStandard": "c++11",
"intelliSenseMode": "linux-clang-x64"
}
],
"version": 4
}
  • launch.json
1
2
3
4
5
6
7
8
9
10
11
12
13
14
15
16
17
18
19
20
21
22
23
24
25
26
27
28
29
30
31
32
33
34
35
36
37
38
39
40
41
42
43
44
45
{
// Use IntelliSense to learn about possible attributes.
// Hover to view descriptions of existing attributes.
// For more information,visit: https://go.microsoft.com/fwlink/?linkid=830387
"version": "0.2.0",
"configurations": [
{
"name": "(gdb) Launch",
"type": "cppdbg",
"request": "launch",
"program": "${workspaceFolder}/vscode_build/output/myapp",
"args": [],
"stopAtEntry": false,
"cwd": "${fileDirname}",
"environment": [],
"externalConsole": false,
"linux": {
"MIMode": "gdb",
"miDebuggerPath": "/usr/bin/gdb"
},
"osx": {
"MIMode": "lldb"
},
"windows": {
"MIMode": "gdb",
"miDebuggerPath": "C:\\MinGw\\bin\\gdb.exe"
},
"setupCommands": [
{
"description": "Enable pretty-printing for gdb",
"text": "-enable-pretty-printing",
"ignoreFailures": true
}
],
// ${env.HOME} 是指Linux下的 $HOME 变量.
"visualizerFile": "${env:HOME}/qt5.natvis", // (https://github.com/inviwo/inviwo/tree/master/tools/natvis)
"showDisplayString": true, // 开启可以显示对像的内容,但是太慢了, 不如vs2019的效果.
"logging": {
"engineLogging": true,
"trace": true,
"traceResponse": true
}
}
]
}
  • tasks.json
1
2
3
4
5
6
7
8
9
10
11
12
13
14
15
16
17
18
19
20
21
22
23
24
25
26
27
28
29
30
31
32
33
34
35
36
37
38
39
40
41
42
43
44
45
46
47
48
49
50
51
52
53
54
55
56
57
58
59
60
61
62
63
64
65
66
67
68
69
70
71
72
73
74
75
76
77
78
79
80
81
82
83
84
85
86
87
88
89
90
91
92
{
"version": "2.0.0",
"tasks": [
{
"label": "Create build dir",
"type": "shell",
"linux": {
"command": "[ ! -d ./vscode_build ] && mkdir -p ./vscode_build"
},
"windows": {
"command": "cmd",
"args": [
"/C",
"if not exist .\\build\\release mkdir .\\build\\release"
]
}
},
{
"label": "Run qmake",
"type": "shell",
"command": "qmake -r ../<your project full path>.pro",
"options": {
"cwd": "vscode_build"
},
"presentation": {
"echo": true,
"reveal": "always",
"focus": false,
"panel": "shared"
},
"problemMatcher": []
},
{
"label": "Run make",
"type": "shell",
"command": "make -j$(grep -c processor /proc/cpuinfo) -f Makefile",
"options": {
"cwd": "vscode_build"
},
"presentation": {
"echo": true,
"reveal": "always",
"focus": false,
"panel": "shared"
},
"problemMatcher": []
},
{
"label": "Build",
"dependsOn": [
"Create build dir",
"Run qmake",
"Run make"
],
"group": {
"kind": "build",
"isDefault": true
},
"dependsOrder": "sequence",
"problemMatcher": []
},
{
"label": "Clear build folder",
"type": "shell",
"command": "make clean",
"options": {
"cwd": "vscode_build"
},
"presentation": {
"echo": true,
"reveal": "always",
"focus": false,
"panel": "shared"
},
"problemMatcher": []
},
{
"label": "Clean build",
"dependsOn": [
"Clear build folder",
"Run qmake",
"Run make"
],
"group": {
"kind": "build",
"isDefault": true
},
"dependsOrder": "sequence",
"problemMatcher": []
}
]
}

Python 开发环境

  • 相关的插件: - ms-python.python

创建工程

  • 这里 python 创建工程与上面类似,只是安装完成这个ms-python.python插件,有可能需要手动(如果没有自动)用pip安装一些依赖的 python 库,如:pylint,flake8,autopep8,yapf等,注意:pylint,flake8 开启只能二选一.

相关设置

settings.json

  • 选择解释器,组合快捷键Ctrl+Shift+P,输入Python会列出所有Python相关的设置.选择Python: Selecter Interpreter,选择之后也会在根目录下创建.vscode/settings.json,我的配置如下:
1
2
3
4
5
6
7
8
9
10
11
12
13
14
15
16
17
18
19
20
21
22
23
24
25
26
27
    {
//这里隐藏一些文件类型,不要让它在explorer上面显示.
"files.exclude": {
"**/.git": true,
"**/.svn": true,
"**/.hg": true,
"**/CVS": true,
"**/*.pyc":true,
"**/.DS_Store": true
},
//这里可以写入一个其它位置的解释器,默认就是/usr/bin/python
"python.pythonPath": "/fullpath/.pyenv/versions/py3dev/bin/python",
"python.autoComplete.extraPaths": [
"/fullpath/.pyenv/versions/py3dev/lib/python3.6/site-packages/",
"/fullpath/opencv-build-3.x-qt5-py3/lib/python3.6/site-packages"
],
"python.linting.flake8Path": "/fullpath/.pyenv/versions/3.6.5/envs/py3dev/bin/flake8",
"python.linting.pylintEnabled": false,
"python.linting.flake8Enabled": true,
"python.formatting.provider": "yapf",//格式化代码组合键: Ctrl+Shift+I
"python.formatting.yapfPath": "/fullpath/.pyenv/versions/3.6.5/envs/py3dev/bin/yapf",
"python.linting.enabled": true,
"python.linting.flake8Args": [
"--ignore=E501,E402,E401"
],
"python.linting.pylintPath": "/fullpath/.pyenv/versions/3.6.5/envs/py3dev/bin/pylint"
}

tasks.json

1
2
3
4
5
6
7
8
9
10
11
12
13
14
15
16
17
18
19
20
{
// See https://go.microsoft.com/fwlink/?LinkId=733558
// for the documentation about the tasks.json format
"version": "2.0.0",
"tasks": [
{
"label": "echo",
"type": "shell",
"command": "/fullpath/.pyenv/versions/py3dev/bin/python",
"args": [
"cameo.py" //当前要运行的脚本,也就是__main__ 所在的位置
],
"group": {
"kind": "build",
"isDefault": true
}
}
]
}

安装Arduino开发环境

  • Arduino 官方的 IDE 功能什么都好,开源库的下载管理,各种开发板的支持都很完善,就是欠缺编辑功能,如自动补全,函数定义跳转等功能.Choosing The Right Arduino IDE这里有几种其它方式的 ArduinoIDE 的实现.
    这里我就选取VS Code插件方式.它的安装方式都很简单如下:

  • Open VS Code and press F1 or Ctrl + Shift + P to open command palette,select Install Extension and type vscode-arduino.  Or launch VS Code Quick Open (Ctrl + P),paste the following command,and press enter.

1
ext install vscode-arduino
  • 使用方法与配置,直接参照vscode-arduino插件的Details描述就行了.注意要正确配置arduino.path的路径,我这里就直接指向Arduino官方IDE的目录,这样vscode就可以完全找到该系统安装的库与开发板的支持了.settings.json文件可以设置成全局用户配置,也可以设置成单独工程配置,放在工程目录.vscode下面.

.vscode/settings.json

1
2
3
4
5
6
7
8
9
{
"arduino.path": "C:/Program Files (x86)/Arduino",
"arduino.commandPath": "run-arduino.bat",
"arduino.additionalUrls": "",
"arduino.logLevel": "info",
"arduino.enableUSBDetection": true,
"arduino.disableTestingOpen": false,
"arduino.skipHeaderProvider": false,
}

.vscode/arduino.json under the workspace.

1
2
3
4
5
6
7
8
{
"sketch": "example.ino",
"port": "COM5",
"board": "adafruit:samd:adafruit_feather_m0",
"output": "../build",
"debugger": "jlink",
"prebuild": "bash prebuild.sh"
}

.vscode/c_cpp_properties.json

1
2
3
4
5
6
7
8
9
10
11
12
13
14
15
16
17
18
19
20
21
22
23
24
25
26
27
28
29
30
{
"configurations": [
{
"name": "Linux",
"includePath": [
"/fullpath/Arduino/libraries/Adafruit_SSD1306",
"/fullpath/Arduino/libraries/Adafruit_GFX_Library",
"/fullpath/.arduino15/packages/arduino/hardware/sam/1.6.11/cores/arduino",
"${workspaceFolder}/**"
],
"defines": [],
"compilerPath": "/usr/bin/clang",
"cStandard": "c11",
"cppStandard": "c++17",
"intelliSenseMode": "clang-x64",
"browse": {
"limitSymbolsToIncludedHeaders": false,
"path": [
"/fullpath/Arduino/libraries/Adafruit_GFX_Library",
"/fullpath/Arduino/libraries/Adafruit_SSD1306",
"/fullpath/Arduino/libraries/STM32duino_LwIP/src",
"/fullpath/arduino-1.8.3/hardware/arduino/avr/cores/arduino",
"/fullpath/arduino-1.8.3/hardware/arduino/avr/libraries/SPI/src",
"/fullpath/.arduino15/packages/arduino/hardware/sam/1.6.11/cores/arduino"
]
}
}
],
"version": 4
}

配置AVR开发环境

  • 安装gcc编译环境
1
~$ sudo apt-get install gcc-avr avrdue binutils-avr avr-libc
  • 安装AVR Helper Extension
  • 进入到工程目录下,按F1,选择C/C++ :edit configurations (JSON),写入如下的内容:
1
2
3
4
5
6
7
8
9
10
11
12
13
14
15
16
17
18
~$ .vscode/c_cpp_properties.json
{
"configurations": [
{
"name": "AVR",
"intelliSenseMode": "${default}",
"cStandard": "c11",
"cppStandard": "c++14",
"compilerPath": "/usr/bin/avr-gcc",
"includePath": ["/usr/lib/avr/include"],
"compilerArgs": [
"-mmcu=attiny85",
"-DF_CPU=8000000UL"
]
}
],
"version": 4
}
  • F1,输入avr过滤到选择AVR Helper: Perform initial setup,按提示输入gcc,avrdude的绝对路径.
  • 继续选择AVR Helper: Select programmer,按提示选择正确的烧写器,与烧写参数,最终生成的内容如下:
1
2
3
4
5
6
7
8
9
10
11
12
~$ .vscode/settings.json
{
"AVR.source.compiler": "/usr/bin/avr-gcc",
"AVR.programmer.tool": "/usr/bin/avrdude",
"AVR.device.type": "attiny85",
"AVR.device.frequency": 1000000,
"AVR.source.libraries": [],
"AVR.programmer.type": "c232hm",
"AVR.programmer.port": "/dev/ttyUSB0",
"AVR.programmer.rate": 19200
}

PlatformIO集成

快速开始

  • 在此之前需要先安装git客户端。查找安装platformio这个扩展。因为网络的原因,可能在线安装需要很长的时间,安装成功后,会在左边栏(Panel)下方出现它的图标。
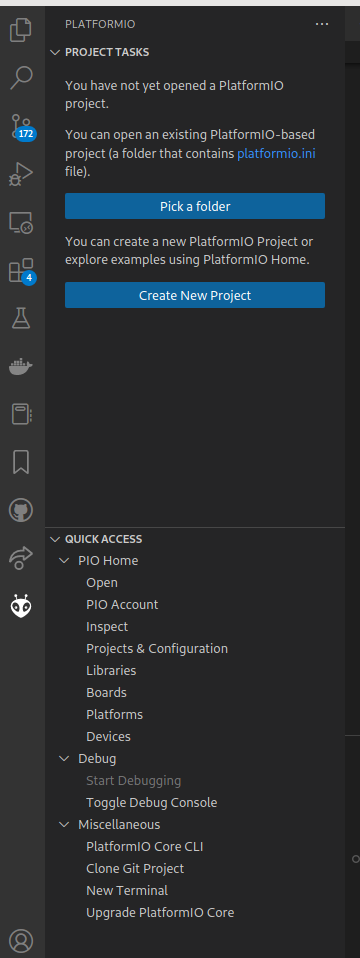
  • platformio-panel.png

  • 通过QUICK ACCESS -> PIO Home -> Platforms安装不同的平台的支持文件,如:Atmel AVR,Atmel SAM,Espressif 32,Raspberry Pi RP2040.

  • 通过QUICK ACCESS -> PIO Home -> Boards查看的各种平台板子的详细参数,如:Heltec WiFi LoRa 32 (V3),AI Thinker ESP32-CAM,ESP-32 Dev Kit C V4

  • 通过QUICK ACCESS -> PIO Home -> Libraries安装不同的库支持文件,如:U8g2,Blinker,TFT_eSPI

  • 通过QUICK ACCESS -> PIO Home -> Devices创建连接本机的板子串口。

使用pio命令行接口安装platform packages.

1
2
~$ echo "export PATH=\$HOME/.platformio/penv/bin:\$PATH" >> ~/.bashrc
~$ pio pkg install --global --tool "espressif/toolchain-xtensa-esp32s3"
  • 或者
1
~$ pio pkg update -g -p espressif32

git 使用备忘

清除一个错误的提交.

  • How to delete a commit in git,local and remote

  • 查看commit的日志记录

    1
    2
    3
    4
    5
    $git log --pretty=oneline --abbrev-commit
    46cd867 Changed with mistake
    d9f1cf5 Changed again
    105fd3d Changed content
    df33c8a First commit
  • 如上面所示,我想清除掉46cd867提交,这里需指定HEAD~2,使用如下操作:

1
2
3
4
5
6
7
8
9
10
11
12
13
14
15
16
17
$git rebase -i HEAD~2

pick d9f1cf5 Changed again
pick 46cd867 Changed with mistake

# Rebase 105fd3d..46cd867 onto 105fd3d
#
# Commands:
# p,pick = use commit
# r,reword = use commit,but edit the commit message
# e,edit = use commit,but stop for amending
# s,squash = use commit,but meld into previous commit
# f,fixup = like "squash",but discard this commit's log message
# x,exec = run command (the rest of the line) using shell
#
# If you remove a line here THAT COMMIT WILL BE LOST.
# However,if you remove everything,the rebase will be aborted.
  • 如上面所示,只要把相应的commit记录行,删除并保存该文件既可,如果这里碰到冲突,需要解决完冲突才能继续.rebase成功如下:
1
2
3
4
$git log --pretty=oneline --abbrev-commit
d9f1cf5 Changed again
105fd3d Changed content
df33c8a First commit
  • 再使用强制push到远端仓库.这样本地与远端仓库都把这个错误提交清除了.
1
~$ git push -f

错误处理

1
Error loading webview: Error: Could not register service workers: InvalidStateError: Failed to register a ServiceWorker: The document is in an invalid state..
  • 删除本地缓存文件:rm -rf ~/.config/Code/Cache.

总结

  • 这里只是关于VSCode的最基本使用流程,后续会加上其它语言,其它平台的使用笔记进来.初步使用的感觉与效率都很适合我,我以前使用的Qt Creator时间比较长,总体来讲,使用难度曲线不高.

谢谢支持