1
2
3
4
5
6
7
8
9
10
11
12
13
14
15
16
17
18
19
20
21
22
23
24
25
26
27
28
29
30
31
32
33
34
35
36
37
38
39
40
41
42
43
44
45
46
47
48
49
50
51
52
53
54
55
56
57
58
59
60
61
62
63
64
65
66
67
68
69
70
71
72
73
74
75
76
77
78
79
80
81
82
83
84
85
86
87
88
89
90
91
92
93
94
95
96
97
98
99
100
101
102
103
104
105
106
107
108
109
110
111
112
113
114
115
116
117
118
119
120
121
122
123
124
125
126
127
128
129
130
131
132
133
134
135
136
137
138
139
140
141
142
143
144
145
146
147
148
149
150
151
152
153
154
155
156
157
158
159
160
161
162
163
164
165
166
167
168
169
170
171
172
173
174
175
176
177
178
179
180
181
182
183
184
185
186
187
188
189
190
191
192
193
194
195
196
197
198
199
200
201
202
203
204
205
206
207
208
209
210
211
212
213
214
215
216
217
218
219
220
221
222
223
224
225
226
227
228
229
230
231
232
233
234
235
236
237
238
239
240
241
242
| linux-on-litex-vexriscv$ ~/.local/bin/lxterm --images=images/boot.json /dev/ttyUSB1 --speed=1e6
BIOS CRC passed (f7d62022)
Migen git sha1: 7507a2b
LiteX git sha1: af5167c7
--=============== SoC ==================--
CPU: VexRiscv SMP-LINUX @ 100MHz
BUS: WISHBONE 32-bit @ 4GiB
CSR: 32-bit data
ROM: 64KiB
SRAM: 8KiB
L2: 0KiB
FLASH: 16384KiB
SDRAM: 262144KiB 16-bit @ 800MT/s (CL-7 CWL-5)
--========== Initialization ============--
Ethernet init...
Initializing SDRAM @0x40000000...
Switching SDRAM to software control.
Write latency calibration:
m0:0 m1:0
Read leveling:
m0, b00: |00000000000000000000000000000000| delays: -
m0, b01: |00000000000000000000000000000000| delays: -
m0, b02: |11111111110000000000000000000000| delays: 05+-05
m0, b03: |00000000000011111111111110000000| delays: 18+-06
m0, b04: |00000000000000000000000000011111| delays: 29+-02
m0, b05: |00000000000000000000000000000000| delays: -
m0, b06: |00000000000000000000000000000000| delays: -
m0, b07: |00000000000000000000000000000000| delays: -
best: m0, b03 delays: 18+-06
m1, b00: |00000000000000000000000000000000| delays: -
m1, b01: |00000000000000000000000000000000| delays: -
m1, b02: |11111111110000000000000000000000| delays: 05+-05
m1, b03: |00000000000111111111111110000000| delays: 18+-07
m1, b04: |00000000000000000000000000011111| delays: 29+-02
m1, b05: |00000000000000000000000000000000| delays: -
m1, b06: |00000000000000000000000000000000| delays: -
m1, b07: |00000000000000000000000000000000| delays: -
best: m1, b03 delays: 18+-07
Switching SDRAM to hardware control.
Memtest at 0x40000000 (2.0MiB)...
Write: 0x40000000-0x40200000 2.0MiB
Read: 0x40000000-0x40200000 2.0MiB
Memtest OK
Memspeed at 0x40000000 (Sequential, 2.0MiB)...
Write speed: 31.7MiB/s
Read speed: 33.1MiB/s
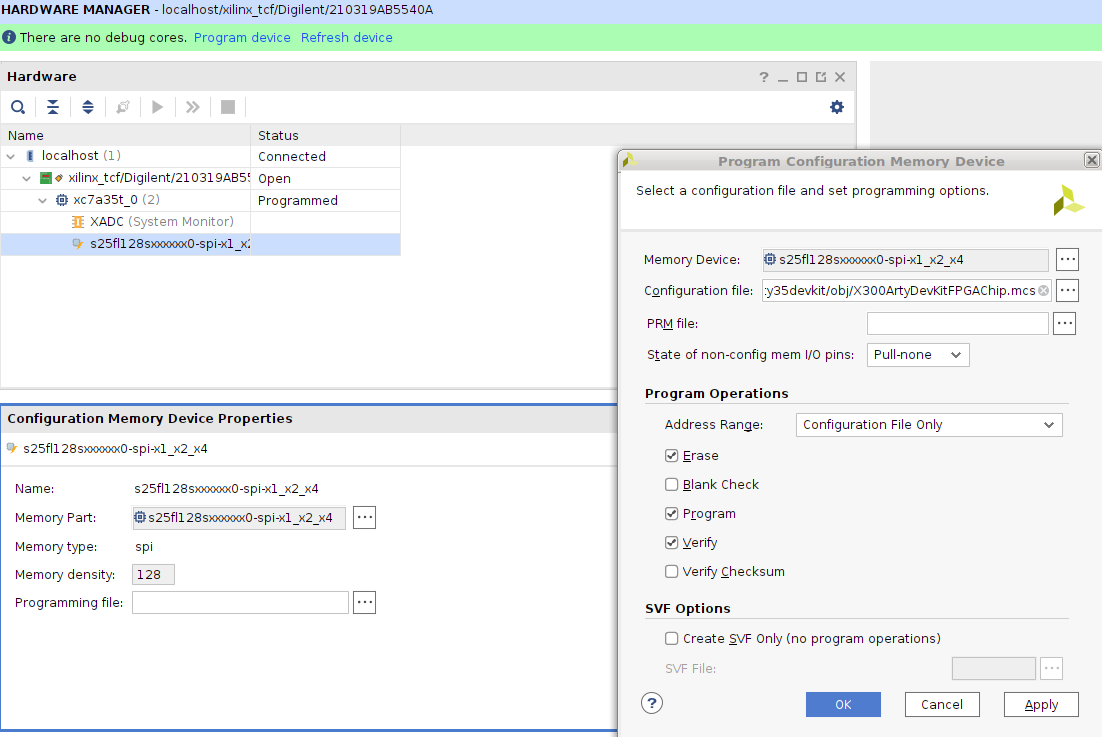
Initializing S25FL128L SPI Flash @0xd0000000...
SPI Flash clk configured to 25 MHz
Memspeed at 0xd0000000 (Sequential, 4.0KiB)...
Read speed: 2.5MiB/s
Memspeed at 0xd0000000 (Random, 4.0KiB)...
Read speed: 1.1MiB/s
--============== Boot ==================--
Booting from serial...
Press Q or ESC to abort boot completely.
sL5DdSMmkekro
[LXTERM] Received firmware download request from the device.
[LXTERM] Uploading images/Image to 0x40000000 (7420864 bytes)...
[LXTERM] Upload calibration...(inter-frame: 10.00us, length: 64)
[LXTERM] Upload complete (86.2KB/s).
[LXTERM] Uploading images/rv32.dtb to 0x40ef0000 (12130 bytes)...
[LXTERM] Upload calibration...(inter-frame: 10.00us, length: 64)
[LXTERM] Upload complete (78.9KB/s).
[LXTERM] Uploading images/rootfs.cpio to 0x41000000 (4010496 bytes)...
[LXTERM] Upload calibration...(inter-frame: 10.00us, length: 64)
[LXTERM] Upload complete (86.2KB/s).
[LXTERM] Uploading images/opensbi.bin to 0x40f00000 (53640 bytes)...
[LXTERM] Upload calibration...(inter-frame: 10.00us, length: 64)
[LXTERM] Upload complete (85.3KB/s).
[LXTERM] Booting the device.
[LXTERM] Done.
Executing booted program at 0x40f00000
--============= Liftoff! ===============--
OpenSBI v0.8-1-gecf7701
____ _____ ____ _____
/ __ \ / ____| _ \_ _|
| | | |_ __ ___ _ __ | (___ | |_) || |
| | | | '_ \ / _ \ '_ \ \___ \| _ < | |
| |__| | |_) | __/ | | |____) | |_) || |_
\____/| .__/ \___|_| |_|_____/|____/_____|
| |
|_|
Platform Name : LiteX / VexRiscv-SMP
Platform Features : timer,mfdeleg
Platform HART Count : 8
Boot HART ID : 0
Boot HART ISA : rv32imas
BOOT HART Features : time
BOOT HART PMP Count : 0
Firmware Base : 0x40f00000
Firmware Size : 124 KB
Runtime SBI Version : 0.2
MIDELEG : 0x00000222
MEDELEG : 0x0000b101
[ 0.000000] Linux version 5.12.0-rc4 (florent@panda) (riscv32-buildroot-linux-gnu-gcc.br_real (Buildroot 2020.11-281-g69e5046e7b) 10.2.0, GNU ld (GNU Binutils) 2.35.2)
[ 0.000000] Zone ranges:
[ 0.000000] Normal [mem 0x0000000040000000-0x000000004fffffff]
[ 0.000000] Movable zone start for each node
[ 0.000000] Early memory node ranges
[ 0.000000] node 0: [mem 0x0000000040000000-0x000000004fffffff]
[ 0.000000] Initmem setup node 0 [mem 0x0000000040000000-0x000000004fffffff]
[ 0.000000] SBI specification v0.2 detected
[ 0.000000] SBI implementation ID=0x1 Version=0x8
[ 0.000000] SBI v0.2 TIME extension detected
[ 0.000000] SBI v0.2 IPI extension detected
[ 0.000000] SBI v0.2 RFENCE extension detected
[ 0.000000] SBI v0.2 HSM extension detected
[ 0.000000] Invalid cpuid [8] for hartid [8]
[ 0.000000] riscv: ISA extensions aim
[ 0.000000] riscv: ELF capabilities aim
[ 0.000000] percpu: Embedded 10 pages/cpu s19148 r0 d21812 u40960
[ 0.000000] CPU node for /cpus/cpu@8 exist but the possible cpu range is :0-7
[ 0.000000] CPU node for /cpus/cpu@9 exist but the possible cpu range is :0-7
[ 0.000000] CPU node for /cpus/cpu@10 exist but the possible cpu range is :0-7
[ 0.000000] CPU node for /cpus/cpu@11 exist but the possible cpu range is :0-7
[ 0.000000] CPU node for /cpus/cpu@12 exist but the possible cpu range is :0-7
[ 0.000000] CPU node for /cpus/cpu@13 exist but the possible cpu range is :0-7
[ 0.000000] CPU node for /cpus/cpu@14 exist but the possible cpu range is :0-7
[ 0.000000] CPU node for /cpus/cpu@15 exist but the possible cpu range is :0-7
[ 0.000000] Built 1 zonelists, mobility grouping on. Total pages: 65024
[ 0.000000] Kernel command line: console=liteuart earlycon=liteuart,0xf0001000 rootwait root=/dev/ram0
[ 0.000000] Dentry cache hash table entries: 32768 (order: 5, 131072 bytes, linear)
[ 0.000000] Inode-cache hash table entries: 16384 (order: 4, 65536 bytes, linear)
[ 0.000000] Sorting __ex_table...
[ 0.000000] mem auto-init: stack:off, heap alloc:off, heap free:off
[ 0.000000] Memory: 243356K/262144K available (5596K kernel code, 572K rwdata, 860K rodata, 214K init, 221K bss, 18788K reserved, 0K cma-reserved)
[ 0.000000] SLUB: HWalign=64, Order=0-3, MinObjects=0, CPUs=8, Nodes=1
[ 0.000000] rcu: Hierarchical RCU implementation.
[ 0.000000] rcu: RCU calculated value of scheduler-enlistment delay is 25 jiffies.
[ 0.000000] NR_IRQS: 64, nr_irqs: 64, preallocated irqs: 0
[ 0.000000] riscv-intc: 32 local interrupts mapped
[ 0.000000] Couldn't find cpu id for hartid [8]
[ 0.000000] Couldn't find cpu id for hartid [9]
[ 0.000000] Couldn't find cpu id for hartid [10]
[ 0.000000] Couldn't find cpu id for hartid [11]
[ 0.000000] Couldn't find cpu id for hartid [12]
[ 0.000000] Couldn't find cpu id for hartid [13]
[ 0.000000] Couldn't find cpu id for hartid [14]
[ 0.000000] Couldn't find cpu id for hartid [15]
[ 0.000000] Couldn't find cpu id for hartid [8]
[ 0.000000] Couldn't find cpu id for hartid [9]
[ 0.000000] plic: handler already present for context 19.
[ 0.000000] Couldn't find cpu id for hartid [10]
[ 0.000000] plic: handler already present for context 21.
[ 0.000000] Couldn't find cpu id for hartid [11]
[ 0.000000] plic: handler already present for context 23.
[ 0.000000] Couldn't find cpu id for hartid [12]
[ 0.000000] plic: handler already present for context 25.
[ 0.000000] Couldn't find cpu id for hartid [13]
[ 0.000000] plic: handler already present for context 27.
[ 0.000000] Couldn't find cpu id for hartid [14]
[ 0.000000] plic: handler already present for context 29.
[ 0.000000] Couldn't find cpu id for hartid [15]
[ 0.000000] plic: handler already present for context 31.
[ 0.000000] plic: interrupt-controller@f0c00000: mapped 32 interrupts with 16 handlers for 32 contexts.
[ 0.000000] random: get_random_bytes called from start_kernel+0x360/0x4d0 with crng_init=0
[ 0.000000] riscv_timer_init_dt: Registering clocksource cpuid [0] hartid [0]
[ 0.000000] clocksource: riscv_clocksource: mask: 0xffffffffffffffff max_cycles: 0x171024e7e0, max_idle_ns: 440795205315 ns
[ 0.000021] sched_clock: 64 bits at 100MHz, resolution 10ns, wraps every 4398046511100ns
[ 0.002019] Couldn't find cpu id for hartid [8]
[ 0.002715] Couldn't find cpu id for hartid [9]
[ 0.003406] Couldn't find cpu id for hartid [10]
[ 0.004035] Couldn't find cpu id for hartid [11]
[ 0.004647] Couldn't find cpu id for hartid [12]
[ 0.005269] Couldn't find cpu id for hartid [13]
[ 0.005888] Couldn't find cpu id for hartid [14]
[ 0.006510] Couldn't find cpu id for hartid [15]
[ 0.008712] Console: colour dummy device 80x25
[ 0.009694] Calibrating delay loop (skipped), value calculated using timer frequency..200.00 BogoMIPS (lpj=400000)
[ 0.011160] pid_max: default: 32768 minimum: 301
[ 0.015359] Mount-cache hash table entries: 1024 (order: 0, 4096 bytes, linear)
[ 0.016601] Mountpoint-cache hash table entries: 1024 (order: 0, 4096 bytes, linear)
[ 0.039744] ASID allocator using 9 bits (512 entries)
[ 0.042606] rcu: Hierarchical SRCU implementation.
[ 0.052177] smp: Bringing up secondary CPUs ...
[ 1.106334] CPU1: failed to come online
[ 2.174473] CPU2: failed to come online
[ 3.242724] CPU3: failed to come online
[ 4.310959] CPU4: failed to come online
[ 5.379125] CPU5: failed to come online
[ 6.447274] CPU6: failed to come online
[ 7.515486] CPU7: failed to come online
[ 7.516400] smp: Brought up 1 node, 1 CPU
[ 7.522412] devtmpfs: initialized
[ 7.631706] clocksource: jiffies: mask: 0xffffffff max_cycles: 0xffffffff, max_idle_ns: 7645041785100000 ns
[ 7.633017] futex hash table entries: 2048 (order: 5, 131072 bytes, linear)
[ 7.639479] NET: Registered protocol family 16
[ 7.880381] FPGA manager framework
[ 7.895223] clocksource: Switched to clocksource riscv_clocksource
[ 8.064355] NET: Registered protocol family 2
[ 8.073113] tcp_listen_portaddr_hash hash table entries: 512 (order: 0, 6144 bytes, linear)
[ 8.074433] TCP established hash table entries: 2048 (order: 1, 8192 bytes, linear)
[ 8.076232] TCP bind hash table entries: 2048 (order: 2, 16384 bytes, linear)
[ 8.077425] TCP: Hash tables configured (established 2048 bind 2048)
[ 8.079928] UDP hash table entries: 256 (order: 1, 8192 bytes, linear)
[ 8.081038] UDP-Lite hash table entries: 256 (order: 1, 8192 bytes, linear)
[ 8.092717] Unpacking initramfs...
[ 8.858450] Initramfs unpacking failed: invalid magic at start of compressed archive
[ 8.916140] Freeing initrd memory: 8192K
[ 8.932899] workingset: timestamp_bits=30 max_order=16 bucket_order=0
[ 9.193838] Block layer SCSI generic (bsg) driver version 0.4 loaded (major 253)
[ 9.194565] io scheduler mq-deadline registered
[ 9.195468] io scheduler kyber registered
[ 9.223323] No litex,nclkout entry in the dts file
[ 9.225515] LiteX SoC Controller driver initialized: subreg:4, align:4
[ 10.286467] f0001000.serial: ttyLXU0 at MMIO 0x0 (irq = 0, base_baud = 0) is a liteuart
[ 10.388082] printk: console [liteuart0] enabled
[ 10.443080] libphy: Fixed MDIO Bus: probed
[ 10.445897] liteeth f0002000.mac: unable to get rx-fifo-depth
[ 10.447597] liteeth: probe of f0002000.mac failed with error -22
[ 10.451740] i2c /dev entries driver
[ 10.459084] i2c i2c-0: Not I2C compliant: can\'t read SCL
[ 10.460008] i2c i2c-0: Bus may be unreliable
[ 10.491212] litex-mmc f0009000.mmc: Requested clk_freq=12500000: set to 12500000 via div=8
[ 10.523707] fpga_manager fpga0: LiteX ICAPBitstream FPGA Manager registered
[ 10.549391] NET: Registered protocol family 10
[ 10.558414] litex-mmc f0009000.mmc: Requested clk_freq=0: set to 390625 via div=256
[ 10.565072] Segment Routing with IPv6
[ 10.567088] sit: IPv6, IPv4 and MPLS over IPv4 tunneling driver
[ 10.582063] NET: Registered protocol family 17
[ 10.594660] Freeing unused kernel memory: 208K
[ 10.596083] Kernel memory protection not selected by kernel config.
[ 10.597491] Run /init as init process
Starting syslogd: OK
Starting klogd: OK
Running sysctl: OK
Saving random seed: [ 12.456910] random: dd: uninitialized urandom read (512 bytes read)
OK
Starting network: OK
Welcome to Buildroot
buildroot login:
|